


[ad_1]
Steps
Part 1
Part 1 of 3:
Preparing Your Index
-

1Choose your indexing source. When you start working on your index, you may want to use printed proof pages, or work directly from the computer screen. A searchable PDF will help you find the words you’re indexing without disturbing the text.[2]
- Typically, if you index from a hard copy you’ll have to transfer your work to a digital file. If the work is particularly long, try to work straight from the computer so you can skip this extra step.
-
 2Decide what needs to be indexed. Generally speaking, you’ll want to index the entire text of your work, including the introduction and any footnotes or endnotes that expand on the content of the text. Typically, indexed items are nouns, like ideas, concepts, and things, that contribute to the subject of the text.[3]
- If footnotes or endnotes are merely source citations, they don’t need to be included in the index.
- Generally, you don’t need to index glossaries, bibliographies, acknowledgements, or illustrative items such as charts and graphs.
- If you’re not sure whether something should be indexed, ask yourself if it contributes something substantial to the text. If it doesn’t, it typically doesn’t need to be indexed.
-
 3List cited authors if necessary. Some publishers may require you to index any authors cited, either in text or footnotes. This may require a separate index, or they may be included in your general index. Check with your advisor or editor if you’re not sure.
- In most cases, if you have a “works cited” section appearing at the end of your text you won’t need to index authors. You would still include their names in the general index, however, if you discussed them in the text rather than simply citing their work.
-
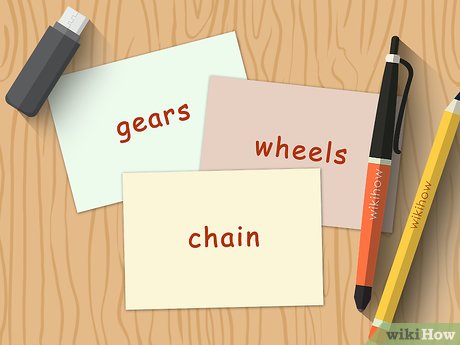 4Create index cards for entries if you’re indexing by hand. As you read through your work, make a list of the keywords or main concepts discussed in the text. Many of these you may already know off the top of your head. Creating an index card for each individual entry can help you sort and organize the entries before typing them up.[4]
- For example, if you’re writing a book on bicycle maintenance, you might have index cards for “gears,” “wheels,” and “chain.”
- Put yourself in your reader’s shoes, and ask yourself why they would pick up your book and what information they would likely be looking for. Chapter or section headings can help guide you as well.
-
 5Use nouns for the main headings of entries. Nouns referring to people, places, objects, or concepts are the most common nouns indexed. Typically the noun you use will be singular, and will not include any adjectives or phrases.
- For example, a dessert cookbook that included several types of ice cream might have one entry for “ice cream,” followed by subentries for “strawberry,” “chocolate,” and “vanilla.”
- Treat proper nouns as a single unit. For example, “United States Senate” and “United States House of Representatives” would be separate entries, rather than subentries under the entry “United States.”
-
 6Include subentries for entries with 5 or more pointers. Unless you’re working with an extremely long text, a keyword or concept that occurs on more than five pages typically can be broken into smaller parts.[5]
- Stick to nouns and brief phrases for subentries, avoiding any unnecessary words.
- For example, suppose you are writing a book about comic books that discusses Wonder Woman’s influence on the feminist movement. You might include a subentry under “Wonder Woman” that says “influence on feminism.”
-
 7Identify potential cross references. If you have entries that are similar to each other, you may want to use cross references in your index to link the similar entries. That way your readers will be able to dig further into similar information.[6]
- For example, if you were writing a dessert cookbook, you might have entries for “ice cream” and “sorbet.” Since these frozen treats are similar, they would make good cross references of each other.
Part 2
Part 2 of 3:
Formatting Entries and Subentries
-
 1Confirm the style and formatting requirements. Before you start building your index, you need to know its maximum length and what style guide the publisher wants you to use. Typically, you’ll be expected to use the Chicago Manual of Style.
- The style guide provides specifics for you in terms of spacing, alignment, and punctuation of your entries and subentries.
-
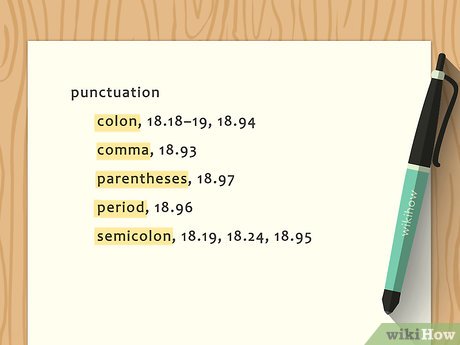
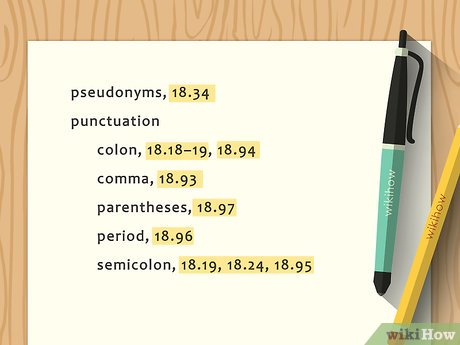
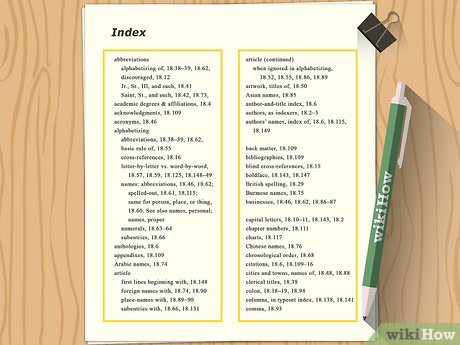
 2Use the correct punctuation. Generally, you’ll put a colon after the header or main entry, then continue with the rest of the entry. If there is more than one subentry, place a semicolon between them. Use commas between subentries and page numbers, and between non-consecutive page numbers.[7]
- For example, an entry in the index of a political science book might read: “capitalism: 21st century, 164; American free trade, 112; backlash against, 654; expansion of, 42; Russia, 7; and television, 3; treaties, 87.”
- If an entry contains no subentries, simply follow the entry with a comma and list the page numbers.
-
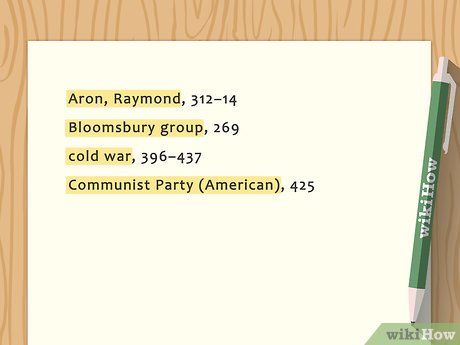
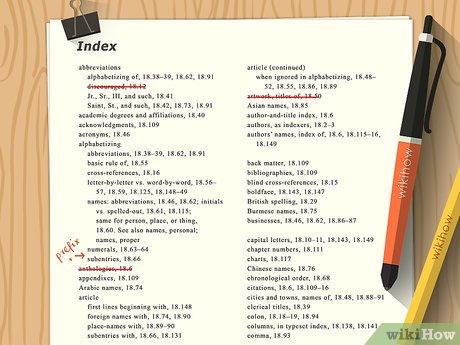
 3Organize your entries in alphabetical order. If you used the index card method, arrange your cards in alphabetical order and then type the list of main entries into a computer document. You also may be able to use your word-processing app to arrange the entries alphabetically.[8]
- People’s names typically are listed alphabetically by their last name. Put a comma after the last name and add the person’s first name.
- Noun phrases typically are inverted. For example, “adjusting-height saddle” would be listed in an index as “saddle, adjusting-height.”[9]
-
 4Fill in subentries. Once you have your list of entries, you’ll add subentries for those entries that have multiple subdivisions. Avoid articles such as “a,” “an,” and “the” in your subentries, and use “and” sparingly.[10]
- Avoid repeating words in the entry in the subentries. If several subentries repeat the same word, add it as a separate entry, with a cross reference back to the original entry. For example, in a dessert cookbook you might have entries for “ice cream, flavors” and “ice cream, toppings.”
- Subentries typically are listed alphabetically as well. If subentry terms have symbols, hyphens, slashes, or numbers, you can usually ignore them.
-
 5Capitalize proper names. While generally you shouldn’t capitalize the words in your index, you should capitalize a person’s name or the name of a place or event. Check your required style guide if you’re unsure whether something should be capitalized.
- If a proper name, such as the name of a book or song, includes a word such as “a” or “the” at the beginning of the title, you can either omit it or include it after a comma (“Importance of Being Earnest, The”). Check your style guide for the proper rule that applies to your index, and be consistent.
-
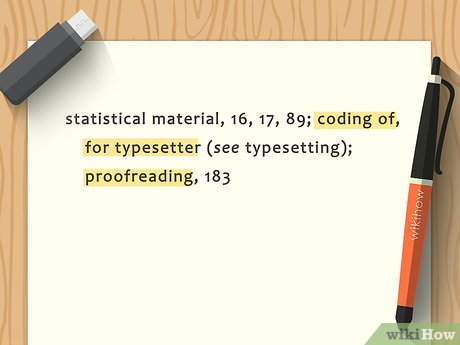
 6Include all page numbers for each entry or subentry. You’ll copy the page numbers from your index cards, formatting them according to the rules laid out in your style guide. Generally, you’ll include all the digits of the page numbers if they are nonconsecutive numbers.[11]
- When listing a series of pages, if the first page number is 1-99 or a multiple of 100, you also use all of the digits. For example, “ice cream: vanilla, 100-109.”
- For other numbers, you generally only have to list the digits that changed for subsequent page numbers. For example, “ice cream: vanilla, 112-18.”
- Use the word passim if references are scattered over a range of pages. For example, “ice cream: vanilla, 45-68 passim. Only use this if there are a large number of references within that range of pages.
-
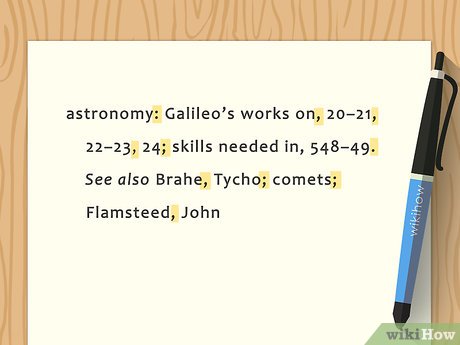
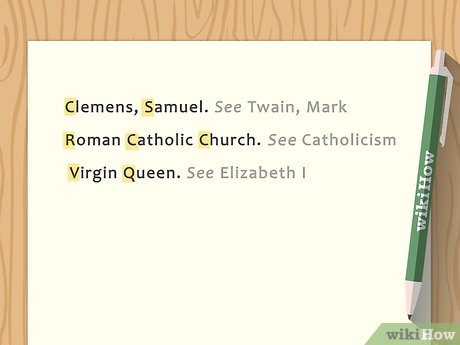
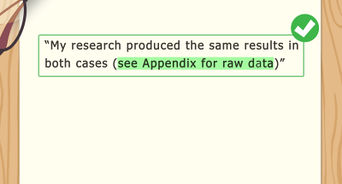
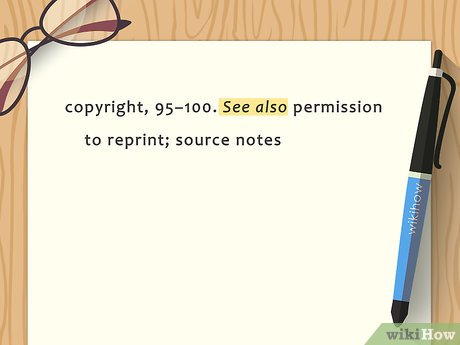 7Add cross references with the phrase “See also.” Cross references introduced by the words “see also” direct your reader to other entries in your index that may include related or similar information to that contained in the original entry.[12]
- Place a period after the last page number in the entry, then type See also in italics, with the word “see” capitalized. Then include the name of the similar entry you want to use.
- For example, an entry in an index for a dessert cookbook might contain the following entry: “ice cream: chocolate, 4, 17, 24; strawberry, 9, 37; vanilla, 18, 25, 32-35. See also sorbet.”
-
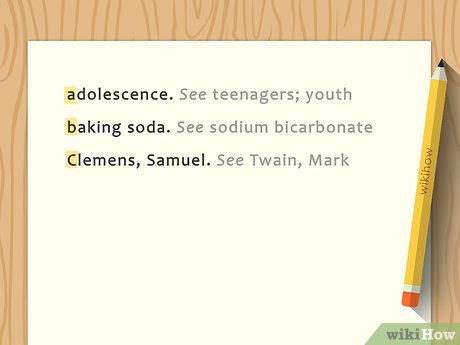
 8Include “See” references to avoid confusion. Unlike “see also” cross references, “see” references are used when you want to include a common term that a reader might use, but which isn’t technically included in your text for whatever reason.[13]
- For example, a beginning cyclist may be looking in a manual for “tire patches,” which are called “boots” in cycling terms. If you’re writing a bicycle manual aimed at beginners, you might include a “see” cross reference: “tire patches, see boots.”
Part 3
Part 3 of 3:
Editing Your Index
-
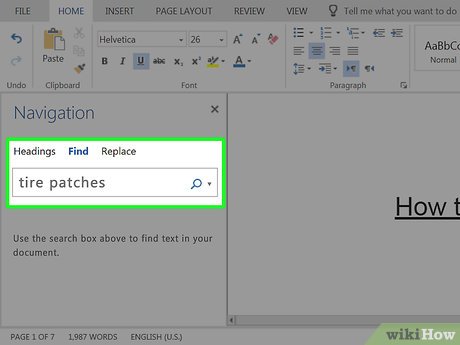 1Use the “search” function to check your pointers. If you are using either a PDF or a word-processing document, you have a search function that you can use to locate specific keywords or other terms.
- You’ll also want to search for related terms, especially if you talk about a general concept in the text without necessarily mentioning it by name.
-
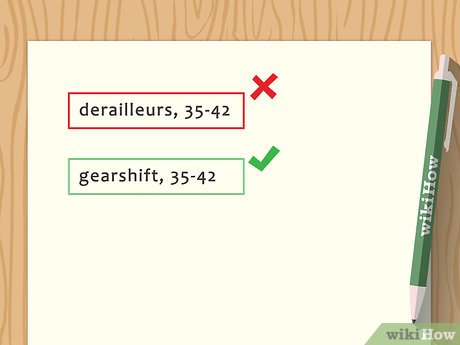 2Simplify entries to suit your readers. The point of your index is to make your work more readable and usable for your readers. All of your entries should include the terms or topics readers would intuitively look for.
- If you have any entries that are too complex or that might confuse your readers, you might want to simplify them or add a cross reference.
- For example, a bicycle maintenance text might discuss “derailleurs,” but a novice would more likely look for terms such as “gearshift” or “shifter” and might not recognize that term.
-
 3Include descriptions of subentries where helpful. If all the subentries have something in common, you can include this after the main entry to help guide the reader. Usually this will be helpful if the subentries all fall under the same category.[14]
- For example, you might include an entry in a dessert cookbook index that read “ice cream, varieties of: chocolate, 54; strawberry, 55; vanilla, 32, 37, 56. See also sorbet.”
-
 4Trim or expand your index as needed. Once you have all the entries and page numbers included, you can more easily see which entries are too short and which are too long. You’ll also want to look at the length of the index as a whole to make sure it fits the publisher’s guidelines.[15]
- Generally, an entry should occur on two or three page numbers. If it’s only found in one place, you may not need to include it at all. If you decide it is necessary, see if you can include it as a subentry under a different entry.
- For example, suppose you are indexing a dessert cookbook, and it has ice cream on two pages and sorbet on one page. You might consider putting these together under a larger heading, such as “frozen treats.”
-
 5Check your index for accuracy. Check every page you have listed in your index and make sure the entry can be found there. Adjust any page numbers as necessary to accurately reflect the content of your book.
- You may want to run searches again to make sure the index is comprehensive and includes as many pointers as possible to help guide your readers.
-
 6Proofread your entries. Go line by line through your index and make sure all words are spelled correctly and all punctuation is correct and consistent. Even if you use spell check, it’s still important to go through the index yourself, since some mistakes may slip past spell checkers.[16]
- Make sure any cross references match the exact wording of the entry or entries they reference.
-
 7Set the final dimensions. The publisher will have page dimensions and margins to which your index should be set once all the proofreading and accuracy checking is complete. This may be your responsibility, or the publisher may do it for you.[17]
- Indexes are typically set in 2 columns, using a smaller font than that used in the main text. Entries begin on the first space of the line, with the subsequent lines of the same entry indented.
Tips
-
If creating an index seems like too large of a task for you to complete on your own by the publisher’s deadline, you may be able to hire a professional indexer to do the work for you. Look for someone who has some knowledge and understanding about the subject matter of your work.⧼thumbs_response⧽
-
Make the index as clear and simple as you can. Readers don’t like looking through a messy, hard-to-read index.⧼thumbs_response⧽

Warnings
-
If you’re using a word processing app that has an indexing function, avoid relying on it too much. It will index all of the words in your text, which will be less than helpful to readers.[18]
⧼thumbs_response⧽
Video
You Might Also Like


[ad_2]
Source link : https://www.wikihow.com/Write-an-Index

