


[ad_1]
Things You Should Know
- Make sure to pre-stretch your elastic cord if you’re making a beaded stretchy bracelet, as this can help your bracelet from overstretching as you wear it.
- Use crimp beads to “tie off” a wire beaded bracelet with a clasp to replicate bracelets you may see in stores.
- String multiple beaded strands onto jump rings using bead tips to create a multi-strand beaded bracelet that looks like you’re wearing more than one bracelet.
Steps
Method 1
Method 1 of 3:
Stretchy Bracelet
-
 1Measure your wrist and cut the elastic to size. Wrap your stretchy elastic cord around your wrist 1 and a half times. Then, use scissors to cut the elastic about 2 in (5.1 cm) away from your wrist. This extra cord will help you tie your knot later.[1]
- Put the elastic around your wrist where you want the bracelet to sit. If you want a looser fit, add extra slack. If you want it tighter, pull the elastic flush against your skin.
- The average bracelet is around 7 in (18 cm) for adult women and 8 in (20 cm) for adult men.
- You can use a colored or clear elastic cord for your project, but keep in mind that a colored cord could be seen through the beads.
-
2Stretch out the elastic. Before you start making your bracelet, it’s important to stretch your elastic, as this can prevent it from overstretching or snapping. Hold the elastic between your fingers and give it a few gentle tugs.[2]
- If your stretch cord snaps while you do this, no worries! Simply measure and cut another piece.
-
3Fold some tape over one end of the elastic. Now, this step is optional, but it can help you keep your beads on the cord (especially if you’re a beginner). Simply stick a piece of tape on the end of the elastic and fold it over.
- Think of the tape as a buffer for your beads. As you thread, they’ll stop rather than slip off the cord.
- The type of tape you use doesn’t matter—just grab whatever you have on hand.
- No tape? No problem! Use a binder clip or paper clip as a stopper or buffer instead.
-
4Thread your beads onto the elastic until you reach your desired length. Start slipping beads onto the open end of the cord. Keep going until the beads are long enough to cover your wrist.[3]
- Try laying out your pattern of beads beforehand. This is especially helpful if you want a specific bead in the center of the design.[4]
- Test to see if you have enough beads on your cord by carefully wrapping it around your wrist—just remember to leave enough slack to tie the bracelet off.
- Try laying out your pattern of beads beforehand. This is especially helpful if you want a specific bead in the center of the design.[4]
-
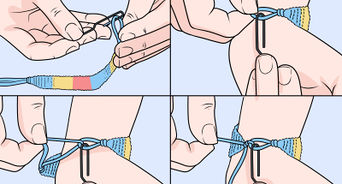
5Tie a square knot to secure your bracelet. Twist the 2 ends of the elastic over and under each other, creating a simple knot. Then, bring the strand you brought under previously over the other strand to make a second knot. Pull the ends of the elastic tight to secure your square knot.[5]
- Dab a dot of super glue onto the knot for extra security.
-
6Cut off the excess string and show off your bracelet. Once the knot is secure, carefully trim off the extra string. Maneuver the elastic to slip the knot in between a bead to hide it. Now all that’s left to do is put on your bracelet and show it to your friends![6]
- If you used glue to help secure your bracelet, wait at least 15 minutes for it to dry before putting it on. Otherwise, the glue might stretch or move away from the cord.
Method 2
Method 2 of 3:
Wire Bracelet
-
1Measure your wrist and add 5 to 6 inches (13 to 15 cm). Use a fabric tape measure to measure the size of your wrist. Make sure to place the measuring tape where you want the bracelet to rest. Add 5 to 6 inches (13 to 15 cm) to your wrist size to ensure that you have enough wire to fit and secure the clasp.[7]
- If you don’t have a tape measure, wrap your wrist with a piece of string to use as a guide instead.[8]
- If you don’t have a tape measure, wrap your wrist with a piece of string to use as a guide instead.[8]
-
2Cut your beading wire to size with wire cutters. Once you have your measurement, line the beading wire up against the measuring tape (or string). Use a pair of jewelry wire cutters to trim the wire to the correct size.
- If you don’t have jewelry wire cutters, that’s okay. Any wire cutter will work.
- There are many sizes of beading wire out there, so make sure your beads fit through your chosen wire before you lay out your design.
-
3Thread beads onto your wire until the beads are the size of your wrist. Lay out your beaded design, or choose beads at random. Guide them through the wire one by one until the string of beads is the same length as your wrist (the measurement before you added the extra length).[9]
- Try clipping a binder clip to the end of your wire to keep your beads from slipping off your bracelet as you bead.[10]
- Try clipping a binder clip to the end of your wire to keep your beads from slipping off your bracelet as you bead.[10]
-
4Latch the clasp onto the bracelet with a crimp bead. Once you’re happy with your bracelet’s design, thread on a crimp bead and one part of the clasp. Then, weave the wire back through the crimp bead to create a loop. Squeeze the crimp bead with a crimper tool or needle nose pliers to flatten it in place and be a “knot.”[11]
- Tug on the wire before crimping to make the loop around the clasp tighter. The tighter the loop, the less wiggle room your bracelet will have.
- Tuck any leftover wire through your beads to strengthen your bracelet.
- Crimp beads separate the bracelet’s beads from the clasp while securing the clasp in place.
-
5Crimp the second part of the clasp onto the other end of the bracelet. Repeat the process on the remaining open end—threading on a crimp bead, slipping on the clasp, weaving the wire back through the crimp bead, and crimping the loop in place. Weave some of the leftover wire through the 2 or 3 beads.[12]
-
6Snip off the excess wire and put on your bracelet. Once everything’s crimped, your bracelet is about ready to wear! Trim off any extra wire that’s poking out of the beads from making your clasp loops with wire cutters. Then, go and show the world your beautiful creation.[13]
Method 3
Method 3 of 3:
Multi-Strand Bracelet
-
1Measure your wrist and add 1 in (2.5 cm) to your measurement. Use a fabric tape measure to find the size of your wrist. Make sure to line up the tape measure where you want your bracelet to fall. Adding on an extra 1 in (2.5 cm) will give you plenty of cord to tie and clamp the bracelet off later.
- Try laying out your bead pattern once you know how long each strand of your bracelet needs to be. Make the line of beads the same length as your wrist (the measurement minus the 1 in (2.5 cm)).[14]
- Try laying out your bead pattern once you know how long each strand of your bracelet needs to be. Make the line of beads the same length as your wrist (the measurement minus the 1 in (2.5 cm)).[14]
-
2Cut 2 pieces of thread twice the length of your measurement. Beading thread is perfect for this type of beaded bracelet because it’s stretchy and delicate. Use scissors to trim the thread off the spool.
- If you don’t have beading thread, try using a thin, stretchy elastic instead.[15]
- If you don’t have beading thread, try using a thin, stretchy elastic instead.[15]
-
3Fold your 2 threads in half and tie a knot to form a loop. Line up both of the threads so that their ends match up. Then, fold them in half to make 4 strings. Double-check that the ends line up, and tie a loop knot at the top.
- Make as many knots as you need to keep the loop from unraveling.
-
4Fold a bead tip over the knot. Dot the knot at the base of the loop with super glue or jewelry glue. Then, thread a bead tip through the strands. Use a pair of needle nose pliers to close the bead tip over the glued knot.[16]
- For now, don’t worry about the loop coming out of the bead tip. Those excess strings will be trimmed off later.
- Bead tips can also be called bead clamps, clam shells, bead ends, or string tips and help protect knots while securing jump rings and clasps.
-
5Thread all 4 strands through a beading needle and start beading. A beading needle isn’t necessary, but it can help you easily get smaller beads onto your bracelet. String beads onto your bracelet until the bead length matches your wrist size. Add a beading tip as your last bead.[17]
- Consider laying out your bead pattern before beading, so you can visually see your design and make sure you have the correct amount of beads.
-
6Tie off your beaded strand. Remove the needle and tie an overhand knot at the end of your beads, leaving a tiny gap between the knot and the beads. More than 1 knot may be needed to keep the beads from sliding off.[18]
- To remove your beading needle, slide the ends of the thread out of it.
-
7Fold the bead tip over the knot and cut off the excess string. Place a drop of glue over the knot and clamp the tip down with your needle nose pliers. Make sure the loop of the bead tip is facing away from the beads. Trim the excess string hanging out of the tips.
-
8Repeat this process until you have your desired number of strands. Cut more cord, fold it in half, add a bead tip, string on beads, and finish with a bead tip until you have 2 or more separate beaded strands. Lay the strands side-by-side to get an idea of what your finished bracelet will look like.[19]
- Make each strand the same, or mix up your bead colors or pattern for a more eclectic look.
- Twist your strands together for a tangled bohemian look.
-
9Join the beaded strands together with jump rings. Open 2 jump rings with your pliers. Slip the looped part of the bead tips from one end of the strands through a jump ring. Close the jump ring with your pliers. Thread the other jump ring through the other end of the strands, slip on a lobster claw clasp, and then close the ring.
- And that’s it! You’ve successfully made a beautiful multi-strand bracelet. Now all that’s left to do is wear it.
Video
Things You’ll Need
Stretchy Bracelet
-
Scissors
-
Tape or binder clip (optional)
Wire Bracelet
-
Beads
-
Binder clip (optional)
Multi-Strand Bracelet
-
Fabric tape measure
-
Beads
-
Lobster claw clasp
-
Needle nose pliers
-
Scissors
-
Super glue or jewelry glue
Tips
-
Use a bead tray to lay out your bracelet’s design and measure your string. Simply line up your beads along the tray’s curve and move your beads around until you like what you see.[20]
⧼thumbs_response⧽ -
Aim to cut the elastic or wire longer rather than shorter, as you can always cut off excess, but you can’t add more.⧼thumbs_response⧽
-
Start with an elastic cord if this is your first time making a beaded bracelet. It’s the easiest material to work with, and it’s super forgiving.⧼thumbs_response⧽
Submit a Tip
All tip submissions are carefully reviewed before being published
Thanks for submitting a tip for review!

You Might Also Like


![]()


[ad_2]
Source link : https://www.wikihow.com/Make-a-Beaded-Bracelet

