[ad_1]
To clear your Safari browsing history, go to Settings > Safari > Clear History and Web Data.
To clear your call history, open the Recents area of the Phone app, tap Edit, and then tap Clear.
Use the Google app to delete your search history.
Steps
{“smallUrl”:”https://www.wikihow.com/images/thumb/e/ed/Clear-History-on-an-iPhone-Step-1-Version-2.jpg/v4-460px-Clear-History-on-an-iPhone-Step-1-Version-2.jpg”,”bigUrl”:”/images/thumb/e/ed/Clear-History-on-an-iPhone-Step-1-Version-2.jpg/v4-728px-Clear-History-on-an-iPhone-Step-1-Version-2.jpg”,”smallWidth”:460,”smallHeight”:345,”bigWidth”:728,”bigHeight”:546,”licensing”:”<div class=”mw-parser-output”><p>License: <a target=”_blank” rel=”nofollow noreferrer noopener” class=”external text” href=”https://creativecommons.org/licenses/by-nc-sa/3.0/”>Creative Commons</a><br>n</p><p><br />n</p></div>”}
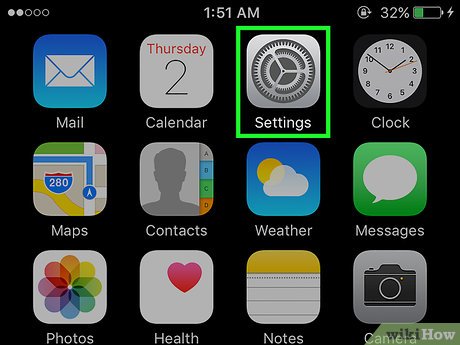
1
Open the Settings app
{“smallUrl”:”https://www.wikihow.com/images/7/7e/Iphonesettingsappicon.png”,”bigUrl”:”/images/thumb/7/7e/Iphonesettingsappicon.png/30px-Iphonesettingsappicon.png”,”smallWidth”:460,”smallHeight”:460,”bigWidth”:30,”bigHeight”:30,”licensing”:”<div class=”mw-parser-output”><p>I edited this screenshot of an iPhone icon.n</p><p>License: <a target=”_blank” rel=”nofollow noreferrer noopener” class=”external text” href=”http://en.wikipedia.org/wiki/Fair_use”>Fair Use</a><br>n</p></div>”}
. You’ll be clearing your Safari browsing history and cookies from the Settings app, not from the Safari app.[1]
{“smallUrl”:”https://www.wikihow.com/images/thumb/b/b0/Clear-History-on-an-iPhone-Step-2-Version-2.jpg/v4-460px-Clear-History-on-an-iPhone-Step-2-Version-2.jpg”,”bigUrl”:”/images/thumb/b/b0/Clear-History-on-an-iPhone-Step-2-Version-2.jpg/v4-728px-Clear-History-on-an-iPhone-Step-2-Version-2.jpg”,”smallWidth”:460,”smallHeight”:345,”bigWidth”:728,”bigHeight”:546,”licensing”:”<div class=”mw-parser-output”><p>License: <a target=”_blank” rel=”nofollow noreferrer noopener” class=”external text” href=”https://creativecommons.org/licenses/by-nc-sa/3.0/”>Creative Commons</a><br>n</p><p><br />n</p></div>”}
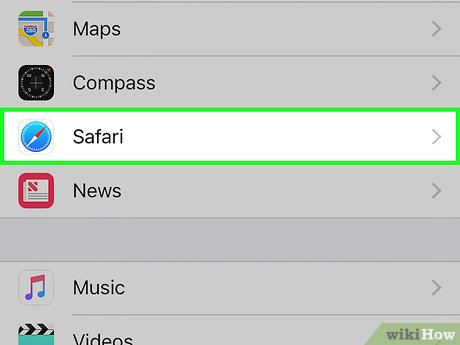
2
Scroll down and tap “Safari.” You should find this in the fifth group of options.
{“smallUrl”:”https://www.wikihow.com/images/thumb/a/aa/Clear-History-on-an-iPhone-Step-3-Version-2.jpg/v4-460px-Clear-History-on-an-iPhone-Step-3-Version-2.jpg”,”bigUrl”:”/images/thumb/a/aa/Clear-History-on-an-iPhone-Step-3-Version-2.jpg/v4-728px-Clear-History-on-an-iPhone-Step-3-Version-2.jpg”,”smallWidth”:460,”smallHeight”:345,”bigWidth”:728,”bigHeight”:546,”licensing”:”<div class=”mw-parser-output”><p>License: <a target=”_blank” rel=”nofollow noreferrer noopener” class=”external text” href=”https://creativecommons.org/licenses/by-nc-sa/3.0/”>Creative Commons</a><br>n</p><p><br />n</p></div>”}
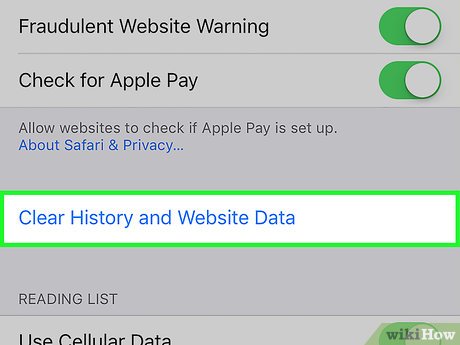
3
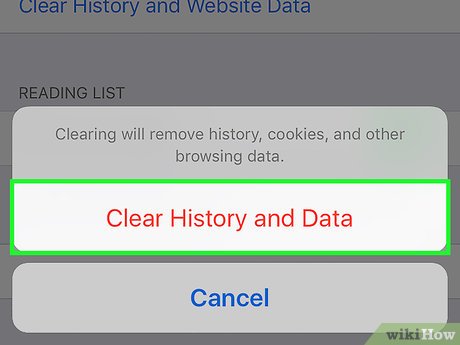
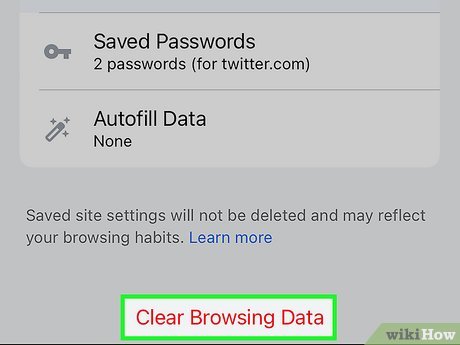
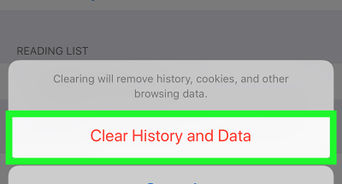
Tap Clear History and Website Data A window will pop up asking you to confirm.
[2]
If this button is grayed-out, there’s either no history saved, or the option is restricted in Screen Time . You can reenable Clear History and Website Data in Settings > Screen Time > Content & Privacy Restrictions Web Content by disabling all website restrictions.
{“smallUrl”:”https://www.wikihow.com/images/thumb/a/a0/Clear-History-on-an-iPhone-Step-4-Version-2.jpg/v4-460px-Clear-History-on-an-iPhone-Step-4-Version-2.jpg”,”bigUrl”:”/images/thumb/a/a0/Clear-History-on-an-iPhone-Step-4-Version-2.jpg/v4-728px-Clear-History-on-an-iPhone-Step-4-Version-2.jpg”,”smallWidth”:460,”smallHeight”:345,”bigWidth”:728,”bigHeight”:546,”licensing”:”<div class=”mw-parser-output”><p>License: <a target=”_blank” rel=”nofollow noreferrer noopener” class=”external text” href=”https://creativecommons.org/licenses/by-nc-sa/3.0/”>Creative Commons</a><br>n</p><p><br />n</p></div>”}
4
Confirm that you want to delete the history. Your Safari browsing history, cache, and cookies will be deleted. Your browsing history will also be deleted on any other devices you are signed into with your iCloud account.
Your AutoFill information (e.g., contact info and saved credit cards) will not be deleted.
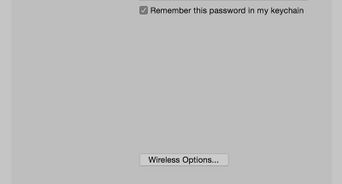
Alternatively, you can delete the cookies without clearing your history. Navigate to Settings > Safari > Advanced > Website Data . Select Remove All Website Data .
{“smallUrl”:”https://www.wikihow.com/images/thumb/2/26/Clear-History-on-an-iPhone-Step-5-Version-2.jpg/v4-460px-Clear-History-on-an-iPhone-Step-5-Version-2.jpg”,”bigUrl”:”/images/thumb/2/26/Clear-History-on-an-iPhone-Step-5-Version-2.jpg/v4-728px-Clear-History-on-an-iPhone-Step-5-Version-2.jpg”,”smallWidth”:460,”smallHeight”:345,”bigWidth”:728,”bigHeight”:546,”licensing”:”<div class=”mw-parser-output”><p>License: <a target=”_blank” rel=”nofollow noreferrer noopener” class=”external text” href=”https://creativecommons.org/licenses/by-nc-sa/3.0/”>Creative Commons</a><br>n</p><p><br />n</p></div>”}
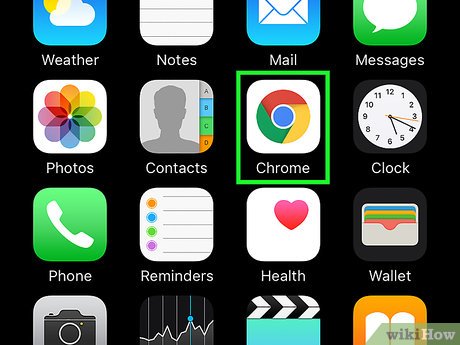
1
Open the Chrome app. If you use Chrome on your iPhone, you can clear the browsing history from within the Chrome app itself.
[3]
If you don’t want Chrome to add the websites you visit to your history, you can browse privately in incognito mode.
{“smallUrl”:”https://www.wikihow.com/images/thumb/0/0e/Clear-History-on-an-iPhone-Step-6-Version-3.jpg/v4-460px-Clear-History-on-an-iPhone-Step-6-Version-3.jpg”,”bigUrl”:”/images/thumb/0/0e/Clear-History-on-an-iPhone-Step-6-Version-3.jpg/v4-728px-Clear-History-on-an-iPhone-Step-6-Version-3.jpg”,”smallWidth”:460,”smallHeight”:345,”bigWidth”:728,”bigHeight”:546,”licensing”:”<div class=”mw-parser-output”><p>License: <a target=”_blank” rel=”nofollow noreferrer noopener” class=”external text” href=”https://en.wikipedia.org/wiki/Fair_use”>Fair Use</a> (screenshot)<br>n</p></div>”}
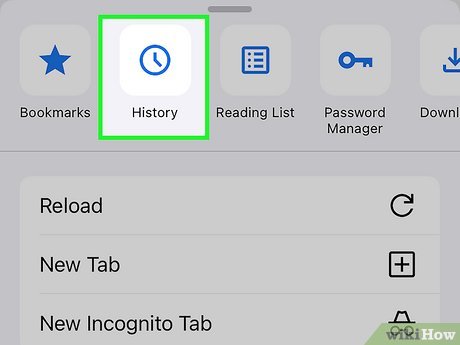
2
Tap the Menu button (⋮). This will show a pop up menu with additional options.
{“smallUrl”:”https://www.wikihow.com/images/thumb/c/c6/Clear-History-on-an-iPhone-Step-7-Version-3.jpg/v4-460px-Clear-History-on-an-iPhone-Step-7-Version-3.jpg”,”bigUrl”:”/images/thumb/c/c6/Clear-History-on-an-iPhone-Step-7-Version-3.jpg/v4-728px-Clear-History-on-an-iPhone-Step-7-Version-3.jpg”,”smallWidth”:460,”smallHeight”:345,”bigWidth”:728,”bigHeight”:546,”licensing”:”<div class=”mw-parser-output”><p>License: <a target=”_blank” rel=”nofollow noreferrer noopener” class=”external text” href=”https://en.wikipedia.org/wiki/Fair_use”>Fair Use</a> (screenshot)<br>n</p></div>”}
3
Tap History It has a clock icon next to it.
{“smallUrl”:”https://www.wikihow.com/images/thumb/e/ea/Clear-History-on-an-iPhone-Step-8-Version-3.jpg/v4-460px-Clear-History-on-an-iPhone-Step-8-Version-3.jpg”,”bigUrl”:”/images/thumb/e/ea/Clear-History-on-an-iPhone-Step-8-Version-3.jpg/v4-728px-Clear-History-on-an-iPhone-Step-8-Version-3.jpg”,”smallWidth”:460,”smallHeight”:345,”bigWidth”:728,”bigHeight”:546,”licensing”:”<div class=”mw-parser-output”><p>License: <a target=”_blank” rel=”nofollow noreferrer noopener” class=”external text” href=”https://en.wikipedia.org/wiki/Fair_use”>Fair Use</a> (screenshot)<br>n</p></div>”}
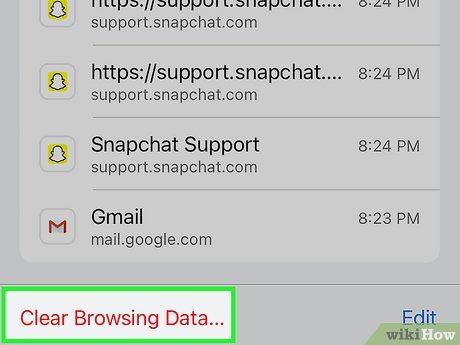
4
Tap Clear browsing data A menu with browsing data options will appear.
{“smallUrl”:”https://www.wikihow.com/images/thumb/b/bb/Clear-History-on-an-iPhone-Step-9-Version-3.jpg/v4-460px-Clear-History-on-an-iPhone-Step-9-Version-3.jpg”,”bigUrl”:”/images/thumb/b/bb/Clear-History-on-an-iPhone-Step-9-Version-3.jpg/v4-728px-Clear-History-on-an-iPhone-Step-9-Version-3.jpg”,”smallWidth”:460,”smallHeight”:345,”bigWidth”:728,”bigHeight”:546,”licensing”:”<div class=”mw-parser-output”><p>License: <a target=”_blank” rel=”nofollow noreferrer noopener” class=”external text” href=”https://en.wikipedia.org/wiki/Fair_use”>Fair Use</a> (screenshot)<br>n</p></div>”}
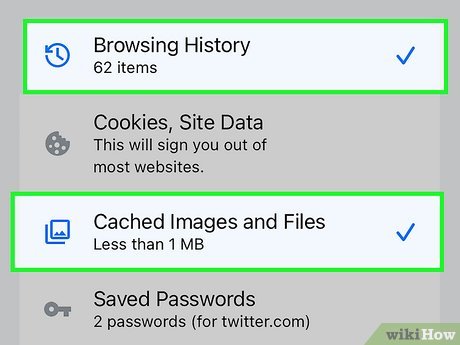
5
Choose the browsing data to delete. In the selection menu, choose what information you want to clear. You can select your browsing history, cookies, cached files, and more!
{“smallUrl”:”https://www.wikihow.com/images/thumb/9/9c/Clear-History-on-an-iPhone-Step-10-Version-3.jpg/v4-460px-Clear-History-on-an-iPhone-Step-10-Version-3.jpg”,”bigUrl”:”/images/thumb/9/9c/Clear-History-on-an-iPhone-Step-10-Version-3.jpg/v4-728px-Clear-History-on-an-iPhone-Step-10-Version-3.jpg”,”smallWidth”:460,”smallHeight”:345,”bigWidth”:728,”bigHeight”:546,”licensing”:”<div class=”mw-parser-output”><p>License: <a target=”_blank” rel=”nofollow noreferrer noopener” class=”external text” href=”https://en.wikipedia.org/wiki/Fair_use”>Fair Use</a> (screenshot)<br>n</p></div>”}
6
Tap Clear browsing data This will delete all of your selected browsing data.
Note that this will delete the Google Chrome browsing data for any synced devices as well.
{“smallUrl”:”https://www.wikihow.com/images/thumb/8/8a/Clear-History-on-an-iPhone-Step-11-Version-2.jpg/v4-460px-Clear-History-on-an-iPhone-Step-11-Version-2.jpg”,”bigUrl”:”/images/thumb/8/8a/Clear-History-on-an-iPhone-Step-11-Version-2.jpg/v4-728px-Clear-History-on-an-iPhone-Step-11-Version-2.jpg”,”smallWidth”:460,”smallHeight”:345,”bigWidth”:728,”bigHeight”:546,”licensing”:”<div class=”mw-parser-output”><p>License: <a target=”_blank” rel=”nofollow noreferrer noopener” class=”external text” href=”https://creativecommons.org/licenses/by-nc-sa/3.0/”>Creative Commons</a><br>n</p><p><br />n</p></div>”}
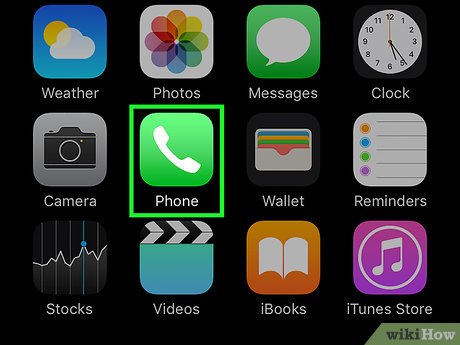
1
Open the Phone app
{“smallUrl”:”https://www.wikihow.com/images/3/36/IPhonephone.png”,”bigUrl”:”/images/thumb/3/36/IPhonephone.png/30px-IPhonephone.png”,”smallWidth”:460,”smallHeight”:460,”bigWidth”:30,”bigHeight”:30,”licensing”:”<div class=”mw-parser-output”><p>I edited this screenshot of an iOS icon.n</p><p>License: <a target=”_blank” rel=”nofollow noreferrer noopener” class=”external text” href=”http://en.wikipedia.org/wiki/Fair_use”>Fair Use</a><br>n</p></div>”}
. You can delete your call history so that none of your calls appear on the Recents list.
In addition to clearing your entire call history, you can also delete individual received or sent phone calls from your call log.
{“smallUrl”:”https://www.wikihow.com/images/thumb/c/c3/Clear-History-on-an-iPhone-Step-12-Version-3.jpg/v4-460px-Clear-History-on-an-iPhone-Step-12-Version-3.jpg”,”bigUrl”:”/images/thumb/c/c3/Clear-History-on-an-iPhone-Step-12-Version-3.jpg/v4-728px-Clear-History-on-an-iPhone-Step-12-Version-3.jpg”,”smallWidth”:460,”smallHeight”:345,”bigWidth”:728,”bigHeight”:546,”licensing”:”<div class=”mw-parser-output”><p>License: <a target=”_blank” rel=”nofollow noreferrer noopener” class=”external text” href=”https://en.wikipedia.org/wiki/Fair_use”>Fair Use</a> (screenshot)<br>n</p></div>”}
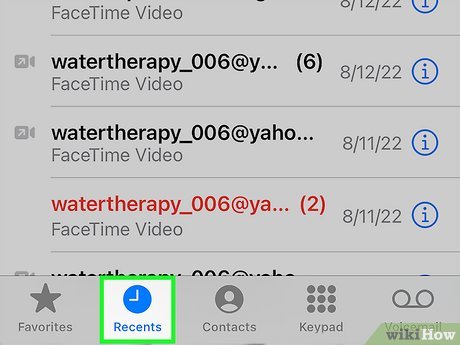
2
Tap the Recents This will display a list of recent calls that you’ve made and received.
{“smallUrl”:”https://www.wikihow.com/images/thumb/5/5b/Clear-History-on-an-iPhone-Step-13-Version-3.jpg/v4-460px-Clear-History-on-an-iPhone-Step-13-Version-3.jpg”,”bigUrl”:”/images/thumb/5/5b/Clear-History-on-an-iPhone-Step-13-Version-3.jpg/v4-728px-Clear-History-on-an-iPhone-Step-13-Version-3.jpg”,”smallWidth”:460,”smallHeight”:345,”bigWidth”:728,”bigHeight”:546,”licensing”:”<div class=”mw-parser-output”><p>License: <a target=”_blank” rel=”nofollow noreferrer noopener” class=”external text” href=”https://en.wikipedia.org/wiki/Fair_use”>Fair Use</a> (screenshot)<br>n</p></div>”}
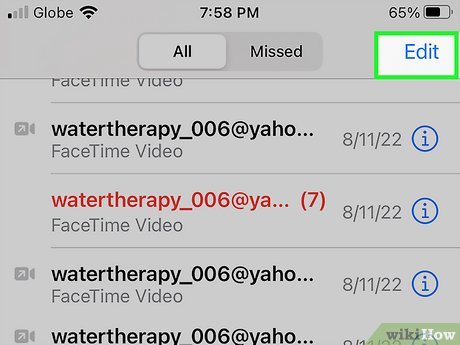
3
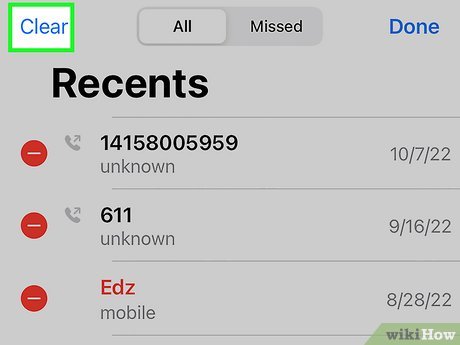
Tap Edit Red minus signs will appear next to each call in the log.
{“smallUrl”:”https://www.wikihow.com/images/thumb/b/b2/Clear-History-on-an-iPhone-Step-14-Version-3.jpg/v4-460px-Clear-History-on-an-iPhone-Step-14-Version-3.jpg”,”bigUrl”:”/images/thumb/b/b2/Clear-History-on-an-iPhone-Step-14-Version-3.jpg/v4-728px-Clear-History-on-an-iPhone-Step-14-Version-3.jpg”,”smallWidth”:460,”smallHeight”:345,”bigWidth”:728,”bigHeight”:546,”licensing”:”<div class=”mw-parser-output”><p>License: <a target=”_blank” rel=”nofollow noreferrer noopener” class=”external text” href=”https://en.wikipedia.org/wiki/Fair_use”>Fair Use</a> (screenshot)<br>n</p></div>”}
4
Tap Clear If you want to delete the whole list, tap “Clear” in the upper-left corner. This only appears after you’ve tapped “Edit.” All of the entries in the Recents tab will be deleted.
If you just want to delete a single entry instead of clearing your entire call log, tap the red minus sign next to the call you want to clear.
{“smallUrl”:”https://www.wikihow.com/images/thumb/c/cb/Clear-History-on-an-iPhone-Step-16-Version-2.jpg/v4-460px-Clear-History-on-an-iPhone-Step-16-Version-2.jpg”,”bigUrl”:”/images/thumb/c/cb/Clear-History-on-an-iPhone-Step-16-Version-2.jpg/v4-728px-Clear-History-on-an-iPhone-Step-16-Version-2.jpg”,”smallWidth”:460,”smallHeight”:345,”bigWidth”:728,”bigHeight”:546,”licensing”:”<div class=”mw-parser-output”><p>License: <a target=”_blank” rel=”nofollow noreferrer noopener” class=”external text” href=”https://creativecommons.org/licenses/by-nc-sa/3.0/”>Creative Commons</a><br>n</p><p><br />n</p></div>”}
1
Open the Messages app
{“smallUrl”:”https://www.wikihow.com/images/1/12/Iphoneimessageapp.png”,”bigUrl”:”/images/thumb/1/12/Iphoneimessageapp.png/30px-Iphoneimessageapp.png”,”smallWidth”:460,”smallHeight”:460,”bigWidth”:30,”bigHeight”:30,”licensing”:”<div class=”mw-parser-output”><p>I edited this screenshot of an iOS icon.n</p><p>License: <a target=”_blank” rel=”nofollow noreferrer noopener” class=”external text” href=”http://en.wikipedia.org/wiki/Fair_use”>Fair Use</a><br>n</p></div>”}
. You can delete text message conversations using the iPhone Messages app.
{“smallUrl”:”https://www.wikihow.com/images/thumb/c/cb/Clear-History-on-an-iPhone-Step-16-Version-3.jpg/v4-460px-Clear-History-on-an-iPhone-Step-16-Version-3.jpg”,”bigUrl”:”/images/thumb/c/cb/Clear-History-on-an-iPhone-Step-16-Version-3.jpg/v4-728px-Clear-History-on-an-iPhone-Step-16-Version-3.jpg”,”smallWidth”:460,”smallHeight”:345,”bigWidth”:728,”bigHeight”:546,”licensing”:”<div class=”mw-parser-output”><p>License: <a target=”_blank” rel=”nofollow noreferrer noopener” class=”external text” href=”https://en.wikipedia.org/wiki/Fair_use”>Fair Use</a> (screenshot)<br>n</p></div>”}
2
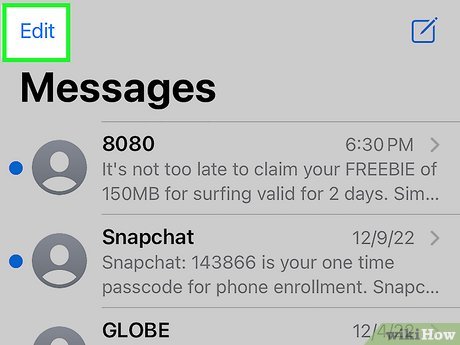
Tap the Edit This can be found in the upper-left corner.
{“smallUrl”:”https://www.wikihow.com/images/thumb/1/1f/Clear-History-on-an-iPhone-Step-17-Version-3.jpg/v4-460px-Clear-History-on-an-iPhone-Step-17-Version-3.jpg”,”bigUrl”:”/images/thumb/1/1f/Clear-History-on-an-iPhone-Step-17-Version-3.jpg/v4-728px-Clear-History-on-an-iPhone-Step-17-Version-3.jpg”,”smallWidth”:460,”smallHeight”:345,”bigWidth”:728,”bigHeight”:546,”licensing”:”<div class=”mw-parser-output”><p>License: <a target=”_blank” rel=”nofollow noreferrer noopener” class=”external text” href=”https://en.wikipedia.org/wiki/Fair_use”>Fair Use</a> (screenshot)<br>n</p></div>”}
3
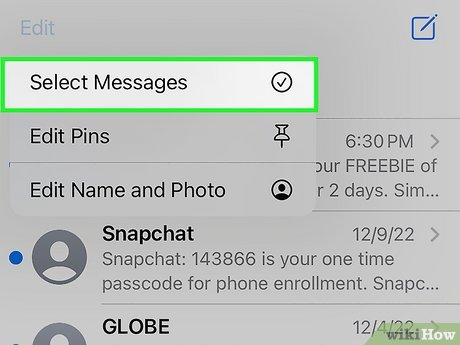
Tap Select Messages This is at the top of the pop-up menu after tapping Edit.
{“smallUrl”:”https://www.wikihow.com/images/thumb/b/b6/Clear-History-on-an-iPhone-Step-18-Version-3.jpg/v4-460px-Clear-History-on-an-iPhone-Step-18-Version-3.jpg”,”bigUrl”:”/images/thumb/b/b6/Clear-History-on-an-iPhone-Step-18-Version-3.jpg/v4-728px-Clear-History-on-an-iPhone-Step-18-Version-3.jpg”,”smallWidth”:460,”smallHeight”:345,”bigWidth”:728,”bigHeight”:546,”licensing”:”<div class=”mw-parser-output”><p>License: <a target=”_blank” rel=”nofollow noreferrer noopener” class=”external text” href=”https://en.wikipedia.org/wiki/Fair_use”>Fair Use</a> (screenshot)<br>n</p></div>”}
4
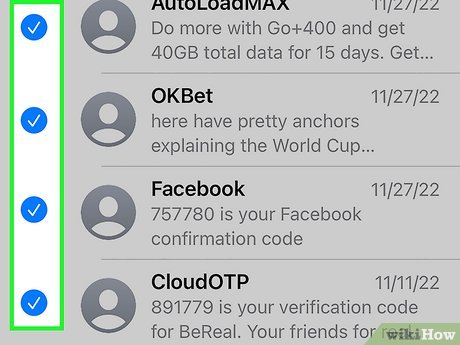
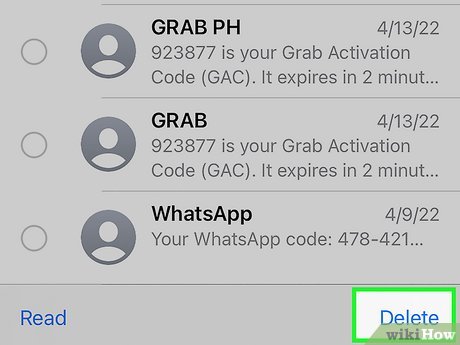
Select each conversation that you want to delete. Tap the checkbox for each conversation that you want to remove. You can select multiple conversations.
{“smallUrl”:”https://www.wikihow.com/images/thumb/3/31/Clear-History-on-an-iPhone-Step-19-Version-3.jpg/v4-460px-Clear-History-on-an-iPhone-Step-19-Version-3.jpg”,”bigUrl”:”/images/thumb/3/31/Clear-History-on-an-iPhone-Step-19-Version-3.jpg/v4-728px-Clear-History-on-an-iPhone-Step-19-Version-3.jpg”,”smallWidth”:460,”smallHeight”:345,”bigWidth”:728,”bigHeight”:546,”licensing”:”<div class=”mw-parser-output”><p>License: <a target=”_blank” rel=”nofollow noreferrer noopener” class=”external text” href=”https://en.wikipedia.org/wiki/Fair_use”>Fair Use</a> (screenshot)<br>n</p></div>”}
5
Tap Delete All of the selected conversations will be deleted without confirmation.
If you’re signed in to another device, such as an iPad or Mac, using the same Apple ID, your iMessage history will be cleared from that device as well.
{“smallUrl”:”https://www.wikihow.com/images/thumb/9/98/Clear-History-on-an-iPhone-Step-20-Version-2.jpg/v4-460px-Clear-History-on-an-iPhone-Step-20-Version-2.jpg”,”bigUrl”:”/images/thumb/9/98/Clear-History-on-an-iPhone-Step-20-Version-2.jpg/v4-728px-Clear-History-on-an-iPhone-Step-20-Version-2.jpg”,”smallWidth”:460,”smallHeight”:345,”bigWidth”:728,”bigHeight”:546,”licensing”:”<div class=”mw-parser-output”><p>License: <a target=”_blank” rel=”nofollow noreferrer noopener” class=”external text” href=”https://creativecommons.org/licenses/by-nc-sa/3.0/”>Creative Commons</a><br>n</p><p><br />n</p></div>”}
6
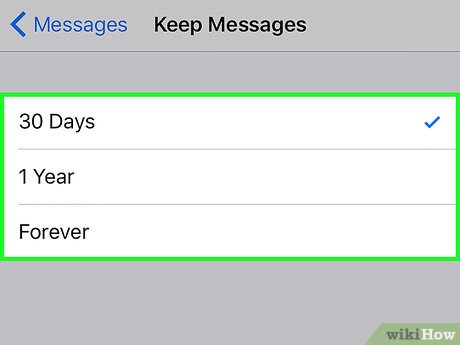
Change your message history settings. By default, Messages will store all of your messages forever. You can change these settings to only keep messages for a year or for 30 days, which can free up space and reduce clutter:
Open the Settings app.
Select Messages .
Tap Keep Messages .
Select how long you want to store messages for. This will automatically delete messages that are older than the new setting.
{“smallUrl”:”https://www.wikihow.com/images/thumb/a/a2/Clear-History-on-an-iPhone-Step-21-Version-3.jpg/v4-460px-Clear-History-on-an-iPhone-Step-21-Version-3.jpg”,”bigUrl”:”/images/thumb/a/a2/Clear-History-on-an-iPhone-Step-21-Version-3.jpg/v4-728px-Clear-History-on-an-iPhone-Step-21-Version-3.jpg”,”smallWidth”:460,”smallHeight”:345,”bigWidth”:728,”bigHeight”:546,”licensing”:”<div class=”mw-parser-output”><p>License: <a target=”_blank” rel=”nofollow noreferrer noopener” class=”external text” href=”https://en.wikipedia.org/wiki/Fair_use”>Fair Use</a> (screenshot)<br>n</p></div>”}
1
Open the Settings app
{“smallUrl”:”https://www.wikihow.com/images/7/7e/Iphonesettingsappicon.png”,”bigUrl”:”/images/thumb/7/7e/Iphonesettingsappicon.png/30px-Iphonesettingsappicon.png”,”smallWidth”:460,”smallHeight”:460,”bigWidth”:30,”bigHeight”:30,”licensing”:”<div class=”mw-parser-output”><p>I edited this screenshot of an iPhone icon.n</p><p>License: <a target=”_blank” rel=”nofollow noreferrer noopener” class=”external text” href=”http://en.wikipedia.org/wiki/Fair_use”>Fair Use</a><br>n</p></div>”}
. If you use Siri to search the web or handle tasks, you can easily clear your Siri history in your Settings.[4]
{“smallUrl”:”https://www.wikihow.com/images/thumb/a/a4/Clear-History-on-an-iPhone-Step-22-Version-3.jpg/v4-460px-Clear-History-on-an-iPhone-Step-22-Version-3.jpg”,”bigUrl”:”/images/thumb/a/a4/Clear-History-on-an-iPhone-Step-22-Version-3.jpg/v4-728px-Clear-History-on-an-iPhone-Step-22-Version-3.jpg”,”smallWidth”:460,”smallHeight”:345,”bigWidth”:728,”bigHeight”:546,”licensing”:”<div class=”mw-parser-output”><p>License: <a target=”_blank” rel=”nofollow noreferrer noopener” class=”external text” href=”https://en.wikipedia.org/wiki/Fair_use”>Fair Use</a> (screenshot)<br>n</p></div>”}
2
Tap Siri & Search You’ll find this in the third group of settings.
{“smallUrl”:”https://www.wikihow.com/images/thumb/d/d6/Clear-History-on-an-iPhone-Step-23-Version-3.jpg/v4-460px-Clear-History-on-an-iPhone-Step-23-Version-3.jpg”,”bigUrl”:”/images/thumb/d/d6/Clear-History-on-an-iPhone-Step-23-Version-3.jpg/v4-728px-Clear-History-on-an-iPhone-Step-23-Version-3.jpg”,”smallWidth”:460,”smallHeight”:345,”bigWidth”:728,”bigHeight”:546,”licensing”:”<div class=”mw-parser-output”><p>License: <a target=”_blank” rel=”nofollow noreferrer noopener” class=”external text” href=”https://en.wikipedia.org/wiki/Fair_use”>Fair Use</a> (screenshot)<br>n</p></div>”}
3
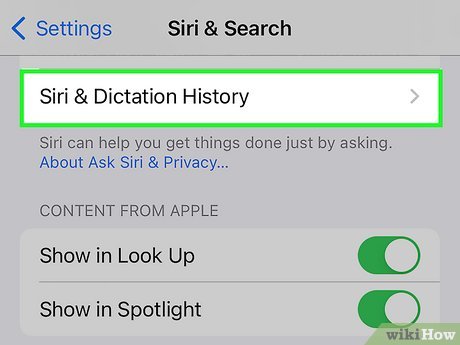
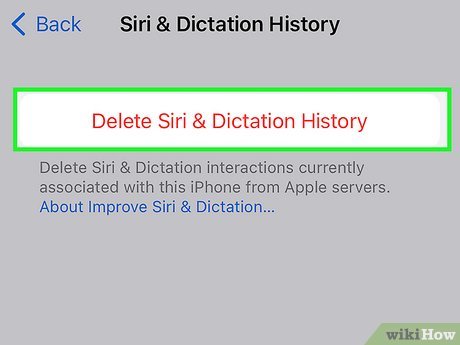
Tap Siri & Dictation History It’s toward the bottom of the screen.
{“smallUrl”:”https://www.wikihow.com/images/thumb/a/a3/Clear-History-on-an-iPhone-Step-24-Version-3.jpg/v4-460px-Clear-History-on-an-iPhone-Step-24-Version-3.jpg”,”bigUrl”:”/images/thumb/a/a3/Clear-History-on-an-iPhone-Step-24-Version-3.jpg/v4-728px-Clear-History-on-an-iPhone-Step-24-Version-3.jpg”,”smallWidth”:460,”smallHeight”:345,”bigWidth”:728,”bigHeight”:546,”licensing”:”<div class=”mw-parser-output”><p>License: <a target=”_blank” rel=”nofollow noreferrer noopener” class=”external text” href=”https://en.wikipedia.org/wiki/Fair_use”>Fair Use</a> (screenshot)<br>n</p></div>”}
4
Tap Delete Siri & Dictionary History This clears your Siri history.
{“smallUrl”:”https://www.wikihow.com/images/thumb/6/6b/Clear-History-on-an-iPhone-Step-25-Version-3.jpg/v4-460px-Clear-History-on-an-iPhone-Step-25-Version-3.jpg”,”bigUrl”:”/images/thumb/6/6b/Clear-History-on-an-iPhone-Step-25-Version-3.jpg/v4-728px-Clear-History-on-an-iPhone-Step-25-Version-3.jpg”,”smallWidth”:460,”smallHeight”:345,”bigWidth”:728,”bigHeight”:546,”licensing”:”<div class=”mw-parser-output”><p>License: <a target=”_blank” rel=”nofollow noreferrer noopener” class=”external text” href=”https://en.wikipedia.org/wiki/Fair_use”>Fair Use</a> (screenshot)<br>n</p></div>”}
1
Open the Settings app (
{“smallUrl”:”https://www.wikihow.com/images/7/7e/Iphonesettingsappicon.png”,”bigUrl”:”/images/thumb/7/7e/Iphonesettingsappicon.png/30px-Iphonesettingsappicon.png”,”smallWidth”:460,”smallHeight”:460,”bigWidth”:30,”bigHeight”:30,”licensing”:”<div class=”mw-parser-output”><p>I edited this screenshot of an iPhone icon.n</p><p>License: <a target=”_blank” rel=”nofollow noreferrer noopener” class=”external text” href=”http://en.wikipedia.org/wiki/Fair_use”>Fair Use</a><br>n</p></div>”}
). If you want to get rid of words added to your iPhone’s autocorrect dictionary, you can do so from the Settings app.
{“smallUrl”:”https://www.wikihow.com/images/thumb/1/1b/Clear-History-on-an-iPhone-Step-26-Version-3.jpg/v4-460px-Clear-History-on-an-iPhone-Step-26-Version-3.jpg”,”bigUrl”:”/images/thumb/1/1b/Clear-History-on-an-iPhone-Step-26-Version-3.jpg/v4-728px-Clear-History-on-an-iPhone-Step-26-Version-3.jpg”,”smallWidth”:460,”smallHeight”:345,”bigWidth”:728,”bigHeight”:546,”licensing”:”<div class=”mw-parser-output”><p>License: <a target=”_blank” rel=”nofollow noreferrer noopener” class=”external text” href=”https://en.wikipedia.org/wiki/Fair_use”>Fair Use</a> (screenshot)<br>n</p></div>”}
2
Select General {“smallUrl”:”https://www.wikihow.com/images/3/36/Iphonesettingsgeneralicon.png”,”bigUrl”:”/images/thumb/3/36/Iphonesettingsgeneralicon.png/30px-Iphonesettingsgeneralicon.png”,”smallWidth”:460,”smallHeight”:460,”bigWidth”:30,”bigHeight”:30,”licensing”:”<div class=”mw-parser-output”><p>I edited this screenshot of an iPhone iconn</p><p>License: <a target=”_blank” rel=”nofollow noreferrer noopener” class=”external text” href=”http://en.wikipedia.org/wiki/Fair_use”>Fair Use</a><br>n</p></div>”}
. A list of your general iPhone options will open.
{“smallUrl”:”https://www.wikihow.com/images/thumb/a/a8/Clear-History-on-an-iPhone-Step-27-Version-3.jpg/v4-460px-Clear-History-on-an-iPhone-Step-27-Version-3.jpg”,”bigUrl”:”/images/thumb/a/a8/Clear-History-on-an-iPhone-Step-27-Version-3.jpg/v4-728px-Clear-History-on-an-iPhone-Step-27-Version-3.jpg”,”smallWidth”:460,”smallHeight”:345,”bigWidth”:728,”bigHeight”:546,”licensing”:”<div class=”mw-parser-output”><p>License: <a target=”_blank” rel=”nofollow noreferrer noopener” class=”external text” href=”https://en.wikipedia.org/wiki/Fair_use”>Fair Use</a> (screenshot)<br>n</p></div>”}
3
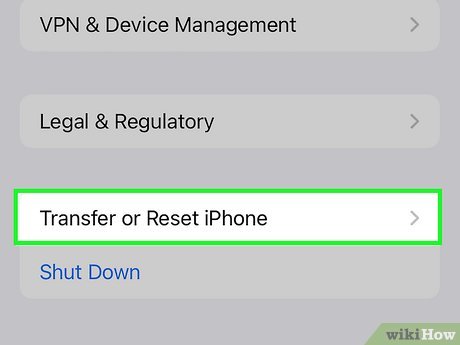
Tap Transfer or Reset iPhone This will take you to the reset page.
{“smallUrl”:”https://www.wikihow.com/images/thumb/b/be/Clear-History-on-an-iPhone-Step-28-Version-3.jpg/v4-460px-Clear-History-on-an-iPhone-Step-28-Version-3.jpg”,”bigUrl”:”/images/thumb/b/be/Clear-History-on-an-iPhone-Step-28-Version-3.jpg/v4-728px-Clear-History-on-an-iPhone-Step-28-Version-3.jpg”,”smallWidth”:460,”smallHeight”:345,”bigWidth”:728,”bigHeight”:546,”licensing”:”<div class=”mw-parser-output”><p>License: <a target=”_blank” rel=”nofollow noreferrer noopener” class=”external text” href=”https://en.wikipedia.org/wiki/Fair_use”>Fair Use</a> (screenshot)<br>n</p></div>”}
4
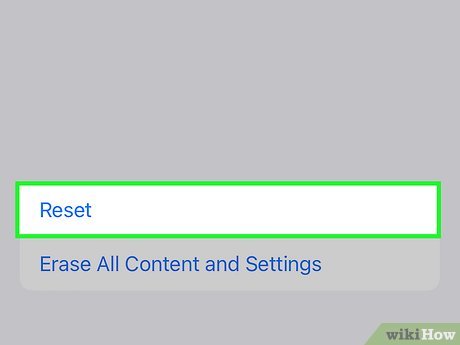
Tap Reset Various reset options will appear.
{“smallUrl”:”https://www.wikihow.com/images/thumb/5/52/Clear-History-on-an-iPhone-Step-29-Version-3.jpg/v4-460px-Clear-History-on-an-iPhone-Step-29-Version-3.jpg”,”bigUrl”:”/images/thumb/5/52/Clear-History-on-an-iPhone-Step-29-Version-3.jpg/v4-728px-Clear-History-on-an-iPhone-Step-29-Version-3.jpg”,”smallWidth”:460,”smallHeight”:345,”bigWidth”:728,”bigHeight”:546,”licensing”:”<div class=”mw-parser-output”><p>License: <a target=”_blank” rel=”nofollow noreferrer noopener” class=”external text” href=”https://en.wikipedia.org/wiki/Fair_use”>Fair Use</a> (screenshot)<br>n</p></div>”}
5
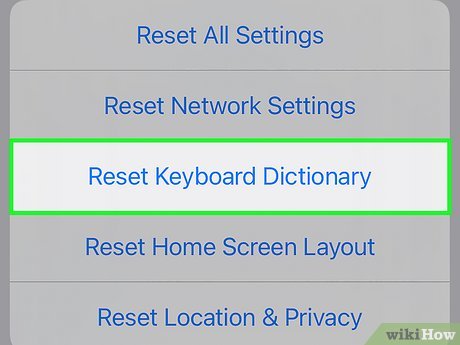
Tap Reset Keyboard Dictionary You’ll be asked to confirm. All of the custom words and shortcuts that you have saved will be deleted.
{“smallUrl”:”https://www.wikihow.com/images/thumb/e/ed/Clear-History-on-an-iPhone-Step-25-Version-2.jpg/v4-460px-Clear-History-on-an-iPhone-Step-25-Version-2.jpg”,”bigUrl”:”/images/thumb/e/ed/Clear-History-on-an-iPhone-Step-25-Version-2.jpg/v4-728px-Clear-History-on-an-iPhone-Step-25-Version-2.jpg”,”smallWidth”:460,”smallHeight”:345,”bigWidth”:728,”bigHeight”:546,”licensing”:”<div class=”mw-parser-output”><p>License: <a target=”_blank” rel=”nofollow noreferrer noopener” class=”external text” href=”https://creativecommons.org/licenses/by-nc-sa/3.0/”>Creative Commons</a><br>n</p><p><br />n</p></div>”}
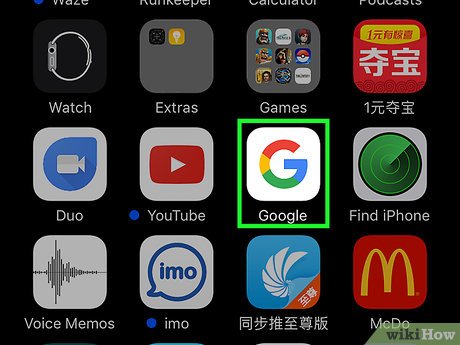
1
Open the Google app. If you use the Google app to search Google, you can clear your search history through the app.
[5]
{“smallUrl”:”https://www.wikihow.com/images/thumb/0/05/Clear-History-on-an-iPhone-Step-31-Version-3.jpg/v4-460px-Clear-History-on-an-iPhone-Step-31-Version-3.jpg”,”bigUrl”:”/images/thumb/0/05/Clear-History-on-an-iPhone-Step-31-Version-3.jpg/v4-728px-Clear-History-on-an-iPhone-Step-31-Version-3.jpg”,”smallWidth”:460,”smallHeight”:345,”bigWidth”:728,”bigHeight”:546,”licensing”:”<div class=”mw-parser-output”><p>License: <a target=”_blank” rel=”nofollow noreferrer noopener” class=”external text” href=”https://en.wikipedia.org/wiki/Fair_use”>Fair Use</a> (screenshot)<br>n</p></div>”}
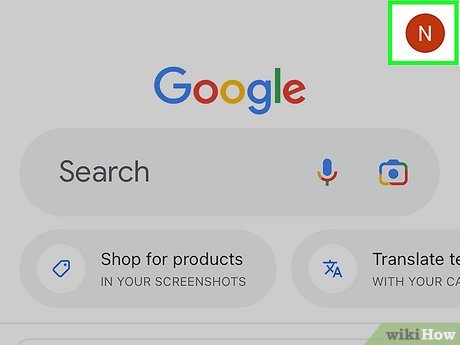
2
Tap the profile button. It’s the profile picture in the top right of the app.
{“smallUrl”:”https://www.wikihow.com/images/thumb/e/e9/Clear-History-on-an-iPhone-Step-32-Version-3.jpg/v4-460px-Clear-History-on-an-iPhone-Step-32-Version-3.jpg”,”bigUrl”:”/images/thumb/e/e9/Clear-History-on-an-iPhone-Step-32-Version-3.jpg/v4-728px-Clear-History-on-an-iPhone-Step-32-Version-3.jpg”,”smallWidth”:460,”smallHeight”:345,”bigWidth”:728,”bigHeight”:546,”licensing”:”<div class=”mw-parser-output”><p>License: <a target=”_blank” rel=”nofollow noreferrer noopener” class=”external text” href=”https://en.wikipedia.org/wiki/Fair_use”>Fair Use</a> (screenshot)<br>n</p></div>”}
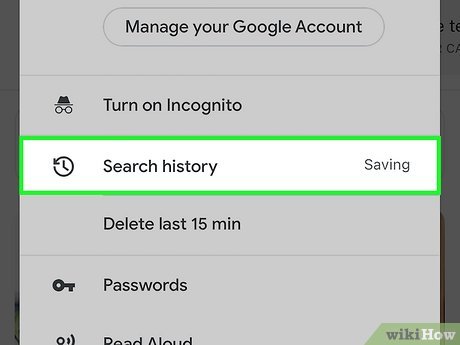
3
Tap Search history This will open a new page with options for your search history.
{“smallUrl”:”https://www.wikihow.com/images/thumb/c/c8/Clear-History-on-an-iPhone-Step-33-Version-3.jpg/v4-460px-Clear-History-on-an-iPhone-Step-33-Version-3.jpg”,”bigUrl”:”/images/thumb/c/c8/Clear-History-on-an-iPhone-Step-33-Version-3.jpg/v4-728px-Clear-History-on-an-iPhone-Step-33-Version-3.jpg”,”smallWidth”:460,”smallHeight”:345,”bigWidth”:728,”bigHeight”:546,”licensing”:”<div class=”mw-parser-output”><p>License: <a target=”_blank” rel=”nofollow noreferrer noopener” class=”external text” href=”https://en.wikipedia.org/wiki/Fair_use”>Fair Use</a> (screenshot)<br>n</p></div>”}
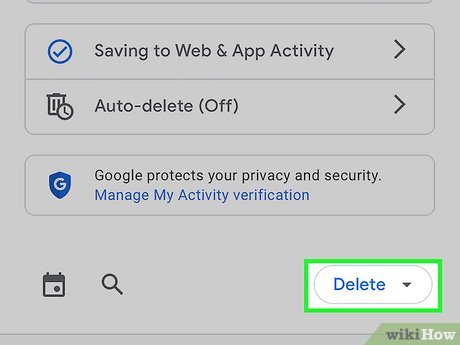
4
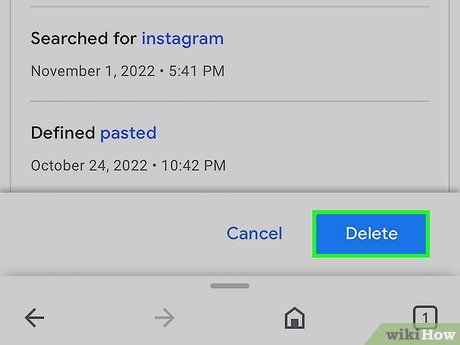
Tap Delete This button is located above your search history.
{“smallUrl”:”https://www.wikihow.com/images/thumb/f/fd/Clear-History-on-an-iPhone-Step-34-Version-3.jpg/v4-460px-Clear-History-on-an-iPhone-Step-34-Version-3.jpg”,”bigUrl”:”/images/thumb/f/fd/Clear-History-on-an-iPhone-Step-34-Version-3.jpg/v4-728px-Clear-History-on-an-iPhone-Step-34-Version-3.jpg”,”smallWidth”:460,”smallHeight”:345,”bigWidth”:728,”bigHeight”:546,”licensing”:”<div class=”mw-parser-output”><p>License: <a target=”_blank” rel=”nofollow noreferrer noopener” class=”external text” href=”https://en.wikipedia.org/wiki/Fair_use”>Fair Use</a> (screenshot)<br>n</p></div>”}
5
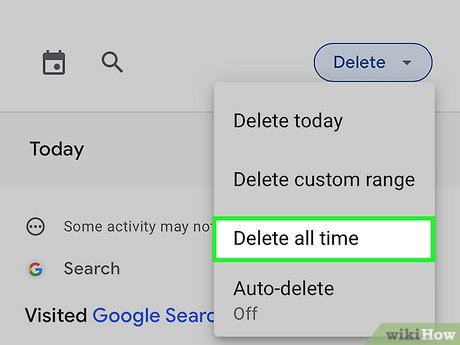
Select a time range. If you want to delete the entire history, select “Delete all time.”
{“smallUrl”:”https://www.wikihow.com/images/thumb/0/07/Clear-History-on-an-iPhone-Step-35.jpg/v4-460px-Clear-History-on-an-iPhone-Step-35.jpg”,”bigUrl”:”/images/thumb/0/07/Clear-History-on-an-iPhone-Step-35.jpg/v4-728px-Clear-History-on-an-iPhone-Step-35.jpg”,”smallWidth”:460,”smallHeight”:345,”bigWidth”:728,”bigHeight”:546,”licensing”:”<div class=”mw-parser-output”><p>License: <a target=”_blank” rel=”nofollow noreferrer noopener” class=”external text” href=”https://en.wikipedia.org/wiki/Fair_use”>Fair Use</a> (screenshot)<br>n</p></div>”}
6
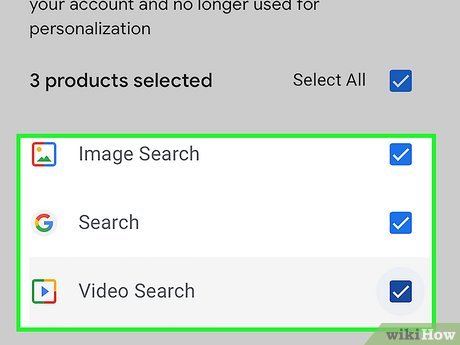
Select Google products. Check the boxes next to the Google products you want to delete your history from. Then click Next .
{“smallUrl”:”https://www.wikihow.com/images/thumb/2/2e/Clear-History-on-an-iPhone-Step-36-Version-3.jpg/v4-460px-Clear-History-on-an-iPhone-Step-36-Version-3.jpg”,”bigUrl”:”/images/thumb/2/2e/Clear-History-on-an-iPhone-Step-36-Version-3.jpg/v4-728px-Clear-History-on-an-iPhone-Step-36-Version-3.jpg”,”smallWidth”:460,”smallHeight”:345,”bigWidth”:728,”bigHeight”:546,”licensing”:”<div class=”mw-parser-output”><p>License: <a target=”_blank” rel=”nofollow noreferrer noopener” class=”external text” href=”https://en.wikipedia.org/wiki/Fair_use”>Fair Use</a> (screenshot)<br>n</p></div>”}
7
Tap Delete This will confirm the deletion of your Google search history.
{“smallUrl”:”https://www.wikihow.com/images/thumb/6/60/Prepare-to-Sell-Your-iPhone-Step-7.jpg/v4-460px-Prepare-to-Sell-Your-iPhone-Step-7.jpg”,”bigUrl”:”/images/thumb/6/60/Prepare-to-Sell-Your-iPhone-Step-7.jpg/v4-728px-Prepare-to-Sell-Your-iPhone-Step-7.jpg”,”smallWidth”:460,”smallHeight”:345,”bigWidth”:728,”bigHeight”:546,”licensing”:”<div class=”mw-parser-output”><p>License: <a target=”_blank” rel=”nofollow noreferrer noopener” class=”external text” href=”https://creativecommons.org/licenses/by-nc-sa/3.0/”>Creative Commons</a><br>n</p><p><br />n</p></div>”}
1
Use this option if you want to completely erase your iPhone. This will delete all of the history and data on the iPhone, and you’ll be prompted to set it up as new when the process is complete.
If you sync your data to iCloud, erasing your iPhone will not erased that synced data. Once you sign back in with your Apple ID, all synced data will reappear.
For example, if you use iCloud to sync your iMessages (the default option), those messages will reappear on your iPhone after you sign back in with your Apple ID after erasing your phone.
{“smallUrl”:”https://www.wikihow.com/images/thumb/2/24/Clear-History-on-an-iPhone-Step-38.jpg/v4-460px-Clear-History-on-an-iPhone-Step-38.jpg”,”bigUrl”:”/images/thumb/2/24/Clear-History-on-an-iPhone-Step-38.jpg/v4-728px-Clear-History-on-an-iPhone-Step-38.jpg”,”smallWidth”:460,”smallHeight”:345,”bigWidth”:728,”bigHeight”:546,”licensing”:”<div class=”mw-parser-output”><p>License: <a target=”_blank” rel=”nofollow noreferrer noopener” class=”external text” href=”https://en.wikipedia.org/wiki/Fair_use”>Fair Use</a> (screenshot)<br>n</p></div>”}
2
Open the Settings app
{“smallUrl”:”https://www.wikihow.com/images/7/7e/Iphonesettingsappicon.png”,”bigUrl”:”/images/thumb/7/7e/Iphonesettingsappicon.png/30px-Iphonesettingsappicon.png”,”smallWidth”:460,”smallHeight”:460,”bigWidth”:30,”bigHeight”:30,”licensing”:”<div class=”mw-parser-output”><p>I edited this screenshot of an iPhone icon.n</p><p>License: <a target=”_blank” rel=”nofollow noreferrer noopener” class=”external text” href=”http://en.wikipedia.org/wiki/Fair_use”>Fair Use</a><br>n</p></div>”}
. If you’re sure you want to erase everything on your iPhone, open the Settings app.
{“smallUrl”:”https://www.wikihow.com/images/thumb/2/2f/Clear-History-on-an-iPhone-Step-39.jpg/v4-460px-Clear-History-on-an-iPhone-Step-39.jpg”,”bigUrl”:”/images/thumb/2/2f/Clear-History-on-an-iPhone-Step-39.jpg/v4-728px-Clear-History-on-an-iPhone-Step-39.jpg”,”smallWidth”:460,”smallHeight”:345,”bigWidth”:728,”bigHeight”:546,”licensing”:”<div class=”mw-parser-output”><p>License: <a target=”_blank” rel=”nofollow noreferrer noopener” class=”external text” href=”https://en.wikipedia.org/wiki/Fair_use”>Fair Use</a> (screenshot)<br>n</p></div>”}
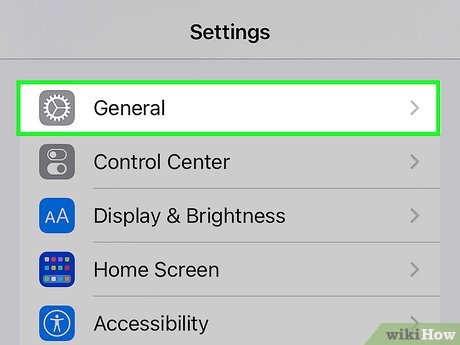
3
Tap General Your iPhone’s general settings will open.
{“smallUrl”:”https://www.wikihow.com/images/thumb/0/01/Clear-History-on-an-iPhone-Step-40.jpg/v4-460px-Clear-History-on-an-iPhone-Step-40.jpg”,”bigUrl”:”/images/thumb/0/01/Clear-History-on-an-iPhone-Step-40.jpg/v4-728px-Clear-History-on-an-iPhone-Step-40.jpg”,”smallWidth”:460,”smallHeight”:345,”bigWidth”:728,”bigHeight”:546,”licensing”:”<div class=”mw-parser-output”><p>License: <a target=”_blank” rel=”nofollow noreferrer noopener” class=”external text” href=”https://en.wikipedia.org/wiki/Fair_use”>Fair Use</a> (screenshot)<br>n</p></div>”}
4
Tap Transfer or Reset iPhone This will take you to the reset page.
{“smallUrl”:”https://www.wikihow.com/images/thumb/8/8a/Clear-History-on-an-iPhone-Step-41.jpg/v4-460px-Clear-History-on-an-iPhone-Step-41.jpg”,”bigUrl”:”/images/thumb/8/8a/Clear-History-on-an-iPhone-Step-41.jpg/v4-728px-Clear-History-on-an-iPhone-Step-41.jpg”,”smallWidth”:460,”smallHeight”:345,”bigWidth”:728,”bigHeight”:546,”licensing”:”<div class=”mw-parser-output”><p>License: <a target=”_blank” rel=”nofollow noreferrer noopener” class=”external text” href=”https://en.wikipedia.org/wiki/Fair_use”>Fair Use</a> (screenshot)<br>n</p></div>”}
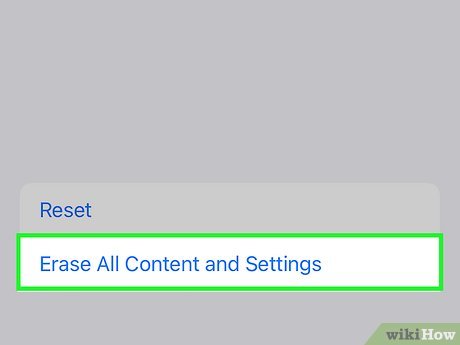
5
Tap Erase All Content and Settings You’ll be asked to confirm that you want to completely delete everything.
You may need to enter your Apple ID password or iPhone passcode.
This will restore your device to the factory settings, deleting all of the information and settings.
{“smallUrl”:”https://www.wikihow.com/images/thumb/f/f7/Clear-History-on-an-iPhone-Step-42.jpg/v4-460px-Clear-History-on-an-iPhone-Step-42.jpg”,”bigUrl”:”/images/thumb/f/f7/Clear-History-on-an-iPhone-Step-42.jpg/v4-728px-Clear-History-on-an-iPhone-Step-42.jpg”,”smallWidth”:460,”smallHeight”:345,”bigWidth”:728,”bigHeight”:546,”licensing”:”<div class=”mw-parser-output”><p>License: <a target=”_blank” rel=”nofollow noreferrer noopener” class=”external text” href=”https://en.wikipedia.org/wiki/Fair_use”>Fair Use</a> (screenshot)<br>n</p></div>”}
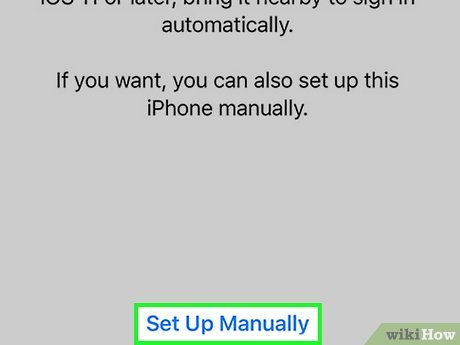
6
Set up your iPhone. Once the reset is complete, you’ll be taken through the initial setup. You can set up your iPhone as new, or restore an iTunes or iCloud backup.
Thanks for submitting a tip for review!
[ad_2]


