


[ad_1]
Things You Should Know
- Press ⇧ Shift + ⌘ Command + 3 to capture your entire screen, or ⇧ Shift + ⌘ Command + 4 to capture a selection.
- In macOS 10.14 (Mojave) and later, use ⇧ Shift + ⌘ Command + 5 to launch the Screenshot app.
- You can also take and edit screenshots in the Preview app.
Steps
1
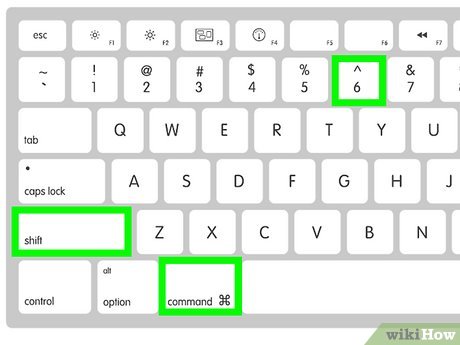
Use ⇧ Shift + ⌘ Command + 3 to capture the whole screen.
-
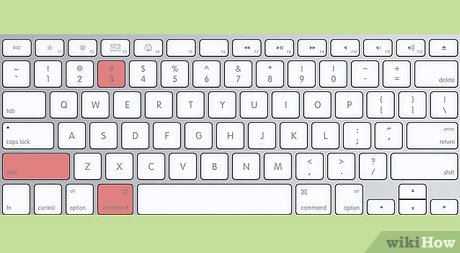
{“smallUrl”:”https://www.wikihow.com/images/thumb/f/f7/Special-1.jpg/v4-460px-Special-1.jpg”,”bigUrl”:”/images/thumb/f/f7/Special-1.jpg/v4-728px-Special-1.jpg”,”smallWidth”:460,”smallHeight”:253,”bigWidth”:728,”bigHeight”:400,”licensing”:”<div class=”mw-parser-output”><p>License: <a target=”_blank” rel=”nofollow noreferrer noopener” class=”external text” href=”https://creativecommons.org/licenses/by-nc-sa/3.0/”>Creative Commons</a><br>n</p><p><br />n</p></div>”}This shortcut quickly captures whatever is on the screen. You’ll hear a camera shutter sound effect, and a thumbnail of your screenshot will briefly appear in the bottom right corner of the screen.[1]
X
Research source
- While the thumbnail is visible, you can click on it to edit your screenshot.
2
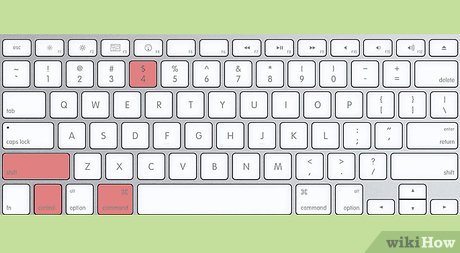
Use ⇧ Shift + ⌘ Command + 4 to capture part of the screen.
-
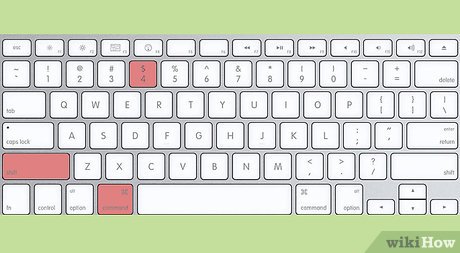 {“smallUrl”:”https://www.wikihow.com/images/thumb/2/2e/Special-3.jpg/v4-460px-Special-3.jpg”,”bigUrl”:”/images/thumb/2/2e/Special-3.jpg/v4-728px-Special-3.jpg”,”smallWidth”:460,”smallHeight”:253,”bigWidth”:728,”bigHeight”:400,”licensing”:”<div class=”mw-parser-output”><p>License: <a target=”_blank” rel=”nofollow noreferrer noopener” class=”external text” href=”https://creativecommons.org/licenses/by-nc-sa/3.0/”>Creative Commons</a><br>n</p><p><br />n</p></div>”}Use this command to control what part of the screen you capture. Your cursor will turn into a pointer with crosshairs. Click and drag your cursor to make a selection. Once you’re satisfied with the selection, release your mouse or trackpad button to take the screenshot.[2]
X
Research source
- You can move the selection by holding down the spacebar while you drag the cursor.
- To cancel taking the screenshot, press Esc.
- Click the thumbnail that briefly appears in the lower right corner of your screen if you want to edit the screenshot before it saves to your desktop.
3
Use ⇧ Shift + ⌘ Command + 4 + Spacebar to capture a window or menu.
-
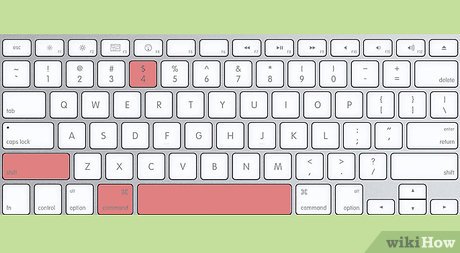 {“smallUrl”:”https://www.wikihow.com/images/thumb/b/b1/Special-6.jpg/v4-460px-Special-6.jpg”,”bigUrl”:”/images/thumb/b/b1/Special-6.jpg/v4-728px-Special-6.jpg”,”smallWidth”:460,”smallHeight”:253,”bigWidth”:728,”bigHeight”:400,”licensing”:”<div class=”mw-parser-output”><p>License: <a target=”_blank” rel=”nofollow noreferrer noopener” class=”external text” href=”https://creativecommons.org/licenses/by-nc-sa/3.0/”>Creative Commons</a><br>n</p><p><br />n</p></div>”}This option captures a window or menu without showing the background. Press ⇧ Shift + ⌘ Command + 4 first, then press the spacebar. Your cursor will turn into a camera icon. Hover the camera over the window or menu you want to capture. If you successfully select the window or menu, it will be highlighted in blue. Click on the window or menu to take the screen capture.
[3]
X
Research source
- By default, the screencap will include the window’s drop shadow. You can exclude it by pressing and holding ⌥ Option while you click the window.
- To cancel taking the screencap, press Esc.
4
Press ⇧ Shift + ⌘ Command + 5 to use the screenshot toolbar.
-
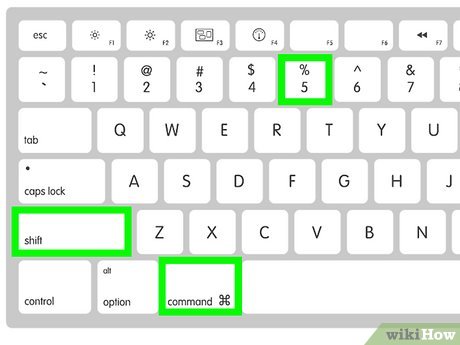 {“smallUrl”:”https://www.wikihow.com/images/thumb/d/d6/Take-a-Screenshot-with-a-MacBook-Step-4-Version-4.jpg/v4-460px-Take-a-Screenshot-with-a-MacBook-Step-4-Version-4.jpg”,”bigUrl”:”/images/thumb/d/d6/Take-a-Screenshot-with-a-MacBook-Step-4-Version-4.jpg/v4-728px-Take-a-Screenshot-with-a-MacBook-Step-4-Version-4.jpg”,”smallWidth”:460,”smallHeight”:345,”bigWidth”:728,”bigHeight”:546,”licensing”:”<div class=”mw-parser-output”><p>License: <a target=”_blank” rel=”nofollow noreferrer noopener” class=”external text” href=”https://en.wikipedia.org/wiki/Fair_use”>Fair Use</a> (screenshot)<br>n</p></div>”}The toolbar also lets you take screen recordings. This option is only available if your MacBook is running macOS 10.14 (Mojave) or later. To open up a whole menu of screen capture options, press ⇧ Shift+⌘ Command+5. A small gray toolbar will appear close to the bottom of your screen. Use the different buttons on the toolbar to:[4]
X
Research source
- Capture your entire screen.
- Capture a selected portion of your screen.
- Capture a highlighted window or menu.
- Record your whole screen.
- Record just a selected portion of your screen.
- Use the drop-down Options menu to customize your screenshot options (e.g., set where your screenshots are saved, use a timer, or remember your previous selection).
- When you’ve made your selection, click Capture to save the screenshot.
5
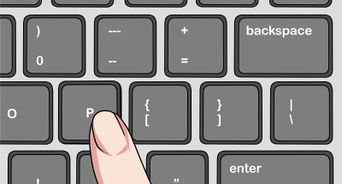
Press ⇧ Shift + ⌘ Command + 6 to screenshot the Touch Bar.
-
 {“smallUrl”:”https://www.wikihow.com/images/thumb/8/89/Take-a-Screenshot-with-a-MacBook-Step-5-Version-4.jpg/v4-460px-Take-a-Screenshot-with-a-MacBook-Step-5-Version-4.jpg”,”bigUrl”:”/images/thumb/8/89/Take-a-Screenshot-with-a-MacBook-Step-5-Version-4.jpg/v4-728px-Take-a-Screenshot-with-a-MacBook-Step-5-Version-4.jpg”,”smallWidth”:460,”smallHeight”:345,”bigWidth”:728,”bigHeight”:546,”licensing”:”<div class=”mw-parser-output”><p>License: <a target=”_blank” rel=”nofollow noreferrer noopener” class=”external text” href=”https://en.wikipedia.org/wiki/Fair_use”>Fair Use</a> (screenshot)<br>n</p></div>”}This shortcut only captures what’s on the Touch Bar. This option is specific to MacBook Pro models with a Touch Bar.[5]
X
Research source
6
Copy a screenshot to the clipboard.
-
 {“smallUrl”:”https://www.wikihow.com/images/thumb/b/b4/Special-9.jpg/v4-460px-Special-9.jpg”,”bigUrl”:”/images/thumb/b/b4/Special-9.jpg/v4-728px-Special-9.jpg”,”smallWidth”:460,”smallHeight”:253,”bigWidth”:728,”bigHeight”:400,”licensing”:”<div class=”mw-parser-output”><p>License: <a target=”_blank” rel=”nofollow noreferrer noopener” class=”external text” href=”https://creativecommons.org/licenses/by-nc-sa/3.0/”>Creative Commons</a><br>n</p><p><br />n</p></div>”}Press and hold Control as you capture the screen to copy the screenshot to the clipboard. This allows you to paste the screenshot into a document. If you’d rather not directly save your screen captures as image files, use any of the other screenshot commands, then hold down Control as you capture your screen. The image will be saved to your clipboard.[6]
X
Research source
- You can then paste the image into a document, such as a text or image file in a word processing or photo editing app.
7
Find screenshots on your desktop.
-
 {“smallUrl”:”https://www.wikihow.com/images/thumb/0/01/Take-a-Screenshot-with-a-MacBook-Step-7-Version-4.jpg/v4-460px-Take-a-Screenshot-with-a-MacBook-Step-7-Version-4.jpg”,”bigUrl”:”/images/thumb/0/01/Take-a-Screenshot-with-a-MacBook-Step-7-Version-4.jpg/v4-728px-Take-a-Screenshot-with-a-MacBook-Step-7-Version-4.jpg”,”smallWidth”:460,”smallHeight”:345,”bigWidth”:728,”bigHeight”:546,”licensing”:”<div class=”mw-parser-output”><p>License: <a target=”_blank” rel=”nofollow noreferrer noopener” class=”external text” href=”https://en.wikipedia.org/wiki/Fair_use”>Fair Use</a> (screenshot)<br>n</p></div>”}Your desktop is the default save location for screenshots. However, if your MacBook is running macOS Mojave or later, you can change this in the Options menu of the Screenshot app.[7]
X
Research source
Launch the app by pressing ⇧ Shift+⌘ Command+5.- File names of screenshots or recordings will always start with Screen Shot or Screen Recording, followed by the date.
- Screenshots are saved as .PNG files, while screen recordings are saved as .MOV files.
8
Customize your keyboard shortcuts in System Preferences.
-
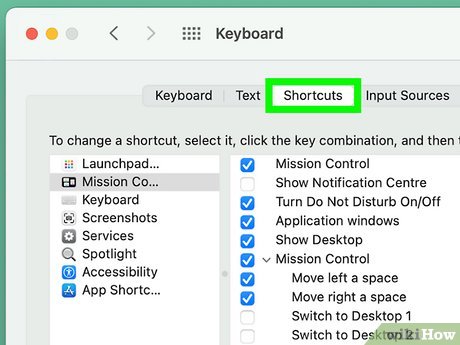 {“smallUrl”:”https://www.wikihow.com/images/thumb/e/e1/Take-a-Screenshot-with-a-MacBook-Step-8-Version-4.jpg/v4-460px-Take-a-Screenshot-with-a-MacBook-Step-8-Version-4.jpg”,”bigUrl”:”/images/thumb/e/e1/Take-a-Screenshot-with-a-MacBook-Step-8-Version-4.jpg/v4-728px-Take-a-Screenshot-with-a-MacBook-Step-8-Version-4.jpg”,”smallWidth”:460,”smallHeight”:345,”bigWidth”:728,”bigHeight”:546,”licensing”:”<div class=”mw-parser-output”><p>License: <a target=”_blank” rel=”nofollow noreferrer noopener” class=”external text” href=”https://en.wikipedia.org/wiki/Fair_use”>Fair Use</a> (screenshot)<br>n</p></div>”}If you don’t like the default shortcuts, you can change them. To do this, open the Apple Menu and select System Preferences. In the System Preferences window, click Keyboard, then click the Shortcuts tab. From there:[8]
X
Research source
- Select Screenshots in the menu on the left side of the window.
- Click the screenshot option you want to edit.
- Click on the current keyboard shortcut.
- Hold down the new combination of keys you want to use instead.
- The new shortcut will be applied automatically. To undo your changes, click Restore Defaults at the bottom right side of the window.
9
Take screenshots in Preview to edit the capture immediately.
-
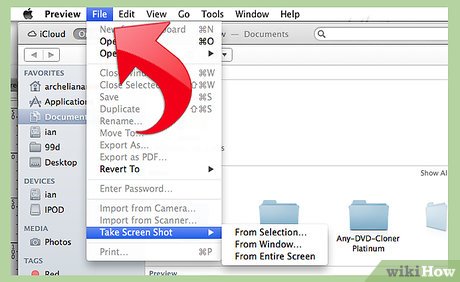 {“smallUrl”:”https://www.wikihow.com/images/thumb/1/15/Take-a-Screenshot-With-a-Macbook-Step-12.jpg/v4-460px-Take-a-Screenshot-With-a-Macbook-Step-12.jpg”,”bigUrl”:”/images/thumb/1/15/Take-a-Screenshot-With-a-Macbook-Step-12.jpg/v4-692px-Take-a-Screenshot-With-a-Macbook-Step-12.jpg”,”smallWidth”:460,”smallHeight”:282,”bigWidth”:692,”bigHeight”:424,”licensing”:”<div class=”mw-parser-output”><p>License: <a target=”_blank” rel=”nofollow noreferrer noopener” class=”external text” href=”https://en.wikipedia.org/wiki/Fair_use”>Fair Use</a> (screenshot)<br>n</p></div>”}The Preview app also allows you to take screenshots. To do this, launch Preview, then open the File menu. Select Take Screenshot, then select the type of screenshot you’d like to take from the submenu (e.g., From Selection, From Window, or From Entire Screen).[9]
X
Research source
- Once the screenshot is captured, it will open as an untitled image file in Preview. From there, you can rename the image, edit it, and save or share it.
10
Try a third party screen capture app for more options.
-
 {“smallUrl”:”https://www.wikihow.com/images/thumb/5/5a/Take-a-Screenshot-with-a-MacBook-Step-10-Version-4.jpg/v4-460px-Take-a-Screenshot-with-a-MacBook-Step-10-Version-4.jpg”,”bigUrl”:”/images/thumb/5/5a/Take-a-Screenshot-with-a-MacBook-Step-10-Version-4.jpg/v4-728px-Take-a-Screenshot-with-a-MacBook-Step-10-Version-4.jpg”,”smallWidth”:460,”smallHeight”:345,”bigWidth”:728,”bigHeight”:546,”licensing”:”<div class=”mw-parser-output”><p>License: <a target=”_blank” rel=”nofollow noreferrer noopener” class=”external text” href=”https://en.wikipedia.org/wiki/Fair_use”>Fair Use</a> (screenshot)<br>n</p></div>”}You can download several screen capture apps from the App Store. Some of these apps offer a variety of options you can’t get with the built-in screenshot features on your MacBook. For instance, some of them allow you to record the screens of multiple connected devices at once, while others have built-in photo or video-editing features. Many screen capture apps are available for free. A few popular options include:
- iScreen Shooter, which includes features such as a text scanner, a highlighter, and screenshot annotation tools: https://apps.apple.com/us/app/iscreen-shoter-screenshot-app/id1596559494?mt=12
- Snip My, a screen capture app with lots of built-in editing and annotation tools: https://apps.apple.com/us/app/snip-my-screenshot-tool/id1584789396?mt=12
- Record It, which allows you to capture recordings of your screen with audio: https://apps.apple.com/us/app/record-it-screen-recorder/id1339001002?mt=12
Video
By using this service, some information may be shared with YouTube.
Tips
-
Some apps, such as DVD Player or Apple TV, may block your ability to take screencaps.⧼thumbs_response⧽

You Might Also Like
 How to Take a Screenshot on a Windows PC: 8 Simple Tricks
How to
Change Your Computer’s Name on a Mac
How to
Temporarily Remove a Key from a Macbook
 MacBook Pro Reset Guide: Erase and Restore to Factory Settings
How to
Connect External Hard Drive to Macbook Pro
 How to Connect a MacBook to an iMac: 2 Step-by-Step Methods
 How to Connect a MacBook Air to an External Display
How to
Clean a MacBook Pro Keyboard
How to
Clean a Macbook Pro Screen


How to
Save Pictures to Your MacBook
 How to Type Musical Notes on a Macbook: Insert Music Symbols
How to
Connect a MacBook to a TV

How to
Restore Macbook to Factory Settings
How to
Change a Macbook Pro Battery
[ad_2]
Source link : https://www.wikihow.com/Take-a-Screenshot-with-a-MacBook

