[ad_1]
Steps
{“smallUrl”:”https://www.wikihow.com/images/thumb/5/5b/Set-a-Song-As-Your-Ringtone-on-iPhone-Step-1-Version-4.jpg/v4-460px-Set-a-Song-As-Your-Ringtone-on-iPhone-Step-1-Version-4.jpg”,”bigUrl”:”/images/thumb/5/5b/Set-a-Song-As-Your-Ringtone-on-iPhone-Step-1-Version-4.jpg/aid3645120-v4-728px-Set-a-Song-As-Your-Ringtone-on-iPhone-Step-1-Version-4.jpg”,”smallWidth”:460,”smallHeight”:348,”bigWidth”:728,”bigHeight”:551,”licensing”:”<div class=”mw-parser-output”><p>License: <a target=”_blank” rel=”nofollow noreferrer noopener” class=”external text” href=”https://en.wikipedia.org/wiki/Fair_use”>Fair Use</a> (screenshot)<br>n</p></div>”}
1
Open iTunes or Apple Music on your computer. If you’re using Windows or a version of macOS released prior to Catalina, click iTunes in your app list. If you’re using a more recent version of macOS, open the app called Music.
{“smallUrl”:”https://www.wikihow.com/images/thumb/7/7e/Set-a-Song-As-Your-Ringtone-on-iPhone-Step-2-Version-4.jpg/v4-460px-Set-a-Song-As-Your-Ringtone-on-iPhone-Step-2-Version-4.jpg”,”bigUrl”:”/images/thumb/7/7e/Set-a-Song-As-Your-Ringtone-on-iPhone-Step-2-Version-4.jpg/aid3645120-v4-728px-Set-a-Song-As-Your-Ringtone-on-iPhone-Step-2-Version-4.jpg”,”smallWidth”:460,”smallHeight”:346,”bigWidth”:728,”bigHeight”:547,”licensing”:”<div class=”mw-parser-output”><p>License: <a target=”_blank” rel=”nofollow noreferrer noopener” class=”external text” href=”https://en.wikipedia.org/wiki/Fair_use”>Fair Use</a> (screenshot)<br>n</p></div>”}
2
Make sure that your song is in iTunes or Apple Music. You’ll need to have the actual music file you want to trim already in iTunes or Apple Music—it can’t just be a streaming song or be in the cloud.
[1] If you have the song as an MP3 (or another format) on your computer, just drag it into iTunes or Apple Music to add it now.
If you see a cloud icon with a down-arrow beside it next to the song, click it to download the song.
{“smallUrl”:”https://www.wikihow.com/images/thumb/8/83/Set-a-Song-As-Your-Ringtone-on-iPhone-Step-3-Version-4.jpg/v4-460px-Set-a-Song-As-Your-Ringtone-on-iPhone-Step-3-Version-4.jpg”,”bigUrl”:”/images/thumb/8/83/Set-a-Song-As-Your-Ringtone-on-iPhone-Step-3-Version-4.jpg/aid3645120-v4-728px-Set-a-Song-As-Your-Ringtone-on-iPhone-Step-3-Version-4.jpg”,”smallWidth”:460,”smallHeight”:346,”bigWidth”:728,”bigHeight”:547,”licensing”:”<div class=”mw-parser-output”><p>License: <a target=”_blank” rel=”nofollow noreferrer noopener” class=”external text” href=”https://en.wikipedia.org/wiki/Fair_use”>Fair Use</a> (screenshot)<br>n</p></div>”}
3
Find the section of the song that you want to use. Double-click the song in iTunes to play it, listen for the beginning of the section that you want to use as the ringtone and note the start time, and listen for up to 40 seconds before noting the end time.
You can see the timestamp for the song at the top of the iTunes window when a song is playing.
Ringtones cannot be longer than 30 seconds.
{“smallUrl”:”https://www.wikihow.com/images/thumb/3/39/Set-a-Song-As-Your-Ringtone-on-iPhone-Step-4-Version-4.jpg/v4-460px-Set-a-Song-As-Your-Ringtone-on-iPhone-Step-4-Version-4.jpg”,”bigUrl”:”/images/thumb/3/39/Set-a-Song-As-Your-Ringtone-on-iPhone-Step-4-Version-4.jpg/aid3645120-v4-728px-Set-a-Song-As-Your-Ringtone-on-iPhone-Step-4-Version-4.jpg”,”smallWidth”:460,”smallHeight”:346,”bigWidth”:728,”bigHeight”:548,”licensing”:”<div class=”mw-parser-output”><p>License: <a target=”_blank” rel=”nofollow noreferrer noopener” class=”external text” href=”https://en.wikipedia.org/wiki/Fair_use”>Fair Use</a> (screenshot)<br>n</p></div>”}
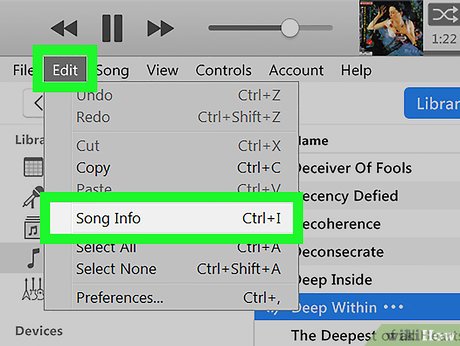
4
Open the song’s information. To do so in iTunes, click the three dots on the song and select
Song Info . If using the Apple Music app on your Mac, click the song once, click the
Song menu, and then click
Info .
[2] .
You can also just right-click the song and click Song Info (Windows) or Get Info (Mac) in the drop-down menu that appears.
{“smallUrl”:”https://www.wikihow.com/images/thumb/c/c4/Set-a-Song-As-Your-Ringtone-on-iPhone-Step-5-Version-4.jpg/v4-460px-Set-a-Song-As-Your-Ringtone-on-iPhone-Step-5-Version-4.jpg”,”bigUrl”:”/images/thumb/c/c4/Set-a-Song-As-Your-Ringtone-on-iPhone-Step-5-Version-4.jpg/aid3645120-v4-728px-Set-a-Song-As-Your-Ringtone-on-iPhone-Step-5-Version-4.jpg”,”smallWidth”:460,”smallHeight”:344,”bigWidth”:728,”bigHeight”:544,”licensing”:”<div class=”mw-parser-output”><p>License: <a target=”_blank” rel=”nofollow noreferrer noopener” class=”external text” href=”https://en.wikipedia.org/wiki/Fair_use”>Fair Use</a> (screenshot)<br>n</p></div>”}
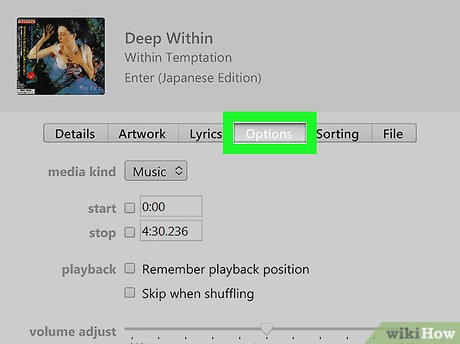
5
Click the Options It’s at the top of the information menu window.
{“smallUrl”:”https://www.wikihow.com/images/thumb/2/2e/Set-a-Song-As-Your-Ringtone-on-iPhone-Step-6-Version-4.jpg/v4-460px-Set-a-Song-As-Your-Ringtone-on-iPhone-Step-6-Version-4.jpg”,”bigUrl”:”/images/thumb/2/2e/Set-a-Song-As-Your-Ringtone-on-iPhone-Step-6-Version-4.jpg/aid3645120-v4-728px-Set-a-Song-As-Your-Ringtone-on-iPhone-Step-6-Version-4.jpg”,”smallWidth”:460,”smallHeight”:341,”bigWidth”:728,”bigHeight”:540,”licensing”:”<div class=”mw-parser-output”><p>License: <a target=”_blank” rel=”nofollow noreferrer noopener” class=”external text” href=”https://en.wikipedia.org/wiki/Fair_use”>Fair Use</a> (screenshot)<br>n</p></div>”}
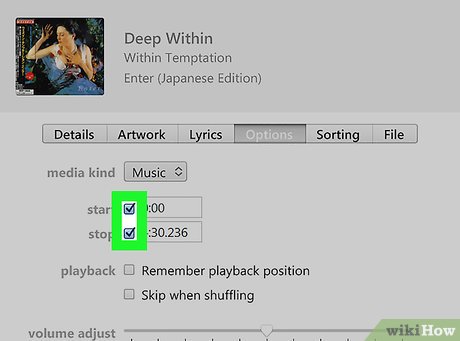
6
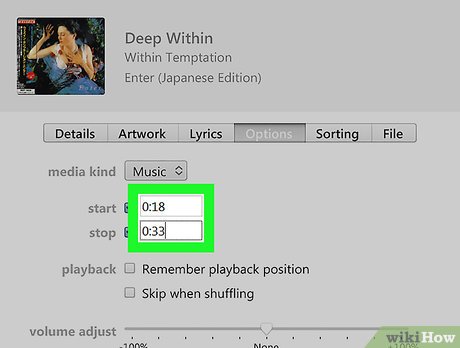
Check the “start” and “stop” boxes. They’re both near the top of the window, just below the “media kind” section. Doing so will place checkmarks in the respective boxes, allowing you to change the start and stop time for the song.
{“smallUrl”:”https://www.wikihow.com/images/thumb/c/c5/Set-a-Song-As-Your-Ringtone-on-iPhone-Step-7-Version-4.jpg/v4-460px-Set-a-Song-As-Your-Ringtone-on-iPhone-Step-7-Version-4.jpg”,”bigUrl”:”/images/thumb/c/c5/Set-a-Song-As-Your-Ringtone-on-iPhone-Step-7-Version-4.jpg/aid3645120-v4-728px-Set-a-Song-As-Your-Ringtone-on-iPhone-Step-7-Version-4.jpg”,”smallWidth”:460,”smallHeight”:348,”bigWidth”:728,”bigHeight”:550,”licensing”:”<div class=”mw-parser-output”><p>License: <a target=”_blank” rel=”nofollow noreferrer noopener” class=”external text” href=”https://en.wikipedia.org/wiki/Fair_use”>Fair Use</a> (screenshot)<br>n</p></div>”}
7
Enter the start and stop time. In the “start” text box, enter the time in the song at which you want the ringtone to start, then do the same with the point at which you want the ringtone to end in the “stop” box. Remember, the ringtone can be up to 30 seconds long.
{“smallUrl”:”https://www.wikihow.com/images/thumb/f/f7/Set-a-Song-As-Your-Ringtone-on-iPhone-Step-8-Version-4.jpg/v4-460px-Set-a-Song-As-Your-Ringtone-on-iPhone-Step-8-Version-4.jpg”,”bigUrl”:”/images/thumb/f/f7/Set-a-Song-As-Your-Ringtone-on-iPhone-Step-8-Version-4.jpg/aid3645120-v4-728px-Set-a-Song-As-Your-Ringtone-on-iPhone-Step-8-Version-4.jpg”,”smallWidth”:460,”smallHeight”:349,”bigWidth”:728,”bigHeight”:552,”licensing”:”<div class=”mw-parser-output”><p>License: <a target=”_blank” rel=”nofollow noreferrer noopener” class=”external text” href=”https://en.wikipedia.org/wiki/Fair_use”>Fair Use</a> (screenshot)<br>n</p></div>”}
8
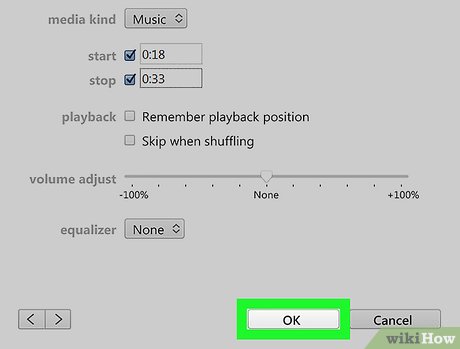
Click OK It’s at the bottom of the window. This will save the song’s changes and exit the information menu.
{“smallUrl”:”https://www.wikihow.com/images/thumb/e/e4/Set-a-Song-As-Your-Ringtone-on-iPhone-Step-9-Version-4.jpg/v4-460px-Set-a-Song-As-Your-Ringtone-on-iPhone-Step-9-Version-4.jpg”,”bigUrl”:”/images/thumb/e/e4/Set-a-Song-As-Your-Ringtone-on-iPhone-Step-9-Version-4.jpg/aid3645120-v4-728px-Set-a-Song-As-Your-Ringtone-on-iPhone-Step-9-Version-4.jpg”,”smallWidth”:460,”smallHeight”:344,”bigWidth”:728,”bigHeight”:544,”licensing”:”<div class=”mw-parser-output”><p>License: <a target=”_blank” rel=”nofollow noreferrer noopener” class=”external text” href=”https://en.wikipedia.org/wiki/Fair_use”>Fair Use</a> (screenshot)<br>n</p></div>”}
9
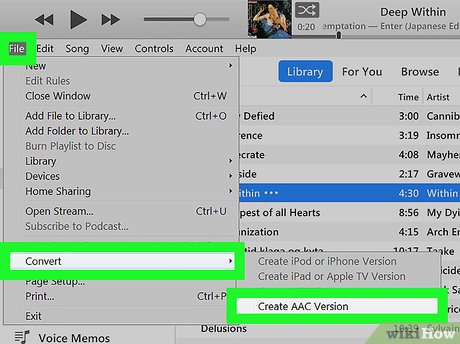
Create an AAC version of the song. Make sure that the song is selected by clicking it, then click
File , select
Convert in the menu, and then click
Create AAC Version . A new version of the song that is the length of your ringtone will appear below the original song in iTunes or Music.
For example, if your selected ringtone segment is 26 seconds, the new song will have “0:26” next to it instead of the full song length.
If you don’t see the Create AAC Version option, enable it by clicking the Edit (Windows) or iTunes (Mac) tab, clicking Preferences… , clicking Import Settings , clicking the “Import Using” drop-down box, and clicking AAC Encoder in the drop-down menu.
{“smallUrl”:”https://www.wikihow.com/images/thumb/2/24/Set-a-Song-As-Your-Ringtone-on-iPhone-Step-10-Version-4.jpg/v4-460px-Set-a-Song-As-Your-Ringtone-on-iPhone-Step-10-Version-4.jpg”,”bigUrl”:”/images/thumb/2/24/Set-a-Song-As-Your-Ringtone-on-iPhone-Step-10-Version-4.jpg/aid3645120-v4-728px-Set-a-Song-As-Your-Ringtone-on-iPhone-Step-10-Version-4.jpg”,”smallWidth”:460,”smallHeight”:342,”bigWidth”:728,”bigHeight”:541,”licensing”:”<div class=”mw-parser-output”><p>License: <a target=”_blank” rel=”nofollow noreferrer noopener” class=”external text” href=”https://en.wikipedia.org/wiki/Fair_use”>Fair Use</a> (screenshot)<br>n</p></div>”}
10
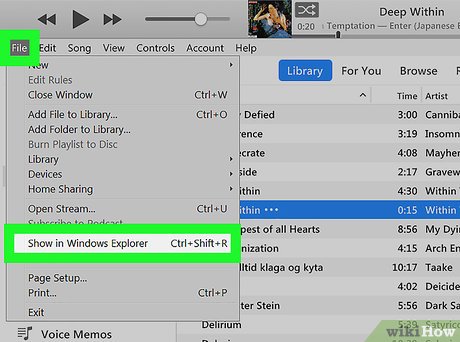
Open the AAC file’s location. Select the AAC version of the song, then click File and click Show in Windows Explorer (Windows) or Show in Finder (Mac) in the drop-down menu. This will open the file’s location on your computer.
{“smallUrl”:”https://www.wikihow.com/images/thumb/b/b9/Set-a-Song-As-Your-Ringtone-on-iPhone-Step-11-Version-4.jpg/v4-460px-Set-a-Song-As-Your-Ringtone-on-iPhone-Step-11-Version-4.jpg”,”bigUrl”:”/images/thumb/b/b9/Set-a-Song-As-Your-Ringtone-on-iPhone-Step-11-Version-4.jpg/aid3645120-v4-728px-Set-a-Song-As-Your-Ringtone-on-iPhone-Step-11-Version-4.jpg”,”smallWidth”:460,”smallHeight”:345,”bigWidth”:728,”bigHeight”:546,”licensing”:”<div class=”mw-parser-output”><p>License: <a target=”_blank” rel=”nofollow noreferrer noopener” class=”external text” href=”https://en.wikipedia.org/wiki/Fair_use”>Fair Use</a> (screenshot)<br>n</p></div>”}
11
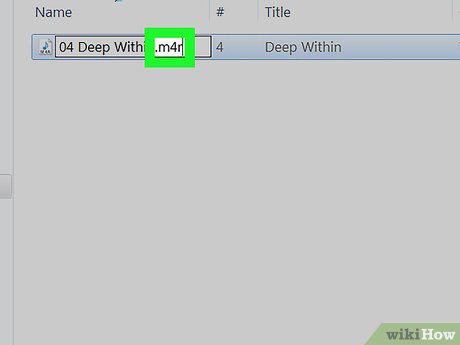
Change the AAC file into an M4R file. This process will vary depending on whether you’re using a PC or a Mac:
Windows – Click the View tab → check the “File name extensions” box if not checked→ click the “.m4a” version of the song to select it → click the Home tab → click Rename → replace m4a with m4r at the end of the song and press Enter → click OK .
Mac – Select the AAC version of the song (the “m4a” version) → click the File menu item → click Get Info in the drop-down menu → change m4a to m4r in the “Name & Extension” section and press ⏎ ReturnUse m4r .
Leave this window open for now.
{“smallUrl”:”https://www.wikihow.com/images/thumb/6/6e/Get-an-iPhone-Out-of-Recovery-Mode-Step-5-Version-4.jpg/v4-460px-Get-an-iPhone-Out-of-Recovery-Mode-Step-5-Version-4.jpg”,”bigUrl”:”/images/thumb/6/6e/Get-an-iPhone-Out-of-Recovery-Mode-Step-5-Version-4.jpg/aid3645120-v4-728px-Get-an-iPhone-Out-of-Recovery-Mode-Step-5-Version-4.jpg”,”smallWidth”:460,”smallHeight”:334,”bigWidth”:728,”bigHeight”:529,”licensing”:”<div class=”mw-parser-output”><p>License: <a target=”_blank” rel=”nofollow noreferrer noopener” class=”external text” href=”https://creativecommons.org/licenses/by-nc-sa/3.0/”>Creative Commons</a><br>n</p><p><br />n</p></div>”}
1
Attach your iPhone to your computer. Plug the USB end of your iPhone’s charging cable into a USB port on your computer, then plug the other end of the cable into the charging port on your iPhone.
{“smallUrl”:”https://www.wikihow.com/images/thumb/3/34/Set-a-Song-As-Your-Ringtone-on-iPhone-Step-13-Version-4.jpg/v4-460px-Set-a-Song-As-Your-Ringtone-on-iPhone-Step-13-Version-4.jpg”,”bigUrl”:”/images/thumb/3/34/Set-a-Song-As-Your-Ringtone-on-iPhone-Step-13-Version-4.jpg/aid3645120-v4-728px-Set-a-Song-As-Your-Ringtone-on-iPhone-Step-13-Version-4.jpg”,”smallWidth”:460,”smallHeight”:342,”bigWidth”:728,”bigHeight”:541,”licensing”:”<div class=”mw-parser-output”><p>License: <a target=”_blank” rel=”nofollow noreferrer noopener” class=”external text” href=”https://en.wikipedia.org/wiki/Fair_use”>Fair Use</a> (screenshot)<br>n</p></div>”}
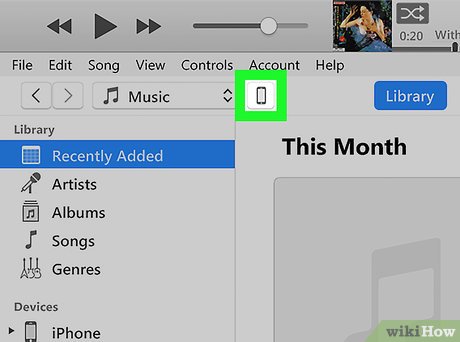
2
Open your iPhone in iTunes or Finder. If you’re using iTunes, click the iPhone icon/button in the upper-left corner of iTunes to display your iPhone’s contents. If you’re using macOS Catalina or later, open a new Finder window by clicking the two-toned smiley face icon on the Dock, and then click your iPhone under “Locations” in the left panel.
{“smallUrl”:”https://www.wikihow.com/images/thumb/a/a0/Set-a-Song-As-Your-Ringtone-on-iPhone-Step-14-Version-5.jpg/v4-460px-Set-a-Song-As-Your-Ringtone-on-iPhone-Step-14-Version-5.jpg”,”bigUrl”:”/images/thumb/a/a0/Set-a-Song-As-Your-Ringtone-on-iPhone-Step-14-Version-5.jpg/aid3645120-v4-728px-Set-a-Song-As-Your-Ringtone-on-iPhone-Step-14-Version-5.jpg”,”smallWidth”:460,”smallHeight”:345,”bigWidth”:728,”bigHeight”:546,”licensing”:”<div class=”mw-parser-output”><p>License: <a target=”_blank” rel=”nofollow noreferrer noopener” class=”external text” href=”https://en.wikipedia.org/wiki/Fair_use”>Fair Use</a> (screenshot)<br>n</p></div>”}
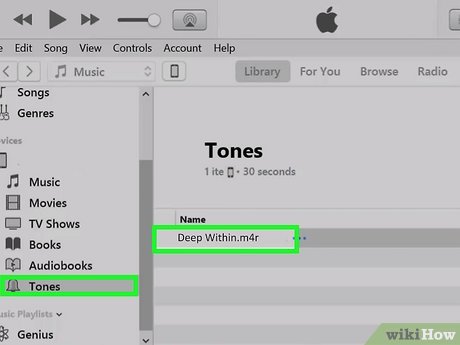
3
Drag the M4R file to your iPhone. If you’re using iTunes and see a folder on your iPhone called Tones in the left panel, you can drag the file right to that folder. If you don’t see this folder, just drag the file to the right panel in iTunes or Finder will transfer the file to your iPhone.
{“smallUrl”:”https://www.wikihow.com/images/thumb/e/ee/Set-a-Song-As-Your-Ringtone-on-iPhone-Step-16-Version-4.jpg/v4-460px-Set-a-Song-As-Your-Ringtone-on-iPhone-Step-16-Version-4.jpg”,”bigUrl”:”/images/thumb/e/ee/Set-a-Song-As-Your-Ringtone-on-iPhone-Step-16-Version-4.jpg/aid3645120-v4-728px-Set-a-Song-As-Your-Ringtone-on-iPhone-Step-16-Version-4.jpg”,”smallWidth”:460,”smallHeight”:345,”bigWidth”:728,”bigHeight”:546,”licensing”:”<div class=”mw-parser-output”><p>License: <a target=”_blank” rel=”nofollow noreferrer noopener” class=”external text” href=”https://en.wikipedia.org/wiki/Fair_use”>Fair Use</a> (screenshot)<br>n</p></div>”}
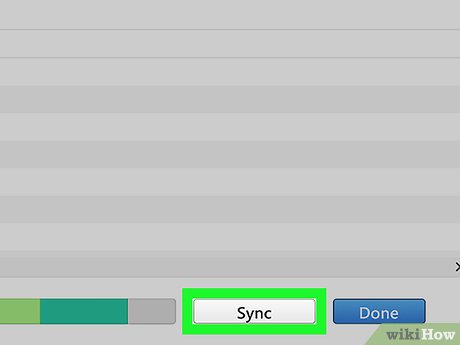
4
Click Sync It’s a white button in the bottom-right side of the iTunes window. Once your iPhone is finished syncing, you can walk away from your computer and complete the remaining steps on your iPhone.
{“smallUrl”:”https://www.wikihow.com/images/thumb/2/21/Set-a-Song-As-Your-Ringtone-on-iPhone-Step-18-Version-3.jpg/v4-460px-Set-a-Song-As-Your-Ringtone-on-iPhone-Step-18-Version-3.jpg”,”bigUrl”:”/images/thumb/2/21/Set-a-Song-As-Your-Ringtone-on-iPhone-Step-18-Version-3.jpg/aid3645120-v4-728px-Set-a-Song-As-Your-Ringtone-on-iPhone-Step-18-Version-3.jpg”,”smallWidth”:460,”smallHeight”:345,”bigWidth”:728,”bigHeight”:546,”licensing”:”<div class=”mw-parser-output”><p>License: <a target=”_blank” rel=”nofollow noreferrer noopener” class=”external text” href=”https://en.wikipedia.org/wiki/Fair_use”>Fair Use</a> (screenshot)<br>n</p></div>”}
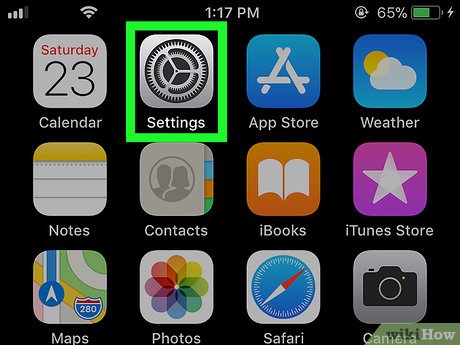
1
Open your iPhone’s Settings
{“smallUrl”:”https://www.wikihow.com/images/7/7e/Iphonesettingsappicon.png”,”bigUrl”:”/images/thumb/7/7e/Iphonesettingsappicon.png/30px-Iphonesettingsappicon.png”,”smallWidth”:460,”smallHeight”:460,”bigWidth”:30,”bigHeight”:30,”licensing”:”<div class=”mw-parser-output”><p>I edited this screenshot of an iPhone icon.n</p><p>License: <a target=”_blank” rel=”nofollow noreferrer noopener” class=”external text” href=”http://en.wikipedia.org/wiki/Fair_use”>Fair Use</a><br>n</p></div>”}
. Tap the grey app with gears on it to do so.
{“smallUrl”:”https://www.wikihow.com/images/thumb/b/b2/Set-a-Song-As-Your-Ringtone-on-iPhone-Step-19-Version-3.jpg/v4-460px-Set-a-Song-As-Your-Ringtone-on-iPhone-Step-19-Version-3.jpg”,”bigUrl”:”/images/thumb/b/b2/Set-a-Song-As-Your-Ringtone-on-iPhone-Step-19-Version-3.jpg/aid3645120-v4-728px-Set-a-Song-As-Your-Ringtone-on-iPhone-Step-19-Version-3.jpg”,”smallWidth”:460,”smallHeight”:345,”bigWidth”:728,”bigHeight”:546,”licensing”:”<div class=”mw-parser-output”><p>License: <a target=”_blank” rel=”nofollow noreferrer noopener” class=”external text” href=”https://en.wikipedia.org/wiki/Fair_use”>Fair Use</a> (screenshot)<br>n</p></div>”}
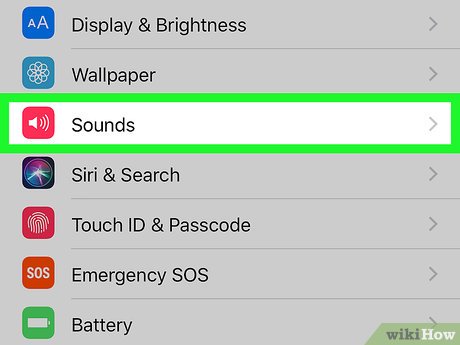
2
Scroll down and tap Sounds & Haptics It’s in the same group of settings as the
{“smallUrl”:”https://www.wikihow.com/images/3/36/Iphonesettingsgeneralicon.png”,”bigUrl”:”/images/thumb/3/36/Iphonesettingsgeneralicon.png/30px-Iphonesettingsgeneralicon.png”,”smallWidth”:460,”smallHeight”:460,”bigWidth”:30,”bigHeight”:30,”licensing”:”<div class=”mw-parser-output”><p>I edited this screenshot of an iPhone iconn</p><p>License: <a target=”_blank” rel=”nofollow noreferrer noopener” class=”external text” href=”http://en.wikipedia.org/wiki/Fair_use”>Fair Use</a><br>n</p></div>”}
General option.
On the iPhone 6S and earlier, you’ll just tap Sounds here.
{“smallUrl”:”https://www.wikihow.com/images/thumb/a/ac/Set-a-Song-As-Your-Ringtone-on-iPhone-Step-20-Version-3.jpg/v4-460px-Set-a-Song-As-Your-Ringtone-on-iPhone-Step-20-Version-3.jpg”,”bigUrl”:”/images/thumb/a/ac/Set-a-Song-As-Your-Ringtone-on-iPhone-Step-20-Version-3.jpg/aid3645120-v4-728px-Set-a-Song-As-Your-Ringtone-on-iPhone-Step-20-Version-3.jpg”,”smallWidth”:460,”smallHeight”:345,”bigWidth”:728,”bigHeight”:546,”licensing”:”<div class=”mw-parser-output”><p>License: <a target=”_blank” rel=”nofollow noreferrer noopener” class=”external text” href=”https://en.wikipedia.org/wiki/Fair_use”>Fair Use</a> (screenshot)<br>n</p></div>”}
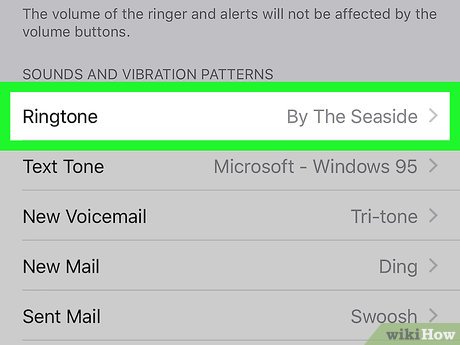
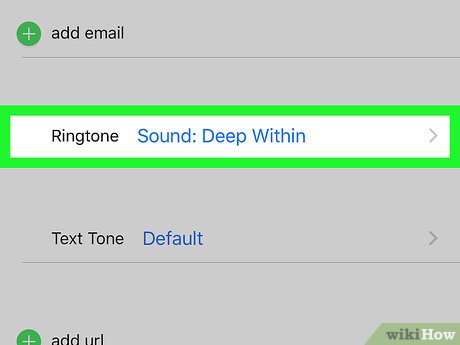
3
Tap Ringtone This option is directly below the “SOUNDS AND VIBRATION PATTERNS” heading in the middle of the page.
{“smallUrl”:”https://www.wikihow.com/images/thumb/c/c6/Set-a-Song-As-Your-Ringtone-on-iPhone-Step-21-Version-3.jpg/v4-460px-Set-a-Song-As-Your-Ringtone-on-iPhone-Step-21-Version-3.jpg”,”bigUrl”:”/images/thumb/c/c6/Set-a-Song-As-Your-Ringtone-on-iPhone-Step-21-Version-3.jpg/aid3645120-v4-728px-Set-a-Song-As-Your-Ringtone-on-iPhone-Step-21-Version-3.jpg”,”smallWidth”:460,”smallHeight”:345,”bigWidth”:728,”bigHeight”:546,”licensing”:”<div class=”mw-parser-output”><p>License: <a target=”_blank” rel=”nofollow noreferrer noopener” class=”external text” href=”https://en.wikipedia.org/wiki/Fair_use”>Fair Use</a> (screenshot)<br>n</p></div>”}
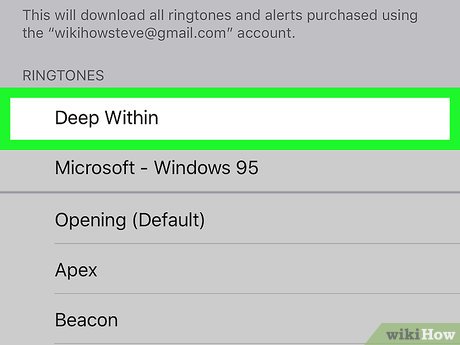
4
Tap your ringtone’s name. In the “RINGTONES” section, tap the name of the ringtone that you want to set as your phone’s default ringtone. You should see a blue checkmark appear to the left of it, signifying that your phone will use your custom ringtone for all incoming calls.
{“smallUrl”:”https://www.wikihow.com/images/thumb/1/11/Set-a-Song-As-Your-Ringtone-on-iPhone-Step-22-Version-3.jpg/v4-460px-Set-a-Song-As-Your-Ringtone-on-iPhone-Step-22-Version-3.jpg”,”bigUrl”:”/images/thumb/1/11/Set-a-Song-As-Your-Ringtone-on-iPhone-Step-22-Version-3.jpg/aid3645120-v4-728px-Set-a-Song-As-Your-Ringtone-on-iPhone-Step-22-Version-3.jpg”,”smallWidth”:460,”smallHeight”:345,”bigWidth”:728,”bigHeight”:546,”licensing”:”<div class=”mw-parser-output”><p>License: <a target=”_blank” rel=”nofollow noreferrer noopener” class=”external text” href=”https://en.wikipedia.org/wiki/Fair_use”>Fair Use</a> (screenshot)<br>n</p></div>”}
5
Set your new ringtone for a specific contact. If you’d rather set the ringtone for a specific contact, do the following:
Open the Contacts app.
Tap a contact’s name.
Tap Ringtone
Select the ringtone.
Tap Done
Make sure that your phone is set to ring audibly if you want to hear your new ringtone.
Thanks for submitting a tip for review!
The “Tones” page in iTunes won’t appear unless your phone is connected to your computer.
[ad_2]


