Peel the adhesive backing off of the light strip and firmly press it against the surface to install it.
Cut off the excess LED strip where you see the 2-4 gold pins or the scissors logo.
Plug the strips in and use the control box to manually turn them on.
If you have customizable, addressable strips, download the LED manufacturer’s app and connect to the lights via Bluetooth to control them.
Steps
Method 1
Method 1 of 3:
Placing Adhesive Strip Lights
{“smallUrl”:”https://www.wikihow.com/images/thumb/5/50/Install-LED-Strip-Lighting-Step-10-Version-3.jpg/v4-460px-Install-LED-Strip-Lighting-Step-10-Version-3.jpg”,”bigUrl”:”/images/thumb/5/50/Install-LED-Strip-Lighting-Step-10-Version-3.jpg/v4-728px-Install-LED-Strip-Lighting-Step-10-Version-3.jpg”,”smallWidth”:460,”smallHeight”:345,”bigWidth”:728,”bigHeight”:546,”licensing”:”<div class=”mw-parser-output”><p>u00a9 2023 wikiHow, Inc. All rights reserved. wikiHow, Inc. is the copyright holder of this image under U.S. and international copyright laws. This image is <b>not</b> licensed under the Creative Commons license applied to text content and some other images posted to the wikiHow website. This image may not be used by other entities without the express written consent of wikiHow, Inc.<br>n</p><p><br />n</p></div>”}
1
Measure how long the strip needs to be and purchase your lights. Take a rough estimate of how much LED lighting you’re going to need. If you’re going to install LED lighting in different locations, measure each spot so you are able to cut the lighting to size later. Then, buy enough strip lighting to completely cover the entire length.[1] X Research source
Govee and Phillips Hue are likely the most popular brands of strip lighting, and with good reason. Both companies make Bluetooth-controlled RGB (red green blue) lights that are completely customizable. You can even sync multiple strips to match one another.
Micomlan makes inexpensive strip lighting that syncs with music! If the lights will be anywhere near moisture or outside, go waterproof. Hitlights makes a great option.
If you want something thicker and bolder than the thin light strips, Corsair makes some fascinating strip lights.
If you only want plain white LEDs, save yourself some money by skipping the addressable RGB lights.
{“smallUrl”:”https://www.wikihow.com/images/thumb/3/3f/Install-LED-Strip-Lighting-Step-2-Version-5.jpg/v4-460px-Install-LED-Strip-Lighting-Step-2-Version-5.jpg”,”bigUrl”:”/images/thumb/3/3f/Install-LED-Strip-Lighting-Step-2-Version-5.jpg/v4-728px-Install-LED-Strip-Lighting-Step-2-Version-5.jpg”,”smallWidth”:460,”smallHeight”:345,”bigWidth”:728,”bigHeight”:546,”licensing”:”<div class=”mw-parser-output”><p>u00a9 2023 wikiHow, Inc. All rights reserved. wikiHow, Inc. is the copyright holder of this image under U.S. and international copyright laws. This image is <b>not</b> licensed under the Creative Commons license applied to text content and some other images posted to the wikiHow website. This image may not be used by other entities without the express written consent of wikiHow, Inc.<br>n</p><p><br />n</p></div>”}
2
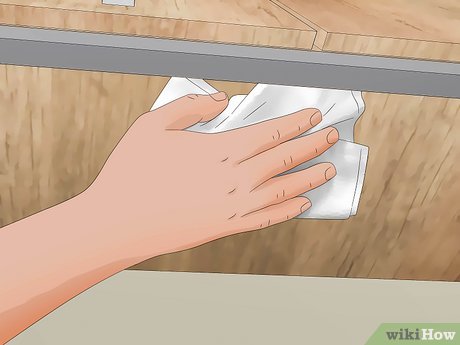
Clean and dry the installation surface. Grab a clean cloth and thoroughly wipe the area where you’re going to install the strip lights. Use soap, water, or vinegar as needed to remove any residue or dirt. Thoroughly dry the area if it’s wet. This will ensure that the adhesive strip sticks permanently and smoothly.[2] X Research source
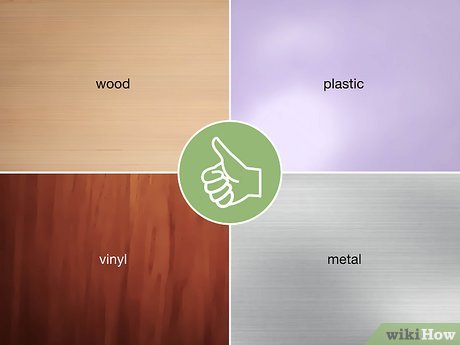
You can install strip lighting on wood, plastic, metal, or vinyl. Basically, any smooth surface will work.
{“smallUrl”:”https://www.wikihow.com/images/thumb/b/b7/Install-LED-Strip-Lighting-Step-2Bullet1.jpg/v4-460px-Install-LED-Strip-Lighting-Step-2Bullet1.jpg”,”bigUrl”:”/images/thumb/b/b7/Install-LED-Strip-Lighting-Step-2Bullet1.jpg/v4-728px-Install-LED-Strip-Lighting-Step-2Bullet1.jpg”,”smallWidth”:460,”smallHeight”:345,”bigWidth”:728,”bigHeight”:546,”licensing”:”<div class=”mw-parser-output”><p>u00a9 2023 wikiHow, Inc. All rights reserved. wikiHow, Inc. is the copyright holder of this image under U.S. and international copyright laws. This image is <b>not</b> licensed under the Creative Commons license applied to text content and some other images posted to the wikiHow website. This image may not be used by other entities without the express written consent of wikiHow, Inc.<br>n</p><p><br />n</p></div>”}
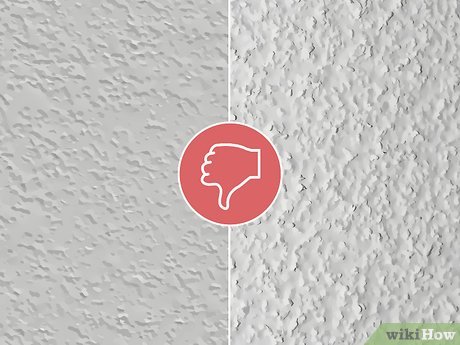
Do not install strip lighting on textured surfaces, like orange peel or painted drywall. The adhesive will peel off over time.
{“smallUrl”:”https://www.wikihow.com/images/thumb/3/3f/Install-LED-Strip-Lighting-Step-2Bullet2.jpg/v4-460px-Install-LED-Strip-Lighting-Step-2Bullet2.jpg”,”bigUrl”:”/images/thumb/3/3f/Install-LED-Strip-Lighting-Step-2Bullet2.jpg/v4-728px-Install-LED-Strip-Lighting-Step-2Bullet2.jpg”,”smallWidth”:460,”smallHeight”:345,”bigWidth”:728,”bigHeight”:546,”licensing”:”<div class=”mw-parser-output”><p>u00a9 2023 wikiHow, Inc. All rights reserved. wikiHow, Inc. is the copyright holder of this image under U.S. and international copyright laws. This image is <b>not</b> licensed under the Creative Commons license applied to text content and some other images posted to the wikiHow website. This image may not be used by other entities without the express written consent of wikiHow, Inc.<br>n</p><p><br />n</p></div>”}
{“smallUrl”:”https://www.wikihow.com/images/thumb/f/fc/Install-LED-Strip-Lighting-Step-3-Version-6.jpg/v4-460px-Install-LED-Strip-Lighting-Step-3-Version-6.jpg”,”bigUrl”:”/images/thumb/f/fc/Install-LED-Strip-Lighting-Step-3-Version-6.jpg/v4-728px-Install-LED-Strip-Lighting-Step-3-Version-6.jpg”,”smallWidth”:460,”smallHeight”:345,”bigWidth”:728,”bigHeight”:546,”licensing”:”<div class=”mw-parser-output”><p>u00a9 2023 wikiHow, Inc. All rights reserved. wikiHow, Inc. is the copyright holder of this image under U.S. and international copyright laws. This image is <b>not</b> licensed under the Creative Commons license applied to text content and some other images posted to the wikiHow website. This image may not be used by other entities without the express written consent of wikiHow, Inc.<br>n</p><p><br />n</p></div>”}
3
Peel the backing off of the adhesive strip like a sticker. Unpack your strips if you haven’t already, but do not unravel the strip—keep it in the round spool. Undo the very end of the spool and peel the backing off of the first 6–18 inches (15–46 cm) depending on how much you’d like to start with.[3] X Research source
The light strips come in a single piece, but it can be kind of awkward to stick big sections all at once. Undoing and reapplying the adhesive will make it less effective, so don’t rush it!
{“smallUrl”:”https://www.wikihow.com/images/thumb/3/34/Install-LED-Strip-Lighting-Step-4-Version-6.jpg/v4-460px-Install-LED-Strip-Lighting-Step-4-Version-6.jpg”,”bigUrl”:”/images/thumb/3/34/Install-LED-Strip-Lighting-Step-4-Version-6.jpg/v4-728px-Install-LED-Strip-Lighting-Step-4-Version-6.jpg”,”smallWidth”:460,”smallHeight”:345,”bigWidth”:728,”bigHeight”:546,”licensing”:”<div class=”mw-parser-output”><p>u00a9 2023 wikiHow, Inc. All rights reserved. wikiHow, Inc. is the copyright holder of this image under U.S. and international copyright laws. This image is <b>not</b> licensed under the Creative Commons license applied to text content and some other images posted to the wikiHow website. This image may not be used by other entities without the express written consent of wikiHow, Inc.<br>n</p><p><br />n</p></div>”}
4
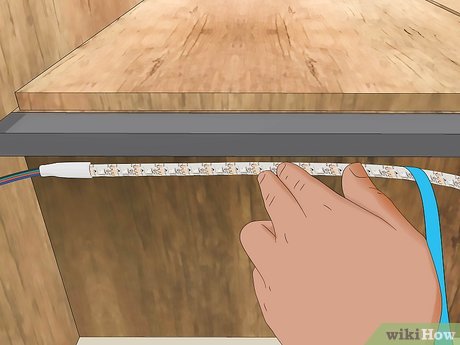
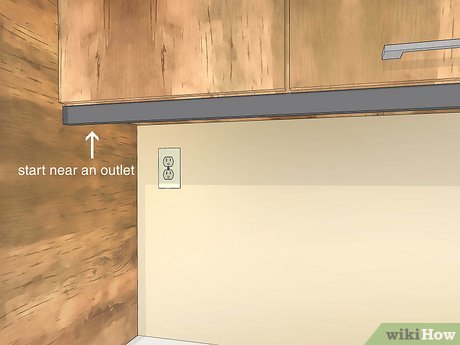
Apply the strip lights to the surface. Map out where you’ll plug the strip in and start there. Line the first section of the strip up carefully and press it against the wall, desk, cabinet, or surface you’re installing the lights on. Smooth the strip down by hand and firmly apply pressure to the section.[4] X Research source
You can use an extension cord if you need to, but it’ll be easier if you just start close to the outlet you want to use.
{“smallUrl”:”https://www.wikihow.com/images/thumb/2/2d/Install-LED-Strip-Lighting-Step-4Bullet1.jpg/v4-460px-Install-LED-Strip-Lighting-Step-4Bullet1.jpg”,”bigUrl”:”/images/thumb/2/2d/Install-LED-Strip-Lighting-Step-4Bullet1.jpg/v4-728px-Install-LED-Strip-Lighting-Step-4Bullet1.jpg”,”smallWidth”:460,”smallHeight”:345,”bigWidth”:728,”bigHeight”:546,”licensing”:”<div class=”mw-parser-output”><p>u00a9 2023 wikiHow, Inc. All rights reserved. wikiHow, Inc. is the copyright holder of this image under U.S. and international copyright laws. This image is <b>not</b> licensed under the Creative Commons license applied to text content and some other images posted to the wikiHow website. This image may not be used by other entities without the express written consent of wikiHow, Inc.<br>n</p><p><br />n</p></div>”}
Don’t worry if there’s a minor bend or gap. So long as the vast majority of the strip is sticking to a clean surface, it’ll stay in place.
{“smallUrl”:”https://www.wikihow.com/images/thumb/f/f0/Install-LED-Strip-Lighting-Step-5-Version-6.jpg/v4-460px-Install-LED-Strip-Lighting-Step-5-Version-6.jpg”,”bigUrl”:”/images/thumb/f/f0/Install-LED-Strip-Lighting-Step-5-Version-6.jpg/v4-728px-Install-LED-Strip-Lighting-Step-5-Version-6.jpg”,”smallWidth”:460,”smallHeight”:345,”bigWidth”:728,”bigHeight”:546,”licensing”:”<div class=”mw-parser-output”><p>u00a9 2023 wikiHow, Inc. All rights reserved. wikiHow, Inc. is the copyright holder of this image under U.S. and international copyright laws. This image is <b>not</b> licensed under the Creative Commons license applied to text content and some other images posted to the wikiHow website. This image may not be used by other entities without the express written consent of wikiHow, Inc.<br>n</p><p><br />n</p></div>”}
5
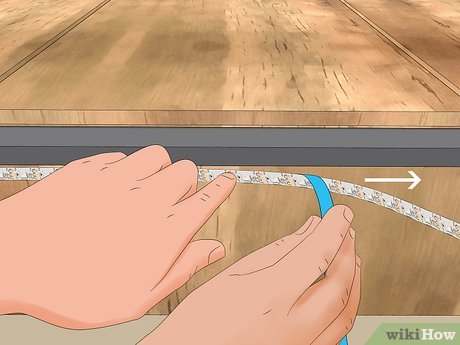
Continue to peel off more backing and cover the entire area. Continue to unravel more of the reel and peel off more of the backing. Press each section of the strip lighting into the surface and apply firm pressure. Keep the lights as straight as possible and work slowly. Pay special attention to any corners you need to work around and take your time.[5] X Research source
If you need to work your way around a corner, go slowly and do your best to fully press the strip’s adhesive into the joint where the edges meet. It’s okay if it isn’t perfect, it’ll still stick.
If you find yourself sort of falling off track with the strip, just gently push it back to the center line where you’re installing the lights. This stuff tends to be pretty forgiving to work with.
{“smallUrl”:”https://www.wikihow.com/images/thumb/f/f9/Install-LED-Strip-Lighting-Step-6-Version-3.jpg/v4-460px-Install-LED-Strip-Lighting-Step-6-Version-3.jpg”,”bigUrl”:”/images/thumb/f/f9/Install-LED-Strip-Lighting-Step-6-Version-3.jpg/v4-728px-Install-LED-Strip-Lighting-Step-6-Version-3.jpg”,”smallWidth”:460,”smallHeight”:345,”bigWidth”:728,”bigHeight”:546,”licensing”:”<div class=”mw-parser-output”><p>u00a9 2023 wikiHow, Inc. All rights reserved. wikiHow, Inc. is the copyright holder of this image under U.S. and international copyright laws. This image is <b>not</b> licensed under the Creative Commons license applied to text content and some other images posted to the wikiHow website. This image may not be used by other entities without the express written consent of wikiHow, Inc.<br>n</p><p><br />n</p></div>”}
6
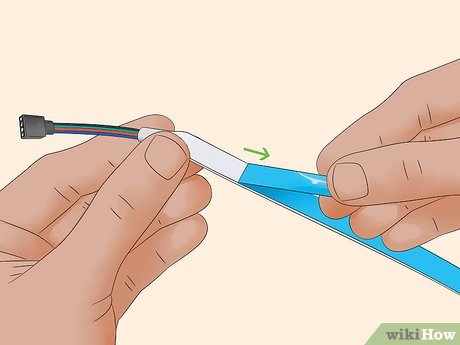
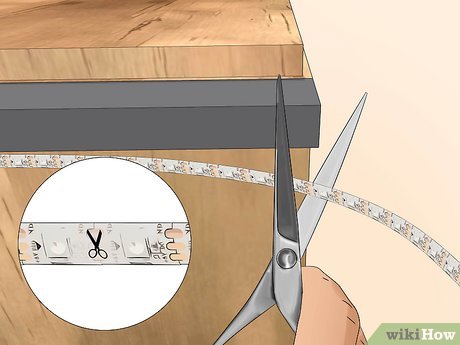
Clip off the excess strip lighting with scissors. Refer to your strip lighting’s manual to determine where you should cut to avoid damaging the lights. Typically, there are gold threads or scissor marks every 2–3 inches (5.1–7.6 cm) where you can safely trim the lights. Snip off the extra light sections and discard them.[6] X Research source
{“smallUrl”:”https://www.wikihow.com/images/thumb/1/17/Install-LED-Strip-Lighting-Step-7-Version-3.jpg/v4-460px-Install-LED-Strip-Lighting-Step-7-Version-3.jpg”,”bigUrl”:”/images/thumb/1/17/Install-LED-Strip-Lighting-Step-7-Version-3.jpg/v4-728px-Install-LED-Strip-Lighting-Step-7-Version-3.jpg”,”smallWidth”:460,”smallHeight”:345,”bigWidth”:728,”bigHeight”:546,”licensing”:”<div class=”mw-parser-output”><p>u00a9 2023 wikiHow, Inc. All rights reserved. wikiHow, Inc. is the copyright holder of this image under U.S. and international copyright laws. This image is <b>not</b> licensed under the Creative Commons license applied to text content and some other images posted to the wikiHow website. This image may not be used by other entities without the express written consent of wikiHow, Inc.<br>n</p><p><br />n</p></div>”}
7
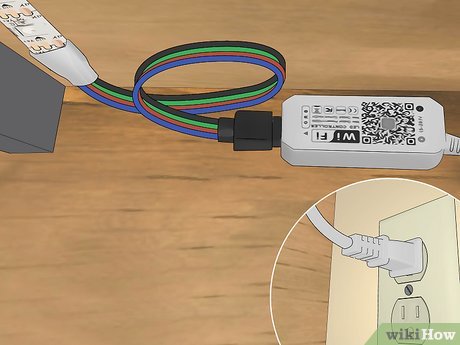
Plug in the LED strips and hang the controller. Plug the power brick that came with the light strips into the outlet. Finally, peel off the adhesive backing of the controller unit and stick it to a surface. If it’s going to rest on a surface (like inside of a cabinet or on an end table), go ahead and let it sit free.[7] X Research source
If you don’t want the controller to be visible, stick it somewhere inconspicuous.
Method 2
Method 2 of 3:
Connecting and Covering the Light Strips
{“smallUrl”:”https://www.wikihow.com/images/thumb/d/df/Install-LED-Strip-Lighting-Step-8-Version-4.jpg/v4-460px-Install-LED-Strip-Lighting-Step-8-Version-4.jpg”,”bigUrl”:”/images/thumb/d/df/Install-LED-Strip-Lighting-Step-8-Version-4.jpg/v4-728px-Install-LED-Strip-Lighting-Step-8-Version-4.jpg”,”smallWidth”:460,”smallHeight”:345,”bigWidth”:728,”bigHeight”:546,”licensing”:”<div class=”mw-parser-output”><p>u00a9 2023 wikiHow, Inc. All rights reserved. wikiHow, Inc. is the copyright holder of this image under U.S. and international copyright laws. This image is <b>not</b> licensed under the Creative Commons license applied to text content and some other images posted to the wikiHow website. This image may not be used by other entities without the express written consent of wikiHow, Inc.<br>n</p><p><br />n</p></div>”}
1
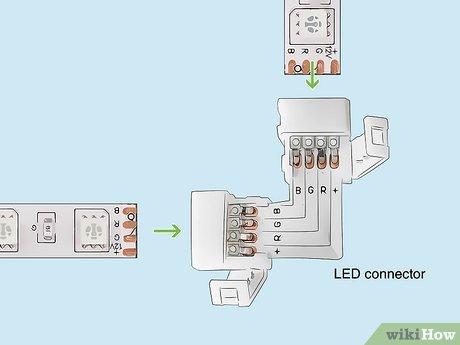
Use 4-pin LED connectors to craft perfect 90-degree angles. If you want to perfectly work your way under a bedframe or around the back of a TV or computer monitor, pick up 4-pin connectors. Clip the strip at the junction and slide the connector into the end of the strip. Clip another portion of strip lighting and stick it into the other end of the connector to join the strips.[8] X Research source
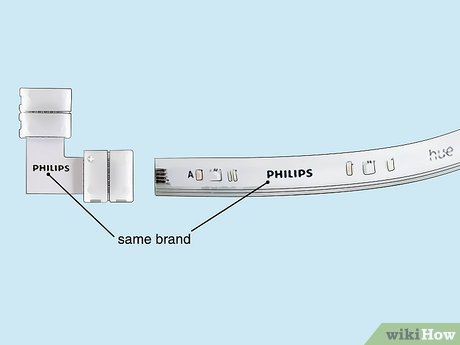
These connectors are not universal, so only purchase connectors from the company that made your strip lights.
{“smallUrl”:”https://www.wikihow.com/images/thumb/8/85/Install-LED-Strip-Lighting-Step-8Bullet1.jpg/v4-460px-Install-LED-Strip-Lighting-Step-8Bullet1.jpg”,”bigUrl”:”/images/thumb/8/85/Install-LED-Strip-Lighting-Step-8Bullet1.jpg/v4-728px-Install-LED-Strip-Lighting-Step-8Bullet1.jpg”,”smallWidth”:460,”smallHeight”:345,”bigWidth”:728,”bigHeight”:546,”licensing”:”<div class=”mw-parser-output”><p>u00a9 2023 wikiHow, Inc. All rights reserved. wikiHow, Inc. is the copyright holder of this image under U.S. and international copyright laws. This image is <b>not</b> licensed under the Creative Commons license applied to text content and some other images posted to the wikiHow website. This image may not be used by other entities without the express written consent of wikiHow, Inc.<br>n</p><p><br />n</p></div>”}
{“smallUrl”:”https://www.wikihow.com/images/thumb/d/db/Install-LED-Strip-Lighting-Step-9-Version-2.jpg/v4-460px-Install-LED-Strip-Lighting-Step-9-Version-2.jpg”,”bigUrl”:”/images/thumb/d/db/Install-LED-Strip-Lighting-Step-9-Version-2.jpg/v4-728px-Install-LED-Strip-Lighting-Step-9-Version-2.jpg”,”smallWidth”:460,”smallHeight”:345,”bigWidth”:728,”bigHeight”:546,”licensing”:”<div class=”mw-parser-output”><p>u00a9 2023 wikiHow, Inc. All rights reserved. wikiHow, Inc. is the copyright holder of this image under U.S. and international copyright laws. This image is <b>not</b> licensed under the Creative Commons license applied to text content and some other images posted to the wikiHow website. This image may not be used by other entities without the express written consent of wikiHow, Inc.<br>n</p><p><br />n</p></div>”}
2
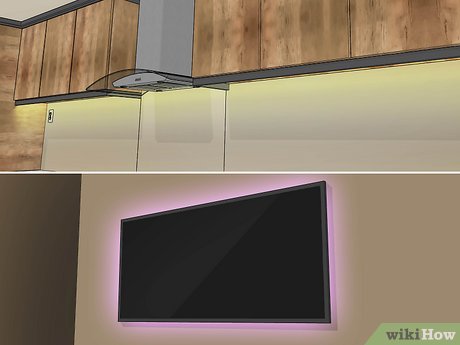
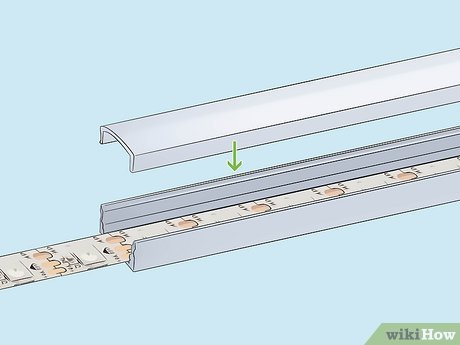
Install a LED diffusion cover if the lights are visible. If you aren’t using LED light strips for bias lighting or backlighting and the strips are visible, you may be a little off-put by the visible nodes on the strip. If you want a clean, uniform light, purchase diffusion covers and install them on top of the lights. The cover will evenly spread the light out where you installed the strip and disguise the individual LED bulbs.[9] X Research source
For most LED diffusers, you install an adhesive track then put your LED lights inside and pop the diffusion cover into the track. Some of them are adhesive strips that lay directly over the lights on the surface.
You 100% do not need diffusers if you’re using the strips for bias/backlighting. The nodes are only noticeable if they’re exposed.
{“smallUrl”:”https://www.wikihow.com/images/thumb/e/e0/Install-LED-Strip-Lighting-Step-10Bullet1.jpg/v4-460px-Install-LED-Strip-Lighting-Step-10Bullet1.jpg”,”bigUrl”:”/images/thumb/e/e0/Install-LED-Strip-Lighting-Step-10Bullet1.jpg/v4-728px-Install-LED-Strip-Lighting-Step-10Bullet1.jpg”,”smallWidth”:460,”smallHeight”:345,”bigWidth”:728,”bigHeight”:546,”licensing”:”<div class=”mw-parser-output”><p>u00a9 2023 wikiHow, Inc. All rights reserved. wikiHow, Inc. is the copyright holder of this image under U.S. and international copyright laws. This image is <b>not</b> licensed under the Creative Commons license applied to text content and some other images posted to the wikiHow website. This image may not be used by other entities without the express written consent of wikiHow, Inc.<br>n</p><p><br />n</p></div>”}
3
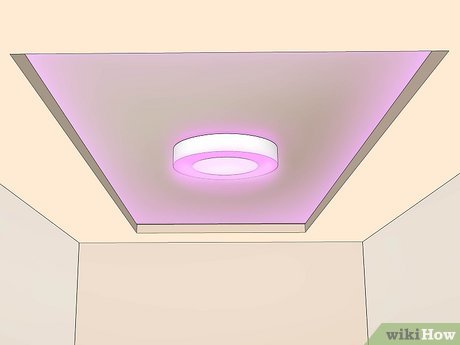
Use multiple strips throughout your home for a unified look. Want to give your entire home a lighting upgrade? Purchase multiple strips from the same company and install them throughout the house. You might put them under cabinets, under bed frames, behind desks, or behind TVs. Then, use the lighting company’s app to sync all of the lights together. Trust us, it’ll be beautiful![10] X Research source
{“smallUrl”:”https://www.wikihow.com/images/thumb/8/84/Install-LED-Strip-Lighting-Step-11-Version-3.jpg/v4-460px-Install-LED-Strip-Lighting-Step-11-Version-3.jpg”,”bigUrl”:”/images/thumb/8/84/Install-LED-Strip-Lighting-Step-11-Version-3.jpg/v4-728px-Install-LED-Strip-Lighting-Step-11-Version-3.jpg”,”smallWidth”:460,”smallHeight”:345,”bigWidth”:728,”bigHeight”:546,”licensing”:”<div class=”mw-parser-output”><p>u00a9 2023 wikiHow, Inc. All rights reserved. wikiHow, Inc. is the copyright holder of this image under U.S. and international copyright laws. This image is <b>not</b> licensed under the Creative Commons license applied to text content and some other images posted to the wikiHow website. This image may not be used by other entities without the express written consent of wikiHow, Inc.<br>n</p><p><br />n</p></div>”}
1
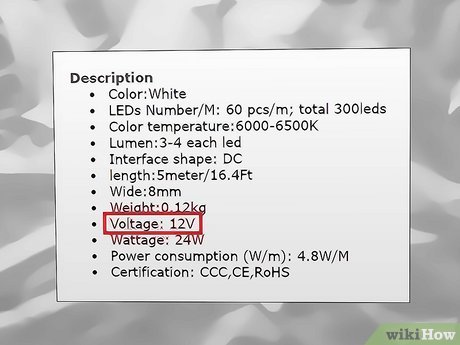
Check the LEDs to see what kind of voltage your lights require. Look at the product label on the LED strips or on the website if you’re purchasing them online. LEDs are either 12V or 24V. To keep your LEDs running long-term, you have to have a matching power supply. Otherwise, the LEDs won’t have enough power to operate.[11] X Research source
If you’re planning on using multiple strips or cutting LEDs into smaller strips, you can generally wire them to the same power source.
{“smallUrl”:”https://www.wikihow.com/images/thumb/6/67/Install-LED-Strip-Lighting-Step-12-Version-3.jpg/v4-460px-Install-LED-Strip-Lighting-Step-12-Version-3.jpg”,”bigUrl”:”/images/thumb/6/67/Install-LED-Strip-Lighting-Step-12-Version-3.jpg/v4-728px-Install-LED-Strip-Lighting-Step-12-Version-3.jpg”,”smallWidth”:460,”smallHeight”:345,”bigWidth”:728,”bigHeight”:546,”licensing”:”<div class=”mw-parser-output”><p>u00a9 2023 wikiHow, Inc. All rights reserved. wikiHow, Inc. is the copyright holder of this image under U.S. and international copyright laws. This image is <b>not</b> licensed under the Creative Commons license applied to text content and some other images posted to the wikiHow website. This image may not be used by other entities without the express written consent of wikiHow, Inc.<br>n</p><p><br />n</p></div>”}
2
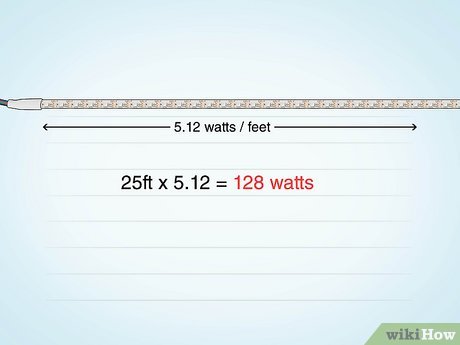
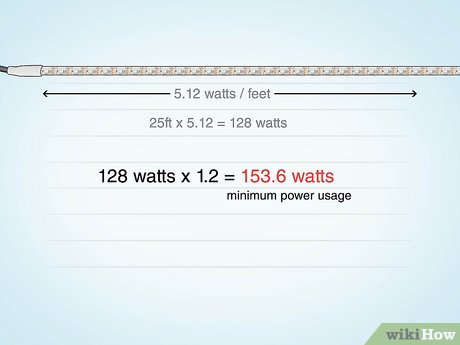
Determine the maximum power consumption of the LED strips. Each LED light strip consumes a specific amount of wattage, or electrical power. It all depends on how long the strip is. Check the product label to see how many watts per 1 ft (0.30 m) the lighting uses. Then, multiply the watts by the total distance of the strip you plan on installing.[12] X Research source
For example, if you’re installing a 25 ft (7.6 m) length of lighting that requires 5.12 watts per foot: 25 watts x 3 ft = 128 watts total.
Remember that the measurement will vary depending on where you live. Check carefully to see if it’s watts per meter or watts per foot.
If the product label lists the total wattage, divide it by the total number of feet or meters in the reel. For example, if the strip is 5 ft (1.5 m) long at 24-watts: 24 / 5 = 4.8 watts per foot.
{“smallUrl”:”https://www.wikihow.com/images/thumb/e/ef/Install-LED-Strip-Lighting-Step-13-Version-3.jpg/v4-460px-Install-LED-Strip-Lighting-Step-13-Version-3.jpg”,”bigUrl”:”/images/thumb/e/ef/Install-LED-Strip-Lighting-Step-13-Version-3.jpg/v4-728px-Install-LED-Strip-Lighting-Step-13-Version-3.jpg”,”smallWidth”:460,”smallHeight”:345,”bigWidth”:728,”bigHeight”:546,”licensing”:”<div class=”mw-parser-output”><p>u00a9 2023 wikiHow, Inc. All rights reserved. wikiHow, Inc. is the copyright holder of this image under U.S. and international copyright laws. This image is <b>not</b> licensed under the Creative Commons license applied to text content and some other images posted to the wikiHow website. This image may not be used by other entities without the express written consent of wikiHow, Inc.<br>n</p><p><br />n</p></div>”}
3
Multiply the power consumption by 1.2 to figure out the minimum power rating. The result will tell you how strong your power supply has to be in order to keep the LEDs powered. Since the LEDs may use a little more power than you anticipate, add an extra 20 percent to the total and treat it as your minimum. That way, the power available will never dip below what the LEDs require.[13] X Research source
For example, using a 25 ft (7.6 m) strip: 128 total watts x 1.2 = 153.6 watts. The power supply should offer at least 153.6 watts, or else the lights won’t work.
Add 20% to the estimate to ensure the lights stay on: 153.6 watts x 20% = 30.72 watts. Then, 153.6 watts + 30.72 watts = 184.32 total watts.
Many online retailers have a handy calculator you can take advantage of to ensure you get a compatible power supply.
{“smallUrl”:”https://www.wikihow.com/images/thumb/4/42/Install-LED-Strip-Lighting-Step-14-Version-2.jpg/v4-460px-Install-LED-Strip-Lighting-Step-14-Version-2.jpg”,”bigUrl”:”/images/thumb/4/42/Install-LED-Strip-Lighting-Step-14-Version-2.jpg/v4-728px-Install-LED-Strip-Lighting-Step-14-Version-2.jpg”,”smallWidth”:460,”smallHeight”:345,”bigWidth”:728,”bigHeight”:546,”licensing”:”<div class=”mw-parser-output”><p>u00a9 2023 wikiHow, Inc. All rights reserved. wikiHow, Inc. is the copyright holder of this image under U.S. and international copyright laws. This image is <b>not</b> licensed under the Creative Commons license applied to text content and some other images posted to the wikiHow website. This image may not be used by other entities without the express written consent of wikiHow, Inc.<br>n</p><p><br />n</p></div>”}
4
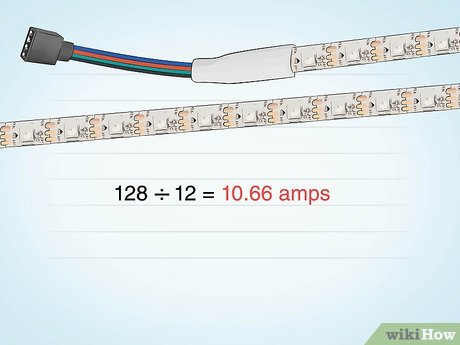
Divide the power consumption by the voltage to get the minimum amperes. One last measurement is essential to powering your new LED strips. Amperes, or amps, measure how fast an electrical current travels. If the current doesn’t travel fast enough through a long stretch of LED strips, then the lights will dim or shut off. The amp rating can be tested with a multimeter or estimated with a little math.[14] X Research source
For example, if you have 12V LEDs that use 128 watts of power: 128 / 12 = 10.66 amps.
To test LED strips, touch the multimeter’s leads to the LED’s copper dots. Make sure it is set to A for amps.
{“smallUrl”:”https://www.wikihow.com/images/thumb/e/e2/Install-LED-Strip-Lighting-Step-15-Version-2.jpg/v4-460px-Install-LED-Strip-Lighting-Step-15-Version-2.jpg”,”bigUrl”:”/images/thumb/e/e2/Install-LED-Strip-Lighting-Step-15-Version-2.jpg/v4-728px-Install-LED-Strip-Lighting-Step-15-Version-2.jpg”,”smallWidth”:460,”smallHeight”:345,”bigWidth”:728,”bigHeight”:546,”licensing”:”<div class=”mw-parser-output”><p>u00a9 2023 wikiHow, Inc. All rights reserved. wikiHow, Inc. is the copyright holder of this image under U.S. and international copyright laws. This image is <b>not</b> licensed under the Creative Commons license applied to text content and some other images posted to the wikiHow website. This image may not be used by other entities without the express written consent of wikiHow, Inc.<br>n</p><p><br />n</p></div>”}
5
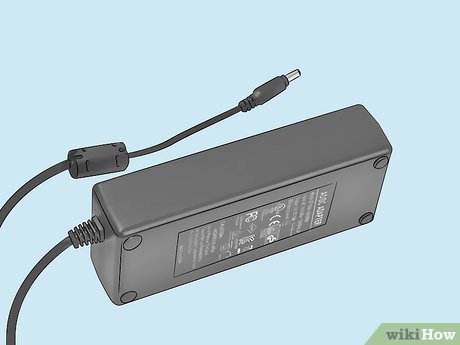
Purchase a power supply that matches your power requirements. You now have enough information to select the perfect power supply to light up the LEDs. Find a suitable power supply matching both the maximum power rating in watts and the amperage you calculated earlier. The most common type of power supply is a brick-style adapter, similar to the ones used to power laptops. It’s very easy to use, since all you do is plug it into the wall after connecting it to the LED strip. Most modern adapters come with the parts needed to connect them to LED strips.[15] X Research source
If you’re planning on powering different LED strips separately, get power supply adapters for each one. Remember to calculate each one’s power requirement, since they may be different.
If you have dimmable lights, select a power supply that is also dimmable. You could also place a dimmer switch between the power supply and the LEDs.
Another option is to hardwire the LED strips to your existing electrical supply with a hardwire power supply. The installation is tough and potentially dangerous, so call a certified electrician for assistance.
{“smallUrl”:”https://www.wikihow.com/images/thumb/f/fe/Install-LED-Strip-Lighting-Step-16-Version-2.jpg/v4-460px-Install-LED-Strip-Lighting-Step-16-Version-2.jpg”,”bigUrl”:”/images/thumb/f/fe/Install-LED-Strip-Lighting-Step-16-Version-2.jpg/v4-728px-Install-LED-Strip-Lighting-Step-16-Version-2.jpg”,”smallWidth”:460,”smallHeight”:345,”bigWidth”:728,”bigHeight”:546,”licensing”:”<div class=”mw-parser-output”><p>u00a9 2023 wikiHow, Inc. All rights reserved. wikiHow, Inc. is the copyright holder of this image under U.S. and international copyright laws. This image is <b>not</b> licensed under the Creative Commons license applied to text content and some other images posted to the wikiHow website. This image may not be used by other entities without the express written consent of wikiHow, Inc.<br>n</p><p><br />n</p></div>”}
6
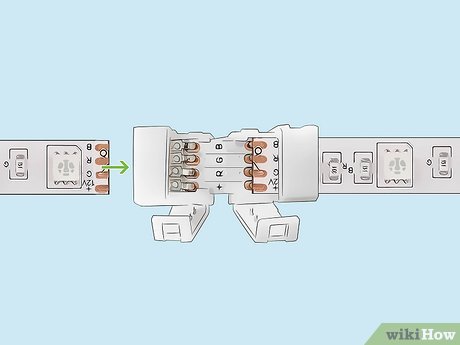
Use plug-in quick connectors if you need to join separate LED strips. Clip-on connectors fit over the copper dots at the end of the LED strip. These dots will be labeled with a plus or minus. Put the red wire over the marked as positive (+) and the black one over the dot marked as negative (-).[16] X Research source
Although you have to buy these connectors, they make setting up modern LEDs straightforward. They are very handy for joining LED strips or power sources.
If you don’t have the appropriate connectors or don’t wish to use any, you could solder the strips together instead.
{“smallUrl”:”https://www.wikihow.com/images/thumb/1/1b/Install-LED-Strip-Lighting-Step-17-Version-2.jpg/v4-460px-Install-LED-Strip-Lighting-Step-17-Version-2.jpg”,”bigUrl”:”/images/thumb/1/1b/Install-LED-Strip-Lighting-Step-17-Version-2.jpg/v4-728px-Install-LED-Strip-Lighting-Step-17-Version-2.jpg”,”smallWidth”:460,”smallHeight”:345,”bigWidth”:728,”bigHeight”:546,”licensing”:”<div class=”mw-parser-output”><p>u00a9 2023 wikiHow, Inc. All rights reserved. wikiHow, Inc. is the copyright holder of this image under U.S. and international copyright laws. This image is <b>not</b> licensed under the Creative Commons license applied to text content and some other images posted to the wikiHow website. This image may not be used by other entities without the express written consent of wikiHow, Inc.<br>n</p><p><br />n</p></div>”}
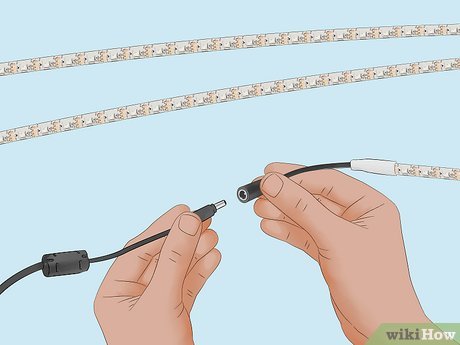
7
Connect the LED to your power source and hang or install the lights. Your power supply will have a long cable with a plug at one end. LED strips also have a similar adapter at one end. The power adapter plugs into the one on the LED strip. If you cut off the LED plug, you could get buy another quick connector that attaches to the end of the strip.[17] X Research source
If your LED strip doesn’t already have a connector, use a clip-on connector first, then attach it to a screw-on connector.
One way to connect multiple LED strips to a power supply is through a strip splitter. It has several plugs on one end for the LED strips. The opposite end fits on the power supply plug.
Test your LED strips. If they don’t light up right away, check that all of the positive and negative wires align.
Video
By using this service, some information may be shared with YouTube.
Warnings
Attempting to wire LEDs into your home’s circuitry is dangerous. Call an electrician to have it done professionally.
In addition to burn risks, soldering involves fumes from melted metal that can be harmful. Take proper safety cautions by wearing protective gear and ventilating the room.


