


[ad_1]
Things You Should Know
- Press the strips to your teeth so they’re lined up with your gums. Fold the excess behind your teeth and press to the backside.
- Leave the strips on for 30 minutes. Then peel them off and rinse out your mouth or brush your teeth.
- Wear 1 set of strips daily for 10-14 days per treatment. Most Crest White Strip treatments are safe to use up to 2 times a year.
- Read the instructions for your specific product. Overuse could result in tooth sensitivity or damage.
Steps
Peel one strip off the plastic sleeve.
-
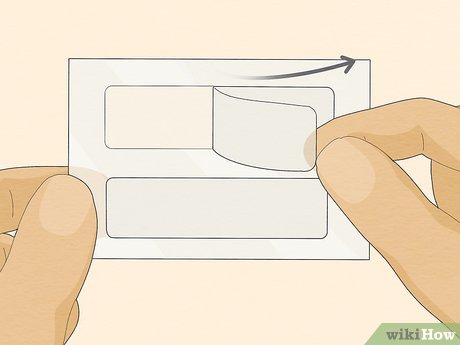
{“smallUrl”:”https://www.wikihow.com/images/thumb/7/76/Apply-Crest-3D-White-Strips-Step-1-Version-2.jpg/v4-460px-Apply-Crest-3D-White-Strips-Step-1-Version-2.jpg”,”bigUrl”:”/images/thumb/7/76/Apply-Crest-3D-White-Strips-Step-1-Version-2.jpg/v4-728px-Apply-Crest-3D-White-Strips-Step-1-Version-2.jpg”,”smallWidth”:460,”smallHeight”:345,”bigWidth”:728,”bigHeight”:546,”licensing”:”<div class=”mw-parser-output”><p>u00a9 2023 wikiHow, Inc. All rights reserved. wikiHow, Inc. is the copyright holder of this image under U.S. and international copyright laws. This image is <b>not</b> licensed under the Creative Commons license applied to text content and some other images posted to the wikiHow website. This image may not be used by other entities without the express written consent of wikiHow, Inc.<br>n</p><p><br />n</p></div>”}Use the pre-cut slit to pull open a packet of strips. You’ll see 2 White Strips stuck to a clear plastic sleeve—a short strip for your lower teeth and a longer strip for your top teeth. Pull either one off first (you’ll come back for the other one later).[1]
X
Trustworthy SourceAmerican Dental Association
World’s largest dental professional organization and advocate for proper oral health
- Wait to lift the strip from the liner until you’re fully ready to stick it on your teeth.
-
Wait at least 30 minutes after brushing your teeth to apply White Strips. They’ll stick better if your teeth aren’t glossy and smooth after a brush.[2]
X
Research source
- If you need to brush beforehand to remove food particles, use a wet toothbrush with no toothpaste or use a fluoride-free toothpaste.[3]
X
Research source
-
Floss beforehand to make sure the strips stick to your teeth and not food particles or plaque.[4]
X
Research source
Face the sticky side of the strip toward your teeth.
-
 {“smallUrl”:”https://www.wikihow.com/images/thumb/a/ad/Apply-Crest-3D-White-Strips-Step-2-Version-2.jpg/v4-460px-Apply-Crest-3D-White-Strips-Step-2-Version-2.jpg”,”bigUrl”:”/images/thumb/a/ad/Apply-Crest-3D-White-Strips-Step-2-Version-2.jpg/v4-728px-Apply-Crest-3D-White-Strips-Step-2-Version-2.jpg”,”smallWidth”:460,”smallHeight”:345,”bigWidth”:728,”bigHeight”:546,”licensing”:”<div class=”mw-parser-output”><p>u00a9 2023 wikiHow, Inc. All rights reserved. wikiHow, Inc. is the copyright holder of this image under U.S. and international copyright laws. This image is <b>not</b> licensed under the Creative Commons license applied to text content and some other images posted to the wikiHow website. This image may not be used by other entities without the express written consent of wikiHow, Inc.<br>n</p><p><br />n</p></div>”}Smiling or baring your teeth can make them easier to access. Stand in front of a mirror to help you guide the strip to the right spot. The sticky gel side that goes on your teeth is the same side that was stuck to the plastic sleeve and contains the whitening agents.[5]
X
Trustworthy SourceAmerican Dental Association
World’s largest dental professional organization and advocate for proper oral health
- Inhale through your teeth a few times or dab them with a clean tissue to dry them (the strips stick better to dry teeth).
Align the edge of the strip with your gum line.
-
 {“smallUrl”:”https://www.wikihow.com/images/thumb/e/e1/Apply-Crest-3D-White-Strips-Step-3-Version-2.jpg/v4-460px-Apply-Crest-3D-White-Strips-Step-3-Version-2.jpg”,”bigUrl”:”/images/thumb/e/e1/Apply-Crest-3D-White-Strips-Step-3-Version-2.jpg/v4-728px-Apply-Crest-3D-White-Strips-Step-3-Version-2.jpg”,”smallWidth”:460,”smallHeight”:345,”bigWidth”:728,”bigHeight”:546,”licensing”:”<div class=”mw-parser-output”><p>u00a9 2023 wikiHow, Inc. All rights reserved. wikiHow, Inc. is the copyright holder of this image under U.S. and international copyright laws. This image is <b>not</b> licensed under the Creative Commons license applied to text content and some other images posted to the wikiHow website. This image may not be used by other entities without the express written consent of wikiHow, Inc.<br>n</p><p><br />n</p></div>”}Be extra careful not to let the strip overlap onto your gums. Hold the ends of the strip and raise or lower the strip so the top edge is at or slightly away from your gum line. Make sure the center of the strip is right over the space between your front two teeth.[6]
X
Trustworthy SourceAmerican Dental Association
World’s largest dental professional organization and advocate for proper oral health
- The whitening ingredients on the strip can irritate your gums’ soft tissue.[7]
X
Research source
- To help center the strip, pinch it at the middle to create a small crease, then pull the strip flat again. Center the crease on your front teeth.
- The whitening ingredients on the strip can irritate your gums’ soft tissue.[7]
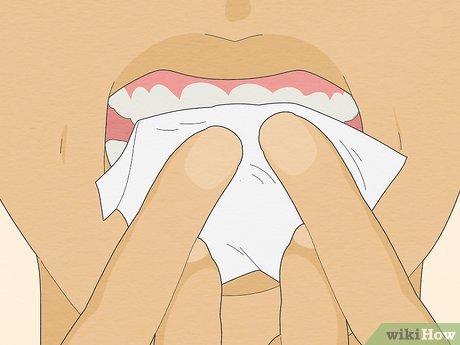
Press down and fold the strip around your teeth.
-
 {“smallUrl”:”https://www.wikihow.com/images/thumb/9/9d/Apply-Crest-3D-White-Strips-Step-4-Version-2.jpg/v4-460px-Apply-Crest-3D-White-Strips-Step-4-Version-2.jpg”,”bigUrl”:”/images/thumb/9/9d/Apply-Crest-3D-White-Strips-Step-4-Version-2.jpg/v4-728px-Apply-Crest-3D-White-Strips-Step-4-Version-2.jpg”,”smallWidth”:460,”smallHeight”:345,”bigWidth”:728,”bigHeight”:546,”licensing”:”<div class=”mw-parser-output”><p>u00a9 2023 wikiHow, Inc. All rights reserved. wikiHow, Inc. is the copyright holder of this image under U.S. and international copyright laws. This image is <b>not</b> licensed under the Creative Commons license applied to text content and some other images posted to the wikiHow website. This image may not be used by other entities without the express written consent of wikiHow, Inc.<br>n</p><p><br />n</p></div>”}Hold the strip against your teeth with your fingers for 2-3 seconds. Start in the center of the strip, then press the ends to make sure the strip is secure. Fold the excess over your teeth and press it against the back of your teeth. Press firmly to create a strong bond between the strip and your teeth.[8]
X
Trustworthy SourceAmerican Dental Association
World’s largest dental professional organization and advocate for proper oral health
- Use your fingernail to press the strip into the crevices between your teeth for the most even coverage.[9]
X
Research source
- Apply the second strip the same way after you’ve secured the first one to your teeth.
- A strong stick keeps the whitening agents trapped against your teeth.
- Use your fingernail to press the strip into the crevices between your teeth for the most even coverage.[9]
Leave the strips on for up to 30 minutes.
-
 {“smallUrl”:”https://www.wikihow.com/images/thumb/d/d3/Apply-Crest-3D-White-Strips-Step-5-Version-2.jpg/v4-460px-Apply-Crest-3D-White-Strips-Step-5-Version-2.jpg”,”bigUrl”:”/images/thumb/d/d3/Apply-Crest-3D-White-Strips-Step-5-Version-2.jpg/v4-728px-Apply-Crest-3D-White-Strips-Step-5-Version-2.jpg”,”smallWidth”:460,”smallHeight”:345,”bigWidth”:728,”bigHeight”:546,”licensing”:”<div class=”mw-parser-output”><p>u00a9 2023 wikiHow, Inc. All rights reserved. wikiHow, Inc. is the copyright holder of this image under U.S. and international copyright laws. This image is <b>not</b> licensed under the Creative Commons license applied to text content and some other images posted to the wikiHow website. This image may not be used by other entities without the express written consent of wikiHow, Inc.<br>n</p><p><br />n</p></div>”}Check the directions on the box for the exact timing. Some strips for sensitive teeth might have a shorter application time, while products like the Supreme FlexFit strips go on for 60 minutes. Wait to smoke, eat, or drink until after you’ve removed the strips.[10]
X
Research source
- Sit back and relax while the strips are in. There’s no recommended time of day to wear them, so go about your regular routine until it’s time to take them out.
- If you’re wearing high-adhesive strips like Classic Vivid or Professional Effects, you can drink water without loosening the strips or swallowing the whitening gel.
- Do not wear the strips for longer than the recommended time in the instructions. Overexposure to the bleaching agents could cause sensitivity or tooth damage.
Use the LED light if your kit came with one.
-
 {“smallUrl”:”https://www.wikihow.com/images/thumb/a/a8/Apply-Crest-3D-White-Strips-Step-6-Version-2.jpg/v4-460px-Apply-Crest-3D-White-Strips-Step-6-Version-2.jpg”,”bigUrl”:”/images/thumb/a/a8/Apply-Crest-3D-White-Strips-Step-6-Version-2.jpg/v4-728px-Apply-Crest-3D-White-Strips-Step-6-Version-2.jpg”,”smallWidth”:460,”smallHeight”:345,”bigWidth”:728,”bigHeight”:546,”licensing”:”<div class=”mw-parser-output”><p>u00a9 2023 wikiHow, Inc. All rights reserved. wikiHow, Inc. is the copyright holder of this image under U.S. and international copyright laws. This image is <b>not</b> licensed under the Creative Commons license applied to text content and some other images posted to the wikiHow website. This image may not be used by other entities without the express written consent of wikiHow, Inc.<br>n</p><p><br />n</p></div>”}Turn on your LED light after 30 minutes if your product came with one. Place it in your mouth and grip the curved groove gently with your teeth. After 10 minutes, remove the light and turn it off (some models will beep to let you know when it’s time).[11]
X
Research source
- If your treatment did not come with an LED light, skip this step and remove your strips.
- The light only works for a certain number of uses, depending on the strips you bought. You’ll have to buy a new light to use it in the future.
Pull the strips off your teeth and toss them.
-
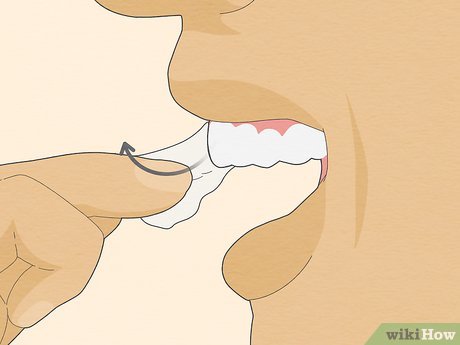 {“smallUrl”:”https://www.wikihow.com/images/thumb/c/c4/Apply-Crest-3D-White-Strips-Step-7-Version-2.jpg/v4-460px-Apply-Crest-3D-White-Strips-Step-7-Version-2.jpg”,”bigUrl”:”/images/thumb/c/c4/Apply-Crest-3D-White-Strips-Step-7-Version-2.jpg/v4-728px-Apply-Crest-3D-White-Strips-Step-7-Version-2.jpg”,”smallWidth”:460,”smallHeight”:345,”bigWidth”:728,”bigHeight”:546,”licensing”:”<div class=”mw-parser-output”><p>u00a9 2023 wikiHow, Inc. All rights reserved. wikiHow, Inc. is the copyright holder of this image under U.S. and international copyright laws. This image is <b>not</b> licensed under the Creative Commons license applied to text content and some other images posted to the wikiHow website. This image may not be used by other entities without the express written consent of wikiHow, Inc.<br>n</p><p><br />n</p></div>”}Find the edge of the strips with your fingernail to peel them off easily. Toss them in the garbage—they might still have a little bleaching agent on them that could stain clothing or irritate your skin. Wash your hands afterward to get any traces of bleaching residue off your fingers.[12]
X
Research source
- Do not reuse White Strips.
- The strips are strong and should come off in one piece without tearing or breaking.
Rinse or brush your teeth to remove the sticky residue.
-
 {“smallUrl”:”https://www.wikihow.com/images/thumb/b/b2/Apply-Crest-3D-White-Strips-Step-8-Version-3.jpg/v4-460px-Apply-Crest-3D-White-Strips-Step-8-Version-3.jpg”,”bigUrl”:”/images/thumb/b/b2/Apply-Crest-3D-White-Strips-Step-8-Version-3.jpg/v4-728px-Apply-Crest-3D-White-Strips-Step-8-Version-3.jpg”,”smallWidth”:460,”smallHeight”:345,”bigWidth”:728,”bigHeight”:546,”licensing”:”<div class=”mw-parser-output”><p>u00a9 2023 wikiHow, Inc. All rights reserved. wikiHow, Inc. is the copyright holder of this image under U.S. and international copyright laws. This image is <b>not</b> licensed under the Creative Commons license applied to text content and some other images posted to the wikiHow website. This image may not be used by other entities without the express written consent of wikiHow, Inc.<br>n</p><p><br />n</p></div>”}Swish clean water or use a soft toothbrush (with or without toothpaste). Use lukewarm water in case you’re experiencing some slight tooth or gum sensitivity. If you’re on the go or don’t have time to brush, leave the gel on your teeth—it’s nontoxic and will come off quickly.[13]
X
Research source
- Wait a few hours to eat or drink anything that may stain your teeth, like coffee or red wine. Your teeth are more prone to staining after a whitening treatment.[14]
X
Research source
- Wait a few hours to eat or drink anything that may stain your teeth, like coffee or red wine. Your teeth are more prone to staining after a whitening treatment.[14]
Apply the strips daily to complete the treatment.
-
 {“smallUrl”:”https://www.wikihow.com/images/thumb/e/ec/Apply-Crest-3D-White-Strips-Step-9-Version-2.jpg/v4-460px-Apply-Crest-3D-White-Strips-Step-9-Version-2.jpg”,”bigUrl”:”/images/thumb/e/ec/Apply-Crest-3D-White-Strips-Step-9-Version-2.jpg/v4-728px-Apply-Crest-3D-White-Strips-Step-9-Version-2.jpg”,”smallWidth”:460,”smallHeight”:345,”bigWidth”:728,”bigHeight”:546,”licensing”:”<div class=”mw-parser-output”><p>u00a9 2023 wikiHow, Inc. All rights reserved. wikiHow, Inc. is the copyright holder of this image under U.S. and international copyright laws. This image is <b>not</b> licensed under the Creative Commons license applied to text content and some other images posted to the wikiHow website. This image may not be used by other entities without the express written consent of wikiHow, Inc.<br>n</p><p><br />n</p></div>”}Read the directions for your specific product (most last 10-14 days). For example, Classic Vivid White comes with 10 sets of strips, whereas the Glamorous White comes with 14. Don’t worry about counting the days—if you’re wearing 1 set daily, you’ll know the treatment is done when you run out of strips.[15]
X
Research source
- White Strips are meant to be used every day for the best results.[16]
X
Expert Source

Licensed DentistExpert Interview. 3 June 2021.
- You’ll start seeing results after 2-3 days, even if the full whitening isn’t complete until after the treatment is finished.
- It’s OK if you miss a day—the impact on your results will be small as long as you’re wearing the strips consistently afterwards.
- White Strips are meant to be used every day for the best results.[16]

Apply White Strips twice a day for faster whitening.
-
 {“smallUrl”:”https://www.wikihow.com/images/thumb/6/6c/Apply-Crest-3D-White-Strips-Step-10-Version-2.jpg/v4-460px-Apply-Crest-3D-White-Strips-Step-10-Version-2.jpg”,”bigUrl”:”/images/thumb/6/6c/Apply-Crest-3D-White-Strips-Step-10-Version-2.jpg/v4-728px-Apply-Crest-3D-White-Strips-Step-10-Version-2.jpg”,”smallWidth”:460,”smallHeight”:345,”bigWidth”:728,”bigHeight”:546,”licensing”:”<div class=”mw-parser-output”><p>u00a9 2023 wikiHow, Inc. All rights reserved. wikiHow, Inc. is the copyright holder of this image under U.S. and international copyright laws. This image is <b>not</b> licensed under the Creative Commons license applied to text content and some other images posted to the wikiHow website. This image may not be used by other entities without the express written consent of wikiHow, Inc.<br>n</p><p><br />n</p></div>”}Wear up to 2 sets per day, back-to-back or separated by a few hours. Wear the strips for the full 30 minutes (or other recommended time) both times.[17]
X
Research source
Check the instructions on the box for how frequently you are able to use the strips. If you’re unsure, once a day is plenty.[18]
X
Expert Source
Licensed DentistExpert Interview. 3 June 2021.
- Only double up on strips if you want to cut down the number of days you have to wear them.
- Your chances of side effects, like tooth and gum sensitivity, increase when you wear strips more than once per day.
- Do not wear more than 2 sets of White Strips per day.
Do a full whitening treatment up to twice a year.
-
 {“smallUrl”:”https://www.wikihow.com/images/thumb/8/81/Apply-Crest-3D-White-Strips-Step-11-Version-2.jpg/v4-460px-Apply-Crest-3D-White-Strips-Step-11-Version-2.jpg”,”bigUrl”:”/images/thumb/8/81/Apply-Crest-3D-White-Strips-Step-11-Version-2.jpg/v4-728px-Apply-Crest-3D-White-Strips-Step-11-Version-2.jpg”,”smallWidth”:460,”smallHeight”:345,”bigWidth”:728,”bigHeight”:546,”licensing”:”<div class=”mw-parser-output”><p>u00a9 2023 wikiHow, Inc. All rights reserved. wikiHow, Inc. is the copyright holder of this image under U.S. and international copyright laws. This image is <b>not</b> licensed under the Creative Commons license applied to text content and some other images posted to the wikiHow website. This image may not be used by other entities without the express written consent of wikiHow, Inc.<br>n</p><p><br />n</p></div>”}It’s normal for the whitening effects to start fading after 6 months. Almost all Crest strips are safe to use 2 times a year, either back-to-back or separated by a few months. If you’re using the Supreme Flexfit White Strips, only use 1 box per year. [19]
X
Research source
- Products that are safe to use twice a year include 3D White Classic Vivid, Glamorous White, 1 Hour Express, Gentle Routine, Shimmer White, Professional Effects, and 3D White Whitestrips with Light strips.
- Practice good dental hygiene and use products like whitening toothpaste or baking soda to keep your teeth white between White Strip treatments.
- Prevent tooth stains by limiting dark drinks and foods, avoiding citrus after whitening treatments, and quitting smoking.
Tips
-
Store your Crest White Strips in a dry, cool place.[20]
X
Trustworthy SourceAmerican Dental Association
World’s largest dental professional organization and advocate for proper oral health
⧼thumbs_response⧽ -
Always read the instructions for your specific product thoroughly. The exact directions vary based on the type of strip and the concentration of whitening agents on them.⧼thumbs_response⧽
-
White Strips are not effective on dental work, like fillings or caps, or fake teeth.⧼thumbs_response⧽

Warnings
[ad_2]
Source link : https://www.wikihow.com/Apply-Crest-3D-White-Strips

