{“smallUrl”:”https://www.wikihow.com/images/thumb/5/53/Connect-a-Laptop-to-a-Monitor-Step-1-Version-3.jpg/v4-460px-Connect-a-Laptop-to-a-Monitor-Step-1-Version-3.jpg”,”bigUrl”:”/images/thumb/5/53/Connect-a-Laptop-to-a-Monitor-Step-1-Version-3.jpg/aid5639204-v4-728px-Connect-a-Laptop-to-a-Monitor-Step-1-Version-3.jpg”,”smallWidth”:460,”smallHeight”:345,”bigWidth”:728,”bigHeight”:546,”licensing”:”<div class=”mw-parser-output”><p>u00a9 2023 wikiHow, Inc. All rights reserved. wikiHow, Inc. is the copyright holder of this image under U.S. and international copyright laws. This image is <b>not</b> licensed under the Creative Commons license applied to text content and some other images posted to the wikiHow website. This image may not be used by other entities without the express written consent of wikiHow, Inc.<br>n</p><p><br />n</p></div>”}
1
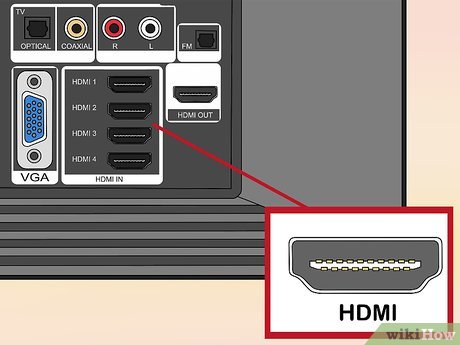
Determine your laptop’s video output options. Most PC laptops have at least one port that can be used for video output. The most common ports are HDMI, DisplayPort, and USB-C.[1] X Research source
There are a few main types of connections that your laptop may have:
HDMI: This is a 6-sided trapezoid-shaped port that’s about ¾ of an inch wide.
DisplayPort: The size is similar to HDMI, but one of the corners is bent inward while the other forms a 90-degree angle.
USB-C: This is an oval-shaped port on many modern PC laptops. Not all USB-C ports support connecting to a monitor, though. You can connect to a monitor with your USB-C port if you see one of the following:
If you see a lightning bolt with an arrow at the bottom next to the port, the port supports Thunderbolt 3, and you can use a USB-C or Thunderbolt 3-compatible monitor.
If you see an icon of a black “D” with a white “P” inside, the port supports DisplayPort, which means you can use a USB-C or DisplayPort-compatible monitor.
VGA or DVI: Less common nowadays are VGA ports, which are 15-holed ports with two pins on either side, and DVI ports, which have 24 holes and a gap on one side.
{“smallUrl”:”https://www.wikihow.com/images/thumb/f/f9/Connect-a-Laptop-to-a-Monitor-Step-2-Version-3.jpg/v4-460px-Connect-a-Laptop-to-a-Monitor-Step-2-Version-3.jpg”,”bigUrl”:”/images/thumb/f/f9/Connect-a-Laptop-to-a-Monitor-Step-2-Version-3.jpg/aid5639204-v4-728px-Connect-a-Laptop-to-a-Monitor-Step-2-Version-3.jpg”,”smallWidth”:460,”smallHeight”:345,”bigWidth”:728,”bigHeight”:546,”licensing”:”<div class=”mw-parser-output”><p>u00a9 2023 wikiHow, Inc. All rights reserved. wikiHow, Inc. is the copyright holder of this image under U.S. and international copyright laws. This image is <b>not</b> licensed under the Creative Commons license applied to text content and some other images posted to the wikiHow website. This image may not be used by other entities without the express written consent of wikiHow, Inc.<br>n</p><p><br />n</p></div>”}
2
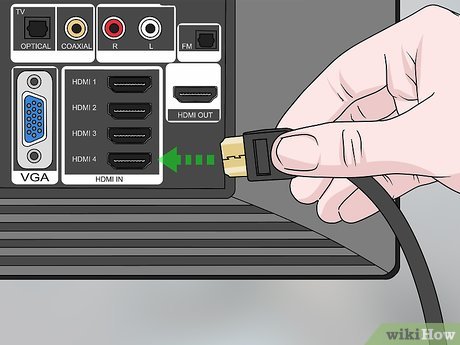
Determine your monitor’s video input. Most modern monitors have HDMI, USB-C, and/or DisplayPort video inputs. If you have the same type of port on both the laptop and the monitor (such as HDMI on both), you can get a standard cable. Otherwise, you’ll want to get an adapter to connect two different technologies, such as a USB-C to HDMI adapter, or an HDMI to VGA adapter. All of these adapter types are common and can be found anywhere electronics are sold.
{“smallUrl”:”https://www.wikihow.com/images/thumb/a/a0/Connect-a-Laptop-to-a-Monitor-Step-4-Version-3.jpg/v4-460px-Connect-a-Laptop-to-a-Monitor-Step-4-Version-3.jpg”,”bigUrl”:”/images/thumb/a/a0/Connect-a-Laptop-to-a-Monitor-Step-4-Version-3.jpg/aid5639204-v4-728px-Connect-a-Laptop-to-a-Monitor-Step-4-Version-3.jpg”,”smallWidth”:460,”smallHeight”:345,”bigWidth”:728,”bigHeight”:546,”licensing”:”<div class=”mw-parser-output”><p>u00a9 2023 wikiHow, Inc. All rights reserved. wikiHow, Inc. is the copyright holder of this image under U.S. and international copyright laws. This image is <b>not</b> licensed under the Creative Commons license applied to text content and some other images posted to the wikiHow website. This image may not be used by other entities without the express written consent of wikiHow, Inc.<br>n</p><p><br />n</p></div>”}
3
Use the cable to connect your laptop to the monitor. Plug on end of the cable into your laptop’s video port, and the other end into your monitor’s video input port. Use an adapter to bridge the connection if necessary.
{“smallUrl”:”https://www.wikihow.com/images/thumb/0/06/Connect-a-Laptop-to-a-Monitor-Step-5-Version-3.jpg/v4-460px-Connect-a-Laptop-to-a-Monitor-Step-5-Version-3.jpg”,”bigUrl”:”/images/thumb/0/06/Connect-a-Laptop-to-a-Monitor-Step-5-Version-3.jpg/aid5639204-v4-728px-Connect-a-Laptop-to-a-Monitor-Step-5-Version-3.jpg”,”smallWidth”:460,”smallHeight”:345,”bigWidth”:728,”bigHeight”:546,”licensing”:”<div class=”mw-parser-output”><p>u00a9 2023 wikiHow, Inc. All rights reserved. wikiHow, Inc. is the copyright holder of this image under U.S. and international copyright laws. This image is <b>not</b> licensed under the Creative Commons license applied to text content and some other images posted to the wikiHow website. This image may not be used by other entities without the express written consent of wikiHow, Inc.<br>n</p><p><br />n</p></div>”}
4
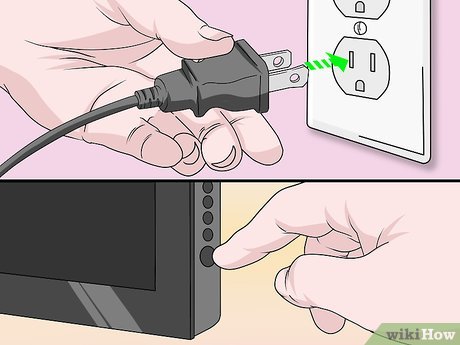
Plug in and turn on the monitor. Attach your monitor to a power source (e.g., an electrical outlet), then press the monitor’s Power button.
Once connected, you should see your laptop’s desktop and icons (or some variation thereof) appear on the monitor’s screen, you can proceed with setting up your laptop’s display settings.
If you are using a monitor or TV that has multiple inputs, you will need to select the port you connected your laptop to on the monitor.
Method 2
Method 2 of 6:
Using Both Screens on a PC Laptop
{“smallUrl”:”https://www.wikihow.com/images/thumb/1/1f/Connect-a-Laptop-to-a-Monitor-Step-18-Version-2.jpg/v4-460px-Connect-a-Laptop-to-a-Monitor-Step-18-Version-2.jpg”,”bigUrl”:”/images/thumb/1/1f/Connect-a-Laptop-to-a-Monitor-Step-18-Version-2.jpg/aid5639204-v4-728px-Connect-a-Laptop-to-a-Monitor-Step-18-Version-2.jpg”,”smallWidth”:460,”smallHeight”:345,”bigWidth”:728,”bigHeight”:546,”licensing”:”<div class=”mw-parser-output”><p>u00a9 2023 wikiHow, Inc. All rights reserved. wikiHow, Inc. is the copyright holder of this image under U.S. and international copyright laws. This image is <b>not</b> licensed under the Creative Commons license applied to text content and some other images posted to the wikiHow website. This image may not be used by other entities without the express written consent of wikiHow, Inc.<br>n</p><p><br />n</p></div>”}
1
Open your Windows Settings
{“smallUrl”:”https://www.wikihow.com/images/d/d0/Windowssettings.png”,”bigUrl”:”/images/thumb/d/d0/Windowssettings.png/31px-Windowssettings.png”,”smallWidth”:460,”smallHeight”:445,”bigWidth”:31,”bigHeight”:30,”licensing”:”<div class=”mw-parser-output”><p>I edited this screenshot of a Windows icon.n</p><p>License: <a target=”_blank” rel=”nofollow noreferrer noopener” class=”external text” href=”http://en.wikipedia.org/wiki/Public_domain”>Public Domain</a><br>n</p></div>”}
. You can do this by clicking the gear icon in your Windows Start menu, or by pressing Windows key + I on the keyboard.
{“smallUrl”:”https://www.wikihow.com/images/thumb/9/9b/Connect-a-Laptop-to-a-Monitor-Step-19-Version-2.jpg/v4-460px-Connect-a-Laptop-to-a-Monitor-Step-19-Version-2.jpg”,”bigUrl”:”/images/thumb/9/9b/Connect-a-Laptop-to-a-Monitor-Step-19-Version-2.jpg/aid5639204-v4-728px-Connect-a-Laptop-to-a-Monitor-Step-19-Version-2.jpg”,”smallWidth”:460,”smallHeight”:345,”bigWidth”:728,”bigHeight”:546,”licensing”:”<div class=”mw-parser-output”><p>u00a9 2023 wikiHow, Inc. All rights reserved. wikiHow, Inc. is the copyright holder of this image under U.S. and international copyright laws. This image is <b>not</b> licensed under the Creative Commons license applied to text content and some other images posted to the wikiHow website. This image may not be used by other entities without the express written consent of wikiHow, Inc.<br>n</p><p><br />n</p></div>”}
2
Click System. If you’re using Windows 10, it’ll be the computer icon in the Settings window. If you have Windows 11, it’s the first option in the left menu.
{“smallUrl”:”https://www.wikihow.com/images/thumb/4/43/Connect-a-Laptop-to-a-Monitor-Step-20-Version-2.jpg/v4-460px-Connect-a-Laptop-to-a-Monitor-Step-20-Version-2.jpg”,”bigUrl”:”/images/thumb/4/43/Connect-a-Laptop-to-a-Monitor-Step-20-Version-2.jpg/aid5639204-v4-728px-Connect-a-Laptop-to-a-Monitor-Step-20-Version-2.jpg”,”smallWidth”:460,”smallHeight”:345,”bigWidth”:728,”bigHeight”:546,”licensing”:”<div class=”mw-parser-output”><p>u00a9 2023 wikiHow, Inc. All rights reserved. wikiHow, Inc. is the copyright holder of this image under U.S. and international copyright laws. This image is <b>not</b> licensed under the Creative Commons license applied to text content and some other images posted to the wikiHow website. This image may not be used by other entities without the express written consent of wikiHow, Inc.<br>n</p><p><br />n</p></div>”}
3
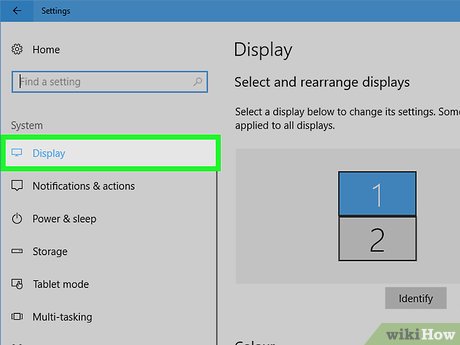
Click Display. It’s in the left panel on Windows 10, and in the right panel on Windows 11.[2] X
Trustworthy Source
Microsoft Support Technical support and product information from Microsoft.
Select a display option. Now you can choose whether you want to mirror or extend your displays:
If you’re on Windows 10, click the drop-down menu under “Multiple Displays.” On Windows 11, click the drop-down menu to the right of the “Identify” button.
Select Duplicate these displays if you want to see the same exact thing on both screens at the same time.
Select Extend these displays if you want to use the second monitor as a continuation of your desktop space. This lets you drag windows between screens.
Select Show only on 1 if you want to use the monitor labeled “1” as your only monitor. This is your laptop’s built-in screen. Choosing this will turn off the external monitor.
Select Show only on 2 to only show your laptop’s contents on the monitor that’s labeled “2,” which is the external monitor. This turns off your laptop’s built-in screen as long as the external monitor is connected.
{“smallUrl”:”https://www.wikihow.com/images/thumb/1/16/Connect-a-Laptop-to-a-Monitor-Step-9-Version-4.jpg/v4-460px-Connect-a-Laptop-to-a-Monitor-Step-9-Version-4.jpg”,”bigUrl”:”/images/thumb/1/16/Connect-a-Laptop-to-a-Monitor-Step-9-Version-4.jpg/aid5639204-v4-728px-Connect-a-Laptop-to-a-Monitor-Step-9-Version-4.jpg”,”smallWidth”:460,”smallHeight”:345,”bigWidth”:728,”bigHeight”:546,”licensing”:”<div class=”mw-parser-output”><p>u00a9 2023 wikiHow, Inc. All rights reserved. wikiHow, Inc. is the copyright holder of this image under U.S. and international copyright laws. This image is <b>not</b> licensed under the Creative Commons license applied to text content and some other images posted to the wikiHow website. This image may not be used by other entities without the express written consent of wikiHow, Inc.<br>n</p><p><br />n</p></div>”}
5
Choose a main display. If you’re duplicating/mirroring your screens, skip this step. But if you’re using two monitors together as an extended desktop, you’ll want to choose which monitor is the main display, which is where apps open by default:
Click the Identify button to display each monitor’s number each screen it’s assigned to.
Click the display you want to make your main display.
Select Make this my main display under “Multiple displays.”
{“smallUrl”:”https://www.wikihow.com/images/thumb/6/66/Connect-a-Laptop-to-a-Monitor-Step-10-Version-4.jpg/v4-460px-Connect-a-Laptop-to-a-Monitor-Step-10-Version-4.jpg”,”bigUrl”:”/images/thumb/6/66/Connect-a-Laptop-to-a-Monitor-Step-10-Version-4.jpg/aid5639204-v4-728px-Connect-a-Laptop-to-a-Monitor-Step-10-Version-4.jpg”,”smallWidth”:460,”smallHeight”:345,”bigWidth”:728,”bigHeight”:546,”licensing”:”<div class=”mw-parser-output”><p>u00a9 2023 wikiHow, Inc. All rights reserved. wikiHow, Inc. is the copyright holder of this image under U.S. and international copyright laws. This image is <b>not</b> licensed under the Creative Commons license applied to text content and some other images posted to the wikiHow website. This image may not be used by other entities without the express written consent of wikiHow, Inc.<br>n</p><p><br />n</p></div>”}
6
Rearrange your screens. The position of each rectangle in the Display window should reflect the placement of your monitors. For example, if your second monitor is to the left of your laptop’s primary screen on your desk, you’ll want the rectangle that represents your second monitor on the left side of the primary monitor rectangle. Drag the rectangles for each monitor until they match your desk’s setup, and then click Apply.
If you’re extending your desktop, you can test the new setup by moving your mouse in the direction of the other monitor—the cursor will appear on the other screen when moved in the right direction.
Method 3
Method 3 of 6:
Using Your PC Laptop with the Lid Closed
{“smallUrl”:”https://www.wikihow.com/images/thumb/c/c0/Connect-a-Laptop-to-a-Monitor-Step-11-Version-4.jpg/v4-460px-Connect-a-Laptop-to-a-Monitor-Step-11-Version-4.jpg”,”bigUrl”:”/images/thumb/c/c0/Connect-a-Laptop-to-a-Monitor-Step-11-Version-4.jpg/aid5639204-v4-728px-Connect-a-Laptop-to-a-Monitor-Step-11-Version-4.jpg”,”smallWidth”:460,”smallHeight”:345,”bigWidth”:728,”bigHeight”:546,”licensing”:”<div class=”mw-parser-output”><p>u00a9 2023 wikiHow, Inc. All rights reserved. wikiHow, Inc. is the copyright holder of this image under U.S. and international copyright laws. This image is <b>not</b> licensed under the Creative Commons license applied to text content and some other images posted to the wikiHow website. This image may not be used by other entities without the express written consent of wikiHow, Inc.<br>n</p><p><br />n</p></div>”}
1
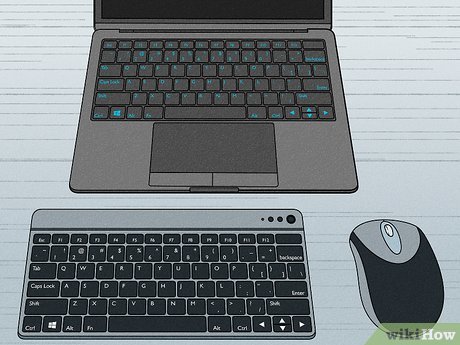
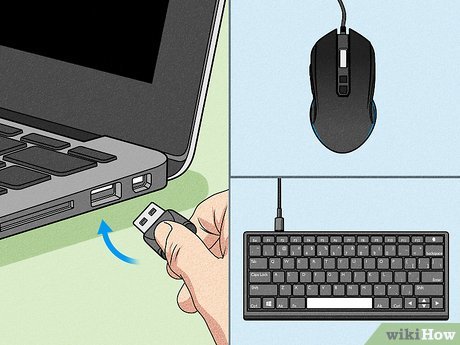
Connect a keyboard and mouse to your laptop. Use your laptop with the lid closed (optional). If you want to use your external monitor as the only monitor when your laptop’s lid is closed, you’ll need to make sure you have a keyboard and mouse that you can use while you can’t access the laptop’s built-in keyboard and trackpad.
{“smallUrl”:”https://www.wikihow.com/images/thumb/4/48/Connect-a-Laptop-to-a-Monitor-Step-12-Version-4.jpg/v4-460px-Connect-a-Laptop-to-a-Monitor-Step-12-Version-4.jpg”,”bigUrl”:”/images/thumb/4/48/Connect-a-Laptop-to-a-Monitor-Step-12-Version-4.jpg/aid5639204-v4-728px-Connect-a-Laptop-to-a-Monitor-Step-12-Version-4.jpg”,”smallWidth”:460,”smallHeight”:345,”bigWidth”:728,”bigHeight”:546,”licensing”:”<div class=”mw-parser-output”><p>u00a9 2023 wikiHow, Inc. All rights reserved. wikiHow, Inc. is the copyright holder of this image under U.S. and international copyright laws. This image is <b>not</b> licensed under the Creative Commons license applied to text content and some other images posted to the wikiHow website. This image may not be used by other entities without the express written consent of wikiHow, Inc.<br>n</p><p><br />n</p></div>”}
2
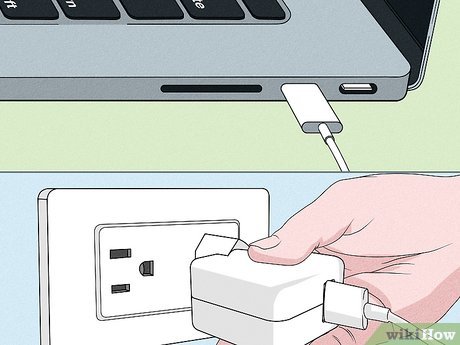
Connect your laptop to a power source. Your laptop will go to sleep when you close the lid if you don’t connect it to a power source first.
{“smallUrl”:”https://www.wikihow.com/images/thumb/c/c6/Connect-a-Laptop-to-a-Monitor-Step-13-Version-4.jpg/v4-460px-Connect-a-Laptop-to-a-Monitor-Step-13-Version-4.jpg”,”bigUrl”:”/images/thumb/c/c6/Connect-a-Laptop-to-a-Monitor-Step-13-Version-4.jpg/aid5639204-v4-728px-Connect-a-Laptop-to-a-Monitor-Step-13-Version-4.jpg”,”smallWidth”:460,”smallHeight”:345,”bigWidth”:728,”bigHeight”:546,”licensing”:”<div class=”mw-parser-output”><p>u00a9 2023 wikiHow, Inc. All rights reserved. wikiHow, Inc. is the copyright holder of this image under U.S. and international copyright laws. This image is <b>not</b> licensed under the Creative Commons license applied to text content and some other images posted to the wikiHow website. This image may not be used by other entities without the express written consent of wikiHow, Inc.<br>n</p><p><br />n</p></div>”}
3
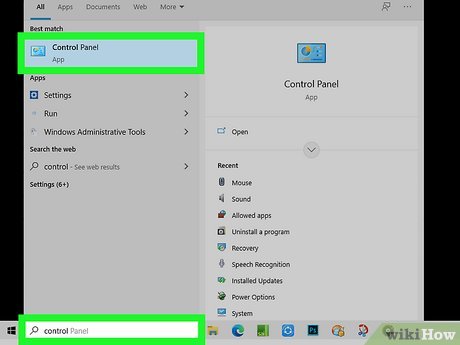
Open the Windows Control Panel. You can do this by clicking the Search icon in the taskbar at the bottom of the screen, typing control panel, and clicking Control Panel in the results.
{“smallUrl”:”https://www.wikihow.com/images/thumb/c/c1/Connect-a-Laptop-to-a-Monitor-Step-14-Version-4.jpg/v4-460px-Connect-a-Laptop-to-a-Monitor-Step-14-Version-4.jpg”,”bigUrl”:”/images/thumb/c/c1/Connect-a-Laptop-to-a-Monitor-Step-14-Version-4.jpg/aid5639204-v4-728px-Connect-a-Laptop-to-a-Monitor-Step-14-Version-4.jpg”,”smallWidth”:460,”smallHeight”:345,”bigWidth”:728,”bigHeight”:546,”licensing”:”<div class=”mw-parser-output”><p>u00a9 2023 wikiHow, Inc. All rights reserved. wikiHow, Inc. is the copyright holder of this image under U.S. and international copyright laws. This image is <b>not</b> licensed under the Creative Commons license applied to text content and some other images posted to the wikiHow website. This image may not be used by other entities without the express written consent of wikiHow, Inc.<br>n</p><p><br />n</p></div>”}
4
Click Power Options. If you don’t see this option, click the menu at the top-right and select Small icons or Large icons and you’ll see it then.
{“smallUrl”:”https://www.wikihow.com/images/thumb/4/4b/Connect-a-Laptop-to-a-Monitor-Step-15-Version-4.jpg/v4-460px-Connect-a-Laptop-to-a-Monitor-Step-15-Version-4.jpg”,”bigUrl”:”/images/thumb/4/4b/Connect-a-Laptop-to-a-Monitor-Step-15-Version-4.jpg/aid5639204-v4-728px-Connect-a-Laptop-to-a-Monitor-Step-15-Version-4.jpg”,”smallWidth”:460,”smallHeight”:345,”bigWidth”:728,”bigHeight”:546,”licensing”:”<div class=”mw-parser-output”><p>u00a9 2023 wikiHow, Inc. All rights reserved. wikiHow, Inc. is the copyright holder of this image under U.S. and international copyright laws. This image is <b>not</b> licensed under the Creative Commons license applied to text content and some other images posted to the wikiHow website. This image may not be used by other entities without the express written consent of wikiHow, Inc.<br>n</p><p><br />n</p></div>”}
5
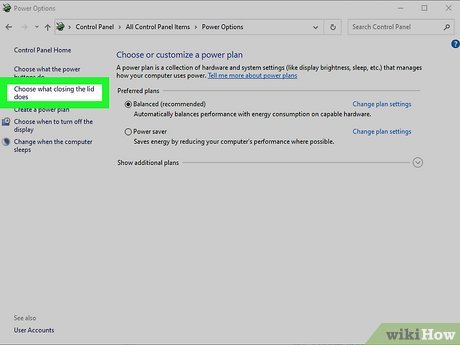
Click Choose what closing the lid does. It’s in the left panel.
{“smallUrl”:”https://www.wikihow.com/images/thumb/e/e5/Connect-a-Laptop-to-a-Monitor-Step-16-Version-4.jpg/v4-460px-Connect-a-Laptop-to-a-Monitor-Step-16-Version-4.jpg”,”bigUrl”:”/images/thumb/e/e5/Connect-a-Laptop-to-a-Monitor-Step-16-Version-4.jpg/aid5639204-v4-728px-Connect-a-Laptop-to-a-Monitor-Step-16-Version-4.jpg”,”smallWidth”:460,”smallHeight”:345,”bigWidth”:728,”bigHeight”:546,”licensing”:”<div class=”mw-parser-output”><p>u00a9 2023 wikiHow, Inc. All rights reserved. wikiHow, Inc. is the copyright holder of this image under U.S. and international copyright laws. This image is <b>not</b> licensed under the Creative Commons license applied to text content and some other images posted to the wikiHow website. This image may not be used by other entities without the express written consent of wikiHow, Inc.<br>n</p><p><br />n</p></div>”}
6
Click the menu next to “When I close the lid” in the “Plugged in” column. Several options will appear.
{“smallUrl”:”https://www.wikihow.com/images/thumb/6/63/Connect-a-Laptop-to-a-Monitor-Step-17-Version-3.jpg/v4-460px-Connect-a-Laptop-to-a-Monitor-Step-17-Version-3.jpg”,”bigUrl”:”/images/thumb/6/63/Connect-a-Laptop-to-a-Monitor-Step-17-Version-3.jpg/aid5639204-v4-728px-Connect-a-Laptop-to-a-Monitor-Step-17-Version-3.jpg”,”smallWidth”:460,”smallHeight”:345,”bigWidth”:728,”bigHeight”:546,”licensing”:”<div class=”mw-parser-output”><p>u00a9 2023 wikiHow, Inc. All rights reserved. wikiHow, Inc. is the copyright holder of this image under U.S. and international copyright laws. This image is <b>not</b> licensed under the Creative Commons license applied to text content and some other images posted to the wikiHow website. This image may not be used by other entities without the express written consent of wikiHow, Inc.<br>n</p><p><br />n</p></div>”}
7
Select Do nothing from the menu. This tells Windows not to shut down if you close the lid of your laptop as long as the laptop is plugged in.
If you choose this option for “On battery,” the second monitor will stay on even if you close the laptop if you’re not plugged in. This could drastically decrease the life of your battery, so it’s not recommended.
{“smallUrl”:”https://www.wikihow.com/images/thumb/9/9c/Connect-a-Laptop-to-a-Monitor-Step-18-Version-3.jpg/v4-460px-Connect-a-Laptop-to-a-Monitor-Step-18-Version-3.jpg”,”bigUrl”:”/images/thumb/9/9c/Connect-a-Laptop-to-a-Monitor-Step-18-Version-3.jpg/aid5639204-v4-728px-Connect-a-Laptop-to-a-Monitor-Step-18-Version-3.jpg”,”smallWidth”:460,”smallHeight”:345,”bigWidth”:728,”bigHeight”:546,”licensing”:”<div class=”mw-parser-output”><p>u00a9 2023 wikiHow, Inc. All rights reserved. wikiHow, Inc. is the copyright holder of this image under U.S. and international copyright laws. This image is <b>not</b> licensed under the Creative Commons license applied to text content and some other images posted to the wikiHow website. This image may not be used by other entities without the express written consent of wikiHow, Inc.<br>n</p><p><br />n</p></div>”}
8
Click Save changes. Now, as long as your laptop is plugged in, you can close the lid without turning off your external monitor.
Method 4
Method 4 of 6:
Connecting a MacBook to a Monitor
{“smallUrl”:”https://www.wikihow.com/images/thumb/6/66/Connect-a-Laptop-to-a-Monitor-Step-19-Version-3.jpg/v4-460px-Connect-a-Laptop-to-a-Monitor-Step-19-Version-3.jpg”,”bigUrl”:”/images/thumb/6/66/Connect-a-Laptop-to-a-Monitor-Step-19-Version-3.jpg/aid5639204-v4-728px-Connect-a-Laptop-to-a-Monitor-Step-19-Version-3.jpg”,”smallWidth”:460,”smallHeight”:345,”bigWidth”:728,”bigHeight”:546,”licensing”:”<div class=”mw-parser-output”><p>u00a9 2023 wikiHow, Inc. All rights reserved. wikiHow, Inc. is the copyright holder of this image under U.S. and international copyright laws. This image is <b>not</b> licensed under the Creative Commons license applied to text content and some other images posted to the wikiHow website. This image may not be used by other entities without the express written consent of wikiHow, Inc.<br>n</p><p><br />n</p></div>”}
1
Find your MacBook’s video output. You’ll need to make sure you have a port on your Mac that is compatible with an input on your monitor. But if your monitor and your laptop don’t have the same ports, don’t worry—in most cases, you can get an adapter that can bridge two video types, such as Thunderbolt to HDMI, which makes it possible to use nearly any type of monitor with your MacBook. These are the connections your MacBook may have:
Thunderbolt 3, Thunderbolt 4, and Thunderbolt USB 4: An oval port with a lightning bolt, found on all MacBook Pros beginning in 2016, and MacBook Airs beginning in 2018.[3] X Research source
USB-C: An oval port without a lightning bolt icon. 12″ MacBook Pros from 2015, 2016, and 2017 have these.[4] X Research source
HDMI: A six-sided tapered port found on 2021 MacBook Pros, as well as MacBook Pros from 2012 to 2015.[5] X Research source
Thunderbolt 1, Thunderbolt 2, or Mini DisplayPort: The original Thunderbolt ports both have 6 sides and are not oval-shaped. You’ll see a lightning bolt icon near this port on MacBook Air models from 2011-2017, and MacBook Pros from 2011-2015. On MacBook Pro and Air models made between 2008 and 2010, you’ll see a square with two vertical lines instead.
If you’re not sure which port you can use for a monitor, go to https://support.apple.com/specs, select your model, and find the ports under “Charging and Expansion.”
{“smallUrl”:”https://www.wikihow.com/images/thumb/f/f9/Connect-a-Laptop-to-a-Monitor-Step-2-Version-3.jpg/v4-460px-Connect-a-Laptop-to-a-Monitor-Step-2-Version-3.jpg”,”bigUrl”:”/images/thumb/f/f9/Connect-a-Laptop-to-a-Monitor-Step-2-Version-3.jpg/aid5639204-v4-728px-Connect-a-Laptop-to-a-Monitor-Step-2-Version-3.jpg”,”smallWidth”:460,”smallHeight”:345,”bigWidth”:728,”bigHeight”:546,”licensing”:”<div class=”mw-parser-output”><p>u00a9 2023 wikiHow, Inc. All rights reserved. wikiHow, Inc. is the copyright holder of this image under U.S. and international copyright laws. This image is <b>not</b> licensed under the Creative Commons license applied to text content and some other images posted to the wikiHow website. This image may not be used by other entities without the express written consent of wikiHow, Inc.<br>n</p><p><br />n</p></div>”}
2
Find your monitor’s video input. Look at the back of your monitor for ports labeled “Input” or that like the port you found on your MacBook. If you don’t have identical ports on both devices, you can usually get an adapter that will connect the two.
Nearly all modern Apple monitors will work with Thunderbolt 3, 4, USB 4, and USB-C. Most of these monitors come with a cable that will fit into these ports and work immediately.
Many non-Apple monitors also support Thunderbolt 3, Thunderbolt 4, USB 4, USB-C, and HDMI.
{“smallUrl”:”https://www.wikihow.com/images/thumb/3/39/Connect-a-Laptop-to-a-Monitor-Step-21-Version-3.jpg/v4-460px-Connect-a-Laptop-to-a-Monitor-Step-21-Version-3.jpg”,”bigUrl”:”/images/thumb/3/39/Connect-a-Laptop-to-a-Monitor-Step-21-Version-3.jpg/aid5639204-v4-728px-Connect-a-Laptop-to-a-Monitor-Step-21-Version-3.jpg”,”smallWidth”:460,”smallHeight”:345,”bigWidth”:728,”bigHeight”:546,”licensing”:”<div class=”mw-parser-output”><p>u00a9 2023 wikiHow, Inc. All rights reserved. wikiHow, Inc. is the copyright holder of this image under U.S. and international copyright laws. This image is <b>not</b> licensed under the Creative Commons license applied to text content and some other images posted to the wikiHow website. This image may not be used by other entities without the express written consent of wikiHow, Inc.<br>n</p><p><br />n</p></div>”}
3
Get a cable and an adapter if necessary. If your MacBook and monitor don’t have matching ports, you can use an adapter to bridge two different cable types, such as Thunderbolt 3 to HDMI.[6] X Research source
There’s an adapter for nearly any two types of cables, and you can find them anywhere computers are sold (including the Apple Store). If you’re confused about which cable to get, this should help:
MacBooks with Thunderbolt 4: Use a Thunderbolt 4, Thunderbolt 3, or USB-C cable to connect to any of these types of monitors. You can also use an adapter to connect to a DVI, HDMI, or VGA monitor.
MacBooks with Thunderbolt 3 and Thunderbolt USB 4: Use a Thunderbolt 3 or USB-C cable to connect to either of these monitor types. You can also use an adapter to connect to a DVI, HDMI, or VGA monitor.
MacBooks with USB-C: Use a USB-C cable to connect to a USB-C monitor. You can also use an adapter to connect to a DVI, HDMI, or VGA monitor.
MacBooks with Thunderbolt 1, Thunderbolt 2, and Mini DisplayPort : Use a Mini DisplayPort cable to connect to Mini DisplayPort monitor, or an adapter to DVI, HDMI, or VGA monitors.
{“smallUrl”:”https://www.wikihow.com/images/thumb/a/a0/Connect-a-Laptop-to-a-Monitor-Step-4-Version-3.jpg/v4-460px-Connect-a-Laptop-to-a-Monitor-Step-4-Version-3.jpg”,”bigUrl”:”/images/thumb/a/a0/Connect-a-Laptop-to-a-Monitor-Step-4-Version-3.jpg/aid5639204-v4-728px-Connect-a-Laptop-to-a-Monitor-Step-4-Version-3.jpg”,”smallWidth”:460,”smallHeight”:345,”bigWidth”:728,”bigHeight”:546,”licensing”:”<div class=”mw-parser-output”><p>u00a9 2023 wikiHow, Inc. All rights reserved. wikiHow, Inc. is the copyright holder of this image under U.S. and international copyright laws. This image is <b>not</b> licensed under the Creative Commons license applied to text content and some other images posted to the wikiHow website. This image may not be used by other entities without the express written consent of wikiHow, Inc.<br>n</p><p><br />n</p></div>”}
4
Use the cable to connect your laptop to the monitor. Plug on end of the cable into your MacBook’s video port, and the other end into your monitor’s video input port. If an adapter is required, connect the cables with adapter to bridge them.
{“smallUrl”:”https://www.wikihow.com/images/thumb/0/06/Connect-a-Laptop-to-a-Monitor-Step-5-Version-3.jpg/v4-460px-Connect-a-Laptop-to-a-Monitor-Step-5-Version-3.jpg”,”bigUrl”:”/images/thumb/0/06/Connect-a-Laptop-to-a-Monitor-Step-5-Version-3.jpg/aid5639204-v4-728px-Connect-a-Laptop-to-a-Monitor-Step-5-Version-3.jpg”,”smallWidth”:460,”smallHeight”:345,”bigWidth”:728,”bigHeight”:546,”licensing”:”<div class=”mw-parser-output”><p>u00a9 2023 wikiHow, Inc. All rights reserved. wikiHow, Inc. is the copyright holder of this image under U.S. and international copyright laws. This image is <b>not</b> licensed under the Creative Commons license applied to text content and some other images posted to the wikiHow website. This image may not be used by other entities without the express written consent of wikiHow, Inc.<br>n</p><p><br />n</p></div>”}
5
Plug in and turn on the monitor. Attach your monitor to a power source (e.g., an electrical outlet), then press the Power button. In most cases, you should see your MacBook’s screen (either extended or mirrored) on the second monitor.
If you are using a monitor or TV that has multiple inputs, you may need to select the port you connected your laptop to on the monitor. Press the button that says “Input”, “Source”. or “Video Select” or something similar on the monitor or remote.
If you don’t see your MacBook’s screen on your monitor, you may need to detect the display. On your MacBook, click the Apple menu, select System Preferences, click Displays, and then click Detect Displays.[7] X Research source
Open your Mac’s System Preferences…. You’ll find it in the Apple menu, which is at the top-left corner of the screen. This is where you can control how your second screen acts on your MacBook.
{“smallUrl”:”https://www.wikihow.com/images/thumb/d/d0/Connect-a-Laptop-to-a-Monitor-Step-25.jpg/v4-460px-Connect-a-Laptop-to-a-Monitor-Step-25.jpg”,”bigUrl”:”/images/thumb/d/d0/Connect-a-Laptop-to-a-Monitor-Step-25.jpg/aid5639204-v4-728px-Connect-a-Laptop-to-a-Monitor-Step-25.jpg”,”smallWidth”:460,”smallHeight”:345,”bigWidth”:728,”bigHeight”:546,”licensing”:”<div class=”mw-parser-output”><p>u00a9 2023 wikiHow, Inc. All rights reserved. wikiHow, Inc. is the copyright holder of this image under U.S. and international copyright laws. This image is <b>not</b> licensed under the Creative Commons license applied to text content and some other images posted to the wikiHow website. This image may not be used by other entities without the express written consent of wikiHow, Inc.<br>n</p><p><br />n</p></div>”}
2
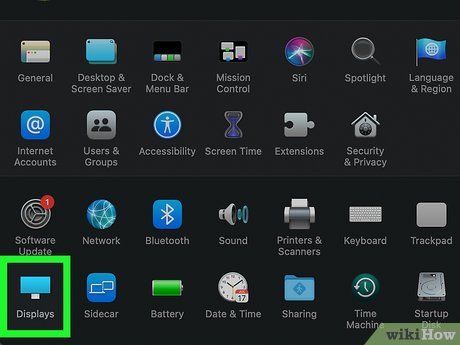
Click Displays. It’s the monitor icon in the System Preferences window. This takes you to the Display tab.
{“smallUrl”:”https://www.wikihow.com/images/thumb/2/2c/Connect-a-Laptop-to-a-Monitor-Step-26.jpg/v4-460px-Connect-a-Laptop-to-a-Monitor-Step-26.jpg”,”bigUrl”:”/images/thumb/2/2c/Connect-a-Laptop-to-a-Monitor-Step-26.jpg/aid5639204-v4-728px-Connect-a-Laptop-to-a-Monitor-Step-26.jpg”,”smallWidth”:460,”smallHeight”:345,”bigWidth”:728,”bigHeight”:546,”licensing”:”<div class=”mw-parser-output”><p>u00a9 2023 wikiHow, Inc. All rights reserved. wikiHow, Inc. is the copyright holder of this image under U.S. and international copyright laws. This image is <b>not</b> licensed under the Creative Commons license applied to text content and some other images posted to the wikiHow website. This image may not be used by other entities without the express written consent of wikiHow, Inc.<br>n</p><p><br />n</p></div>”}
3
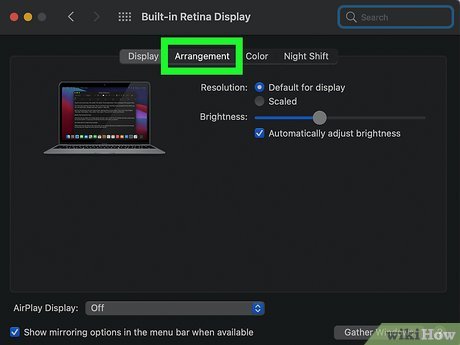
Click the Arrangement tab. It’s at the top of the window.
{“smallUrl”:”https://www.wikihow.com/images/thumb/e/e9/Connect-a-Laptop-to-a-Monitor-Step-27.jpg/v4-460px-Connect-a-Laptop-to-a-Monitor-Step-27.jpg”,”bigUrl”:”/images/thumb/e/e9/Connect-a-Laptop-to-a-Monitor-Step-27.jpg/aid5639204-v4-728px-Connect-a-Laptop-to-a-Monitor-Step-27.jpg”,”smallWidth”:460,”smallHeight”:345,”bigWidth”:728,”bigHeight”:546,”licensing”:”<div class=”mw-parser-output”><p>u00a9 2023 wikiHow, Inc. All rights reserved. wikiHow, Inc. is the copyright holder of this image under U.S. and international copyright laws. This image is <b>not</b> licensed under the Creative Commons license applied to text content and some other images posted to the wikiHow website. This image may not be used by other entities without the express written consent of wikiHow, Inc.<br>n</p><p><br />n</p></div>”}
4
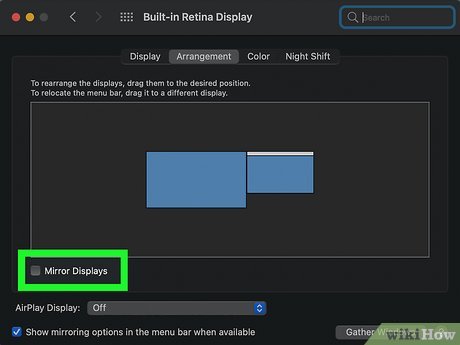
Remove the checkmark from “Mirror Displays.” If you want both screens to display the same thing at all times, leave the checkmark in place. But if you want the second monitor to act as a second desktop to give you more space for multitasking, don’t check this option.
If your plan is to close the laptop and use the second monitor as your only monitor, mirroring is the option you’ll want.
{“smallUrl”:”https://www.wikihow.com/images/thumb/9/9e/Connect-a-Laptop-to-a-Monitor-Step-28.jpg/v4-460px-Connect-a-Laptop-to-a-Monitor-Step-28.jpg”,”bigUrl”:”/images/thumb/9/9e/Connect-a-Laptop-to-a-Monitor-Step-28.jpg/aid5639204-v4-728px-Connect-a-Laptop-to-a-Monitor-Step-28.jpg”,”smallWidth”:460,”smallHeight”:345,”bigWidth”:728,”bigHeight”:546,”licensing”:”<div class=”mw-parser-output”><p>u00a9 2023 wikiHow, Inc. All rights reserved. wikiHow, Inc. is the copyright holder of this image under U.S. and international copyright laws. This image is <b>not</b> licensed under the Creative Commons license applied to text content and some other images posted to the wikiHow website. This image may not be used by other entities without the express written consent of wikiHow, Inc.<br>n</p><p><br />n</p></div>”}
5
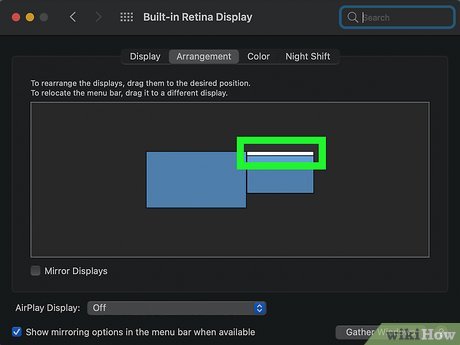
Choose the primary monitor. You’ll see two rectangles at the center of the window—one represents your built-in monitor, and the other represents your external monitor. A thin white bar runs along the top of the rectangle that’s set as your primary monitor, which is your laptop’s built-in screen by default.
If you want your external monitor to be the primary monitor, click and hold the white bar with the mouse, and then drag it to the other monitor. The menu bar will only appear on the primary display.
If you want to keep your laptop as your primary monitor, you don’t have to change anything here.
{“smallUrl”:”https://www.wikihow.com/images/thumb/b/b1/Connect-a-Laptop-to-a-Monitor-Step-29.jpg/v4-460px-Connect-a-Laptop-to-a-Monitor-Step-29.jpg”,”bigUrl”:”/images/thumb/b/b1/Connect-a-Laptop-to-a-Monitor-Step-29.jpg/aid5639204-v4-728px-Connect-a-Laptop-to-a-Monitor-Step-29.jpg”,”smallWidth”:460,”smallHeight”:345,”bigWidth”:728,”bigHeight”:546,”licensing”:”<div class=”mw-parser-output”><p>u00a9 2023 wikiHow, Inc. All rights reserved. wikiHow, Inc. is the copyright holder of this image under U.S. and international copyright laws. This image is <b>not</b> licensed under the Creative Commons license applied to text content and some other images posted to the wikiHow website. This image may not be used by other entities without the express written consent of wikiHow, Inc.<br>n</p><p><br />n</p></div>”}
6
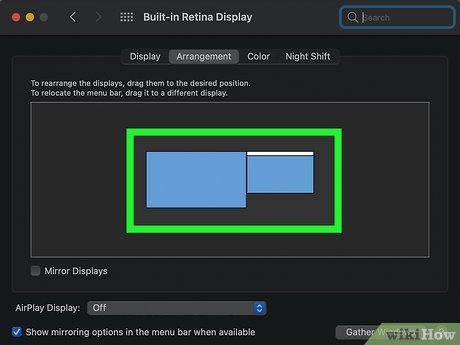
Rearrange the screens (optional). The position of each rectangle in the Display window should reflect the placement of your monitors. For example, if your second monitor is to the left of your laptop’s primary screen on your desk, you’ll want the rectangle that represents your second monitor on the left side of the primary monitor rectangle. Drag the second screen to its actual position so the arrangement looks how it does in real life.
This makes it so you can easily drag a window from one monitor to another without having to guess which direction to drag it in.
Method 6
Method 6 of 6:
Using Your MacBook with the Lid Closed
{“smallUrl”:”https://www.wikihow.com/images/thumb/4/4c/Connect-a-Laptop-to-a-Monitor-Step-30.jpg/v4-460px-Connect-a-Laptop-to-a-Monitor-Step-30.jpg”,”bigUrl”:”/images/thumb/4/4c/Connect-a-Laptop-to-a-Monitor-Step-30.jpg/aid5639204-v4-728px-Connect-a-Laptop-to-a-Monitor-Step-30.jpg”,”smallWidth”:460,”smallHeight”:345,”bigWidth”:728,”bigHeight”:546,”licensing”:”<div class=”mw-parser-output”><p>u00a9 2023 wikiHow, Inc. All rights reserved. wikiHow, Inc. is the copyright holder of this image under U.S. and international copyright laws. This image is <b>not</b> licensed under the Creative Commons license applied to text content and some other images posted to the wikiHow website. This image may not be used by other entities without the express written consent of wikiHow, Inc.<br>n</p><p><br />n</p></div>”}
1
Connect a keyboard and mouse to your MacBook. If you want to use your second monitor as your only monitor while your MacBook’s lid is closed, you’ll need a mouse and keyboard that work with your Mac.
{“smallUrl”:”https://www.wikihow.com/images/thumb/c/c7/Connect-a-Laptop-to-a-Monitor-Step-31.jpg/v4-460px-Connect-a-Laptop-to-a-Monitor-Step-31.jpg”,”bigUrl”:”/images/thumb/c/c7/Connect-a-Laptop-to-a-Monitor-Step-31.jpg/aid5639204-v4-728px-Connect-a-Laptop-to-a-Monitor-Step-31.jpg”,”smallWidth”:460,”smallHeight”:345,”bigWidth”:728,”bigHeight”:546,”licensing”:”<div class=”mw-parser-output”><p>u00a9 2023 wikiHow, Inc. All rights reserved. wikiHow, Inc. is the copyright holder of this image under U.S. and international copyright laws. This image is <b>not</b> licensed under the Creative Commons license applied to text content and some other images posted to the wikiHow website. This image may not be used by other entities without the express written consent of wikiHow, Inc.<br>n</p><p><br />n</p></div>”}
2
Plug your MacBook in to a power source. You can only use a second monitor as your only monitor on your Mac laptop when it is connected to a power source. If your MacBook is not plugged in, your external monitor will turn off when you close the lid of your MacBook.
This is also called “closed lid mode” or “closed clamshell mode.”
{“smallUrl”:”https://www.wikihow.com/images/thumb/f/f1/Connect-a-Laptop-to-a-Monitor-Step-32.jpg/v4-460px-Connect-a-Laptop-to-a-Monitor-Step-32.jpg”,”bigUrl”:”/images/thumb/f/f1/Connect-a-Laptop-to-a-Monitor-Step-32.jpg/aid5639204-v4-728px-Connect-a-Laptop-to-a-Monitor-Step-32.jpg”,”smallWidth”:460,”smallHeight”:345,”bigWidth”:728,”bigHeight”:546,”licensing”:”<div class=”mw-parser-output”><p>u00a9 2023 wikiHow, Inc. All rights reserved. wikiHow, Inc. is the copyright holder of this image under U.S. and international copyright laws. This image is <b>not</b> licensed under the Creative Commons license applied to text content and some other images posted to the wikiHow website. This image may not be used by other entities without the express written consent of wikiHow, Inc.<br>n</p><p><br />n</p></div>”}
3
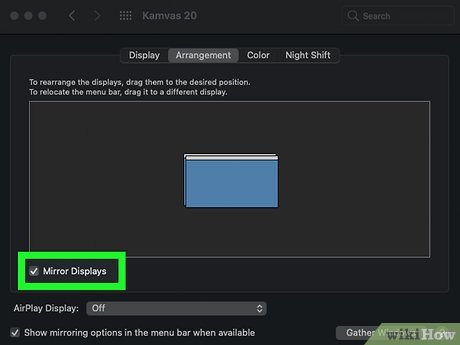
Turn on screen mirroring. If you want the external monitor to display the same thing you’d see on your laptop’s main monitor, you’ll want to mirror the screens. Here’s how:
Click the Apple menu and select System Preferences.
Click the Arrangement tab.
Check the box next to “Mirror Displays.”
{“smallUrl”:”https://www.wikihow.com/images/thumb/b/b3/Connect-a-Laptop-to-a-Monitor-Step-33.jpg/v4-460px-Connect-a-Laptop-to-a-Monitor-Step-33.jpg”,”bigUrl”:”/images/thumb/b/b3/Connect-a-Laptop-to-a-Monitor-Step-33.jpg/aid5639204-v4-728px-Connect-a-Laptop-to-a-Monitor-Step-33.jpg”,”smallWidth”:460,”smallHeight”:345,”bigWidth”:728,”bigHeight”:546,”licensing”:”<div class=”mw-parser-output”><p>u00a9 2023 wikiHow, Inc. All rights reserved. wikiHow, Inc. is the copyright holder of this image under U.S. and international copyright laws. This image is <b>not</b> licensed under the Creative Commons license applied to text content and some other images posted to the wikiHow website. This image may not be used by other entities without the express written consent of wikiHow, Inc.<br>n</p><p><br />n</p></div>”}
4
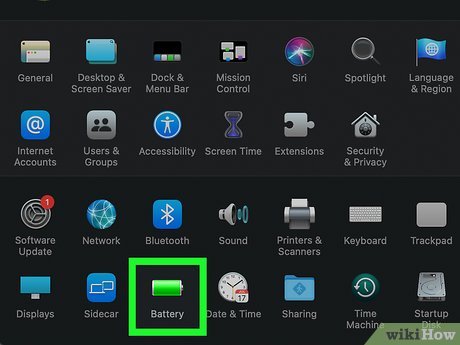
Adjust your energy saving settings. To prevent your screen from turning off when the lid is closed:
Click the Apple menu and select System Preferences.
Click Battery.
Drag the slider at the top all the way to the right (to “Never”).
{“smallUrl”:”https://www.wikihow.com/images/thumb/7/70/Connect-a-Laptop-to-a-Monitor-Step-34.jpg/v4-460px-Connect-a-Laptop-to-a-Monitor-Step-34.jpg”,”bigUrl”:”/images/thumb/7/70/Connect-a-Laptop-to-a-Monitor-Step-34.jpg/aid5639204-v4-728px-Connect-a-Laptop-to-a-Monitor-Step-34.jpg”,”smallWidth”:460,”smallHeight”:345,”bigWidth”:728,”bigHeight”:546,”licensing”:”<div class=”mw-parser-output”><p>u00a9 2023 wikiHow, Inc. All rights reserved. wikiHow, Inc. is the copyright holder of this image under U.S. and international copyright laws. This image is <b>not</b> licensed under the Creative Commons license applied to text content and some other images posted to the wikiHow website. This image may not be used by other entities without the express written consent of wikiHow, Inc.<br>n</p><p><br />n</p></div>”}
5
Close the lid of your MacBook. Now when you close your MacBook, your external monitor will act as the only monitor.
Video
By using this service, some information may be shared with YouTube.
Tips
DisplayPort, HDMI, Thunderbolt 3 and later, and USB-C can all carry audio, meaning that your monitor’s speakers should be able to transmit your laptop’s audio output if you’re using one of these connections.
If you are using an older video cable, you may not be able to get sound on your TV. You can transmit sound to an external set of speakers using the headphone port on your laptop. Use a 3.5mm auxiliary cable to connect to your headphone port. Use an adapter to connect to the speakers or audio input, if needed.


