


[ad_1]
Steps
Method 1
Method 1 of 3:
Creating Classic Space Buns
-
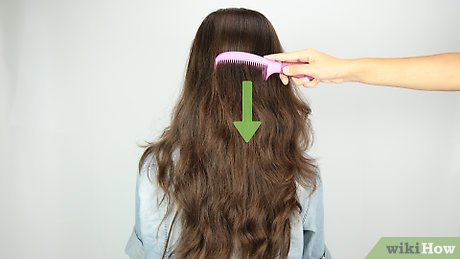
1Brush your hair, then part it down the middle. Comb your hair until it’s smooth and free of any knots or tangles. Use the handle of a rat-tail comb to create a part running down the center of your head, from your forehead to nape.[1]
-
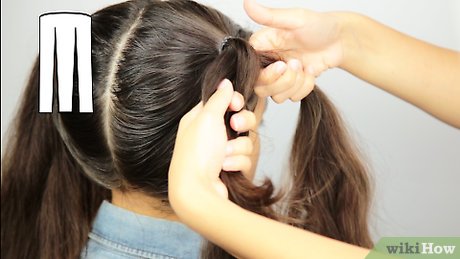
 2Create 2 pigtails. You can make them high on the top of your head, or you can make them low on either side of your nape—experiment with what you like best here. Smooth down the hair going into the pigtails so that they’re nice and neat. Secure the pigtails with hair ties that match your hair color.[2]
- Leave some strands around your forehead loose for a softer touch.[3]
- Leave some strands around your forehead loose for a softer touch.[3]
-
3Tease your pigtails if you want more volume. Lift up your first pigtail and run a comb through it a few times, starting at the tips and finishing at the hair tie. Repeat this for the second pigtail too. This is a great idea if you have thin hair; it will make your hair appear thicker and give you larger space buns in the end.[4]
- Alternatively, you can wrap 3-comb hair extensions around the base of your pigtails instead. This will help give you a little more volume.[5]
- Alternatively, you can wrap 3-comb hair extensions around the base of your pigtails instead. This will help give you a little more volume.[5]
-
4Twist your first pigtail into a rope. Take 1 of your pigtails, and twist it away from your face to create a rope. The tighter you twist the rope, the sleeker and smaller your bun will turn out.[6]
-
5Coil the rope into a bun, then secure it with a hair tie. Wrap the rope around the base of the pigtail. Make sure that you wrap it away from your face, not towards. Tuck the end of your hair under the bun, then wrap another hair tie around the base of the bun.[7]
-
6Repeat the process for the second bun. Twist the second pigtail into a rope, then coil it into a bun. Tuck the ends of the rope under the bun, then secure it with a hair tie.
-
7Touch up your buns as desired. Here is where you can get really creative. If you want to make the buns messier or more voluminous, gently tug on the outer edges to loosen the strands.[8]
For even more volume, you can gently tug on the hair going into the buns to loosen it up. Focus on the hair on the top and sides of your head.[9]
- If you left strands out of your buns, consider straightening them with a flat iron. Give them a wispier look by curving the iron towards your face rather than straight down.[10]
- If you left strands out of your buns, consider straightening them with a flat iron. Give them a wispier look by curving the iron towards your face rather than straight down.[10]
-
8Mist the space buns with hairspray. If the buns feel loose, secure them with bobby pins; use as many bobby pins as you need. Once you are happy with your style, mist it with hairspray, then let the hairspray dry.[11]
Method 2
Method 2 of 3:
Doing Half-Up Space Buns
-
1Brush your hair, then create a center part. Comb your hair so that it is nice and smooth. Use the handle of a rat-tail comb to create a part in the middle of your head. Start the part at your forehead and finish it at the nape. Drape the left half of your hair over your left shoulder, and the right half over the right.
-
2Pull 1 half of your hair into a loose bun to keep it out of the way. Take the right half of your hair, and secure it with a hair tie. You can do a loose bun or even a pigtail. It does not matter; the goal is to keep this half of your hair out of the way while you work on the other side.
-
3Create a half-up ponytail on the left side of your head. Create a horizontal part on the left side of your head at about eyebrow level. Start the part at your hairline and finish it at the center part in the back of your head. Pull the hair above the part into a high ponytail and secure it with a hair tie.[12]
- Instead of making the ponytail in the back center of your head, make it on the top-side of your head, sort of like a puppy ear.
-
4Tease your ponytail, if desired. You are working with less hair than when creating a basic space bun, so it would be a good idea to tease your ponytail a little. Simply lift strands of your ponytail, then backcomb it towards the hair tie with a brush.[13]
-
5Twist the ponytail into a bun, then secure it with a hair tie. Twist the ponytail away from your face to create a rope first. Next, coil the rope around the base of the ponytail to make a bun. Tuck the ends of the rope under the bun, then wrap a hair tie around the base.[14]
- The tighter you twist, the smaller and sleeker the space bun will turn out.
-
6Undo the temporary bun from on the other side and repeat the process. Go back to the right side of your head and undo the loose, temporary bun you created earlier. Create another half-up ponytail, tease it, then wrap it into a bun. Secure the bun with another hair tie.
-
7Tease the rest of your hair, if desired. You don’t have to do this, but it’s a great way to complete the vintage 90s look.[15]
Alternatively, if you made your buns nice and sleek, you could straighten the rest of your hair instead.- For even more volume, pull on the hair going into the buns to loosen it up. Focus on the sides and top of your head.[16]
- It’s okay if the part in the back center of your head goes away at this point. You don’t need it anymore.
- For even more volume, pull on the hair going into the buns to loosen it up. Focus on the sides and top of your head.[16]
-
8Make any finishing touches, then mist the space buns with hairspray. If the buns feel loose, secure them to your hair with bobby pins. Once you are happy with the overall look, lightly mist your hair with hairspray. Let the hairspray dry before setting out.
Method 3
Method 3 of 3:
Making Braided Space Buns
-
1Brush your hair, then part it down the middle. Brush out your hair so that it is nice and smooth. Part it down the middle from forehead to nape with the handle of a rat-tail comb.
-
2Pull your hair into 2 pigtails and secure them with hair ties. Here is where you can get really creative. You can do 2 high pigtails at the top of your head, or you can do 2 low pigtails at the base of your nape. You can even position the pigtails on the sides of your head, just above your ears for a Princess Leia-inspired look!
- If you want something more intricate, try half-up pigtails instead!
-
 3Braid the pigtails and secure them with clear hair elastics. Split the first pigtail into 3 equal strands, then cross the left and right strands over the middle strand to create the braid. Once you run out of hair, wrap a clear hair elastic around the end of the braid to secure it. Repeat this step for the other pigtail too.
- For a more unique look, try a 2-strand rope braid instead. This works especially well for natural hair.[17]
- For a more unique look, try a 2-strand rope braid instead. This works especially well for natural hair.[17]
-
4Pull on the outer loops of the braids to volumize them, if desired. You don’t have to do this, but it’s a great way to add volume to your hair, especially if it is very thin. Starting from the bottom of the braid, gently tug on the outer loops until you reach the top, then do the other braid too.[18]
- Skip this step if you made a 2-strand rope braid.
- Don’t pull too hard, or the braid will come undone.
-
5Wrap the braids into buns and secure them with hair ties. Pick up the left braid, and wrap it around the hair tie to create a bun. Tuck the end of the braid under the bun, then wrap another hair tie around the base of the bun. Repeat this step for the other braid.
- Do not twist the braids into a rope like you would with a standard bun.
-
6Touch up your hair as needed, then mist it with hairspray. If the buns feel loose, secure them along the side edges to the rest of your hair; use as many bobby pins as you need. Once you are happy with the way your space buns look, mist them with hairspray, then let the hairspray dry.
- If you did braided half-up buns, consider straightening the rest of your hair for a sleeker look.
Video
Tips
-
You can make the space buns as neat and sleek, or as loose and messy as you want.⧼thumbs_response⧽
-
If you have very short hair, try doing sock buns or using a doughnut bun maker instead.⧼thumbs_response⧽
-
Add some streaks to your hair with hair chalk before you begin for a more colorful touch.⧼thumbs_response⧽
Submit a Tip
All tip submissions are carefully reviewed before being published
Thanks for submitting a tip for review!

Things You’ll Need
Creating Basic Space Buns
-
Brush
-
Rat-tail comb
-
4 hair ties
-
Bobby pins
-
Hairspray
Doing Half-Up Space Buns
-
Brush
-
Rat-tail comb
-
4 hair ties
-
Bobby pins
-
Hairspray
Making Braided Space Buns
-
Brush
-
Rat-tail comb
-
4 hair ties
-
2 clear hair elastics
-
Bobby pins
-
Hairspray
[ad_2]
Source link : https://www.wikihow.com/Do-Space-Buns

