


[ad_1]
Steps
Method 1
Method 1 of 3:
Measuring
-
 1Rip out the old hem. Use a seam-ripper to take out the stitching that holds the old hem in place. Insert the seam ripper under the stitches and break the thread, pulling it out as you go. Continue until the hem is completely ripped out from both pant legs.[1]
- If you don’t have a seam ripper you can use a small, sharp knife or a pair of nail scissors to do the job.
- Be careful not to catch the fabric of your pants as you rip the stitches out.
-
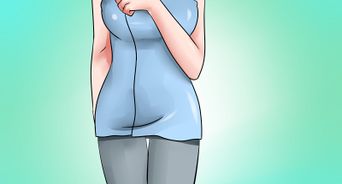
2Put on the pants with matching shoes. To find the right length for your pants, try them on with the shoes you will most likely wear them with. Even flat shoes have a little more height than your bare feet, so it’s important to try on your pants with shoes.
- Try on jeans with sneakers or flats if that’s what you plan to wear with them.
- Dress pants should be worn with heels of the appropriate height.
-
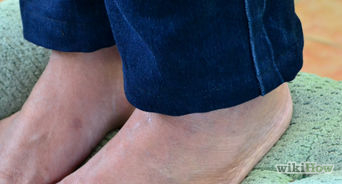
3Cuff the pants at the correct length. Fold the edges of the pant legs under to the length that falls at the right place over the top of your shoes. The cuffs should lightly graze your shoes, rather than hovering above them or bunching up around them.
- Place several straight pins around the cuffs to secure them in place.
- Walk around the room to determine whether the pants seem like they are cuffed at the right length. Check yourself out in the mirror. Do they ride up and swing? Do they catch on the back of your heels? Make adjustments as necessary.
-
4Remove the pants and turn them inside-out. Make sure the pins stay in place so you know exactly how short to hem the pants. They are now ready to be sewed.[2]
Method 2
Method 2 of 3:
Sewing
-
1Measure the cuffs. Use a ruler or a measuring tape to measure the distance from the edge of the pant legs to the hemline fold. Make sure both pant legs are cuffed to the exact same length. Use several more straight pins to hold both cuffs in place.[3]
-
2Iron the cuffs. Use a hot iron (on the right setting for your pants’ fabric) to make a crease at the fold where the pants are cuffed. Take your time and make sure the crease you make is straight.[4]
- At this point you may carefully try on the pants once more to ensure that the hem will fall exactly where you want it. Take care not to prick yourself with the straight pins.
-
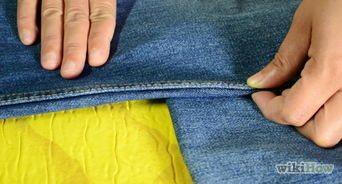
3Measure 1 1⁄2 inch (3.8 cm) from the ironed hemline. This is where you will make a cut to remove extra fabric from the pants before sewing the hem. Use chalk or a marking pencil to make a mark 1 1⁄2 inches (3.8 cm) from the hemline around the entire pant leg. Repeat on the other side.[5]
-
4Remove the pins and cut the fabric along the chalked line. Use pinking shears, rather than fabric scissors, to make the cut. Pinking shears are designed to cut fabric in such a way that it doesn’t become unraveled. Repeat with the other pant leg.[6]
- Take your time trimming the fabric. Make sure you don’t accidentally dip too close to the hemline.
- When you’re finished trimming, use straight pins to pin the fabric back in place about 1 inch (2.5 cm) from the hemline.
-
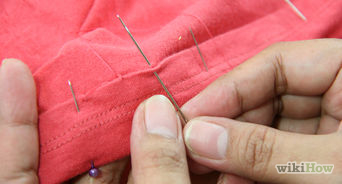
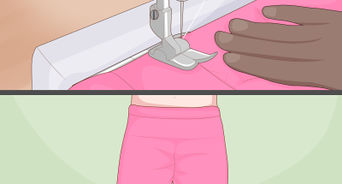
5Sew the hems. Thread a needle with thread that matches the color of your pants. Use a blind stitch to sew around the pant leg about 1⁄2 inch (1.3 cm) from the hem. Continue until you reach the place where you started, then knot the thread and use a scissors to cut it. Repeat with the other pant leg.[7]
- This process can also be completed using a sewing machine.
- To make sure the hem is nearly invisible from the outside of the pants, pick up only one or two fibers at a time on that side of the fabric.
-
6Try on the pants. Turn them right-side out and iron the hemline once more. Try them on with the pair of shoes you plan to wear with them. Make sure the cuffs look even and drop to the right length. If they need adjustment, rip out the seams and start over.
Method 3
Method 3 of 3:
Using Fabric Tape
-
1Cuff the pants to the correct length and iron them to create a hemline crease. Use a ruler or a measuring tape to make sure both pant legs will be hemmed to the same length.
-
2Trim the excess fabric 1 1⁄2 inch (3.8 cm) from the ironed hemline. Use chalk or a marking pencil to make a mark 1 1⁄2 inches (3.8 cm) from the hemline around the entire pant leg, then trim the excess fabric with pinking shears. Repeat on the other side.[8]
-
3Unfold the cuffs and apply the fusible tape. Cut a length of fusible tape and remove the paper backing. Line up the edge of the tape with the crease in the fabric that you ironed. Press the tape down and continue lining it up and applying it around the entire pant leg. Cut more tape if you run out as you go, and fold the cuff back over the tape when you’re finished. Repeat with the other pant leg.[9]
- If you don’t have fusible tape, hem tape and other temporary hemming products can be used in its place. These usually fall out after a wash or two.
- Make sure the tape is completely straight around the bottom of both pant legs.
-
4Fuse the tape with the fabric. Place a thin cloth over the cuffed fabric. Heat up an iron and apply it to the cloth for several seconds. Remove the cloth and continue ironing the fabric underneath. Use this procedure to fuse the tape with the fabric around the entire pant leg, then repeat with the second pant leg.[10]
- After you’ve ironed a section, lift the cuff gently to make sure that the tape has fused with the fabric to hold the hem in place before moving on.
- Make sure your iron is set to a heat that won’t damage the fabric of your pants.
-
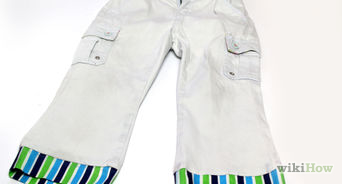
5Try on the pants. Turn the pants right-side out and try them on. If you aren’t happy with the length, launder the pants and run them through the dryer until the tape falls out, then hem them again.
Video
Tips
-
When hemming, take longer stitches on the inside layer of cloth and tiny stitches on the outside cloth where it shows.⧼thumbs_response⧽
-
Use matching thread and stitch the outer material in line with the grain of the material to help hide/blend the threads.⧼thumbs_response⧽

Things You’ll Need
-
Pants to hem
-
Correct shoes to wear with the pants
-
Seam ripper
-
Straight pins
-
Measuring tape
-
Scissors
-
Needle
-
Thread that matches the pants
-
Fusible tape (optional)
You Might Also Like


[ad_2]
Source link : https://www.wikihow.com/Hem-a-Pair-of-Pants

