{“smallUrl”:”https://www.wikihow.com/images/thumb/a/a5/Insert-a-Drawstring-Step-1-Version-3.jpg/v4-460px-Insert-a-Drawstring-Step-1-Version-3.jpg”,”bigUrl”:”/images/thumb/a/a5/Insert-a-Drawstring-Step-1-Version-3.jpg/aid231009-v4-728px-Insert-a-Drawstring-Step-1-Version-3.jpg”,”smallWidth”:460,”smallHeight”:345,”bigWidth”:728,”bigHeight”:546,”licensing”:”<div class=”mw-parser-output”><p>u00a9 2023 wikiHow, Inc. All rights reserved. wikiHow, Inc. is the copyright holder of this image under U.S. and international copyright laws. This image is <b>not</b> licensed under the Creative Commons license applied to text content and some other images posted to the wikiHow website. This image may not be used by other entities without the express written consent of wikiHow, Inc.<br>n</p><p><br />n</p></div>”}
1
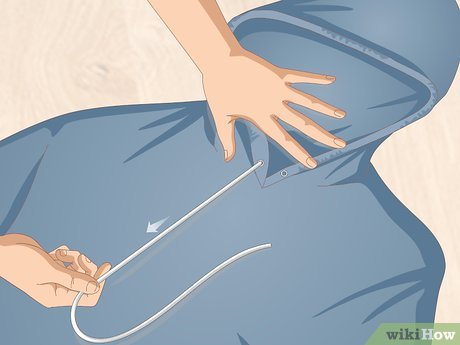
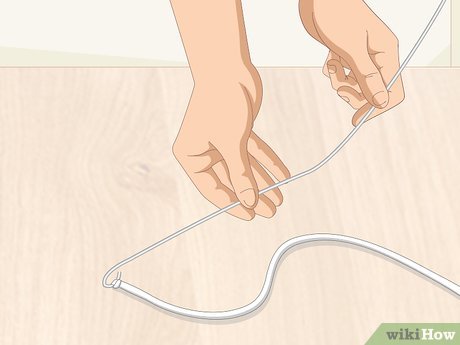
Pull out the drawstring if it’s lost halfway through a casing. If your drawstring is starting to come out but it’s still stuck in the casing, go ahead and pull it completely out. Re-inserting the drawstring is easier than trying to feed it back through the casing without a tool.[1] X Research source
{“smallUrl”:”https://www.wikihow.com/images/thumb/e/e5/Insert-a-Drawstring-Step-2-Version-3.jpg/v4-460px-Insert-a-Drawstring-Step-2-Version-3.jpg”,”bigUrl”:”/images/thumb/e/e5/Insert-a-Drawstring-Step-2-Version-3.jpg/aid231009-v4-728px-Insert-a-Drawstring-Step-2-Version-3.jpg”,”smallWidth”:460,”smallHeight”:345,”bigWidth”:728,”bigHeight”:546,”licensing”:”<div class=”mw-parser-output”><p>u00a9 2023 wikiHow, Inc. All rights reserved. wikiHow, Inc. is the copyright holder of this image under U.S. and international copyright laws. This image is <b>not</b> licensed under the Creative Commons license applied to text content and some other images posted to the wikiHow website. This image may not be used by other entities without the express written consent of wikiHow, Inc.<br>n</p><p><br />n</p></div>”}
2
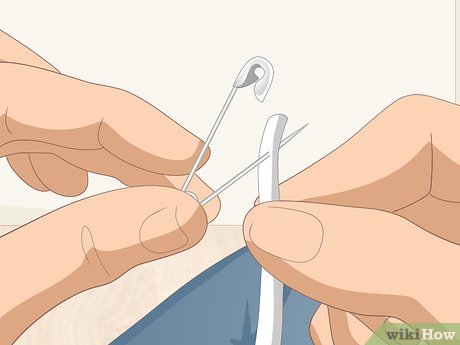
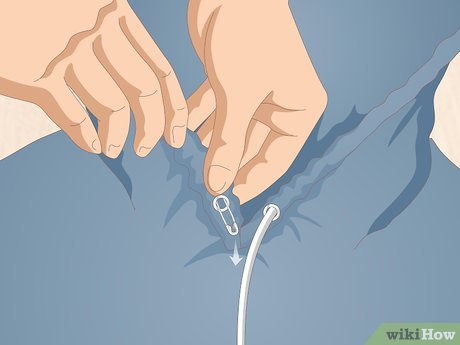
Secure a safety pin to 1 end of the drawstring. Use a large safety pin so it’s easier to handle and feed through the casing. Ensure that the safety pin will fit through the casing and secure it about 1⁄2 inch (1.3 cm) from the end of the drawstring.[2] X Research source
If you’re buying safety pins, look for skirt pins, which are larger and sturdier than standard safety pins.
Variation: If you don’t have a safety pin, use a paperclip! Thread the end of the drawstring through the paperclip so it’s snug.
{“smallUrl”:”https://www.wikihow.com/images/thumb/c/ca/Insert-a-Drawstring-Step-3-Version-3.jpg/v4-460px-Insert-a-Drawstring-Step-3-Version-3.jpg”,”bigUrl”:”/images/thumb/c/ca/Insert-a-Drawstring-Step-3-Version-3.jpg/aid231009-v4-728px-Insert-a-Drawstring-Step-3-Version-3.jpg”,”smallWidth”:460,”smallHeight”:345,”bigWidth”:728,”bigHeight”:546,”licensing”:”<div class=”mw-parser-output”><p>u00a9 2023 wikiHow, Inc. All rights reserved. wikiHow, Inc. is the copyright holder of this image under U.S. and international copyright laws. This image is <b>not</b> licensed under the Creative Commons license applied to text content and some other images posted to the wikiHow website. This image may not be used by other entities without the express written consent of wikiHow, Inc.<br>n</p><p><br />n</p></div>”}
3
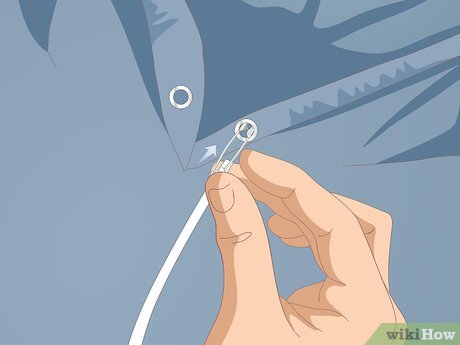
Insert the safety pin into the eyelet. Locate the eyelets, which are the circular openings where your drawstring comes out. Push the safety pin into 1 of the eyelets and pull it through the fabric until it reaches the other eyelet.[3] X Research source
{“smallUrl”:”https://www.wikihow.com/images/thumb/4/4e/Insert-a-Drawstring-Step-4-Version-3.jpg/v4-460px-Insert-a-Drawstring-Step-4-Version-3.jpg”,”bigUrl”:”/images/thumb/4/4e/Insert-a-Drawstring-Step-4-Version-3.jpg/aid231009-v4-728px-Insert-a-Drawstring-Step-4-Version-3.jpg”,”smallWidth”:460,”smallHeight”:345,”bigWidth”:728,”bigHeight”:546,”licensing”:”<div class=”mw-parser-output”><p>u00a9 2023 wikiHow, Inc. All rights reserved. wikiHow, Inc. is the copyright holder of this image under U.S. and international copyright laws. This image is <b>not</b> licensed under the Creative Commons license applied to text content and some other images posted to the wikiHow website. This image may not be used by other entities without the express written consent of wikiHow, Inc.<br>n</p><p><br />n</p></div>”}
4
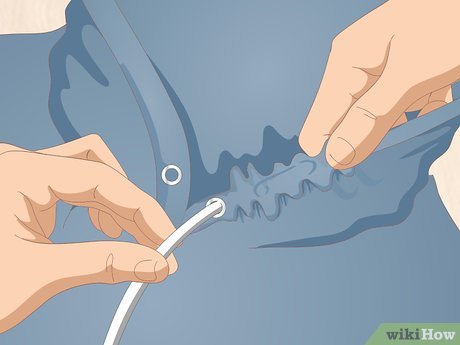
Work the casing toward the pin so the drawstring moves through the fabric. Hold the safety pin in place with 1 hand and use your other hand to scrunch the fabric casing toward the pin so it bunches up. Then, hold the safety pin in place with your other hand and pull the bunched up fabric away with the opposite hand.[4] X Research source
It’s important to hold onto the safety pin so you don’t lose it inside the casing.
{“smallUrl”:”https://www.wikihow.com/images/thumb/4/4e/Insert-a-Drawstring-Step-5-Version-3.jpg/v4-460px-Insert-a-Drawstring-Step-5-Version-3.jpg”,”bigUrl”:”/images/thumb/4/4e/Insert-a-Drawstring-Step-5-Version-3.jpg/aid231009-v4-728px-Insert-a-Drawstring-Step-5-Version-3.jpg”,”smallWidth”:460,”smallHeight”:345,”bigWidth”:728,”bigHeight”:546,”licensing”:”<div class=”mw-parser-output”><p>u00a9 2023 wikiHow, Inc. All rights reserved. wikiHow, Inc. is the copyright holder of this image under U.S. and international copyright laws. This image is <b>not</b> licensed under the Creative Commons license applied to text content and some other images posted to the wikiHow website. This image may not be used by other entities without the express written consent of wikiHow, Inc.<br>n</p><p><br />n</p></div>”}
5
Keep scrunching and pulling the fabric until the pin is at the end of the casing. Continue to bunch the casing up to the safety pin and pull the fabric away so your safety pin moves through the casing. Repeat this until the safety pin comes out of the other end of the fabric casing.[5] X Research source
{“smallUrl”:”https://www.wikihow.com/images/thumb/0/0e/Insert-a-Drawstring-Step-6-Version-3.jpg/v4-460px-Insert-a-Drawstring-Step-6-Version-3.jpg”,”bigUrl”:”/images/thumb/0/0e/Insert-a-Drawstring-Step-6-Version-3.jpg/aid231009-v4-728px-Insert-a-Drawstring-Step-6-Version-3.jpg”,”smallWidth”:460,”smallHeight”:345,”bigWidth”:728,”bigHeight”:546,”licensing”:”<div class=”mw-parser-output”><p>u00a9 2023 wikiHow, Inc. All rights reserved. wikiHow, Inc. is the copyright holder of this image under U.S. and international copyright laws. This image is <b>not</b> licensed under the Creative Commons license applied to text content and some other images posted to the wikiHow website. This image may not be used by other entities without the express written consent of wikiHow, Inc.<br>n</p><p><br />n</p></div>”}
6
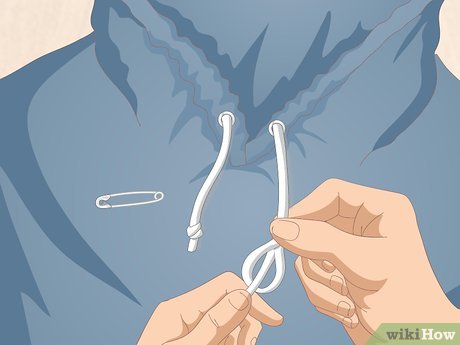
Remove the safety pin and knot the ends of the drawstring. Pull the drawstring until both ends are equal lengths. Then, remove your safety pin. If you’d like to prevent the drawstring from sliding back into the casing, tie a large knot at each end of the drawstring.[6] X Research source
Make the knots larger than the eyelets so the drawstring doesn’t slip back in the casing.
Method 2
Method 2 of 2:
Trying Other Tools
{“smallUrl”:”https://www.wikihow.com/images/thumb/7/76/Insert-a-Drawstring-Step-7-Version-3.jpg/v4-460px-Insert-a-Drawstring-Step-7-Version-3.jpg”,”bigUrl”:”/images/thumb/7/76/Insert-a-Drawstring-Step-7-Version-3.jpg/aid231009-v4-728px-Insert-a-Drawstring-Step-7-Version-3.jpg”,”smallWidth”:460,”smallHeight”:345,”bigWidth”:728,”bigHeight”:546,”licensing”:”<div class=”mw-parser-output”><p>u00a9 2023 wikiHow, Inc. All rights reserved. wikiHow, Inc. is the copyright holder of this image under U.S. and international copyright laws. This image is <b>not</b> licensed under the Creative Commons license applied to text content and some other images posted to the wikiHow website. This image may not be used by other entities without the express written consent of wikiHow, Inc.<br>n</p><p><br />n</p></div>”}
1
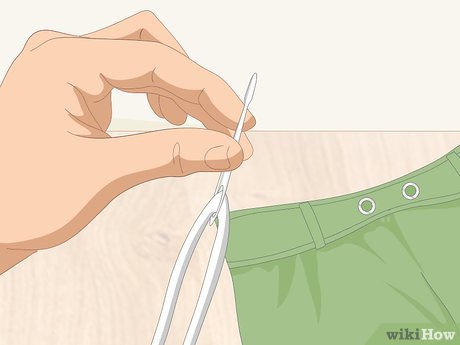
Buy a bodkin to save time and effort. This small tool looks like a large, dull sewing needle with a large hole at the end. Push about 4 inches (10 cm) of the drawstring through the hole and then push the bodkin through the casing of your garment. If your bodkin has a clamp on the end instead of a large hole, open it and put the end of the drawstring under it before you clamp it closed.[7] X Research source
You can buy bodkins from craft supply or hobby stores.
{“smallUrl”:”https://www.wikihow.com/images/thumb/5/51/Insert-a-Drawstring-Step-8-Version-3.jpg/v4-460px-Insert-a-Drawstring-Step-8-Version-3.jpg”,”bigUrl”:”/images/thumb/5/51/Insert-a-Drawstring-Step-8-Version-3.jpg/aid231009-v4-728px-Insert-a-Drawstring-Step-8-Version-3.jpg”,”smallWidth”:460,”smallHeight”:345,”bigWidth”:728,”bigHeight”:546,”licensing”:”<div class=”mw-parser-output”><p>u00a9 2023 wikiHow, Inc. All rights reserved. wikiHow, Inc. is the copyright holder of this image under U.S. and international copyright laws. This image is <b>not</b> licensed under the Creative Commons license applied to text content and some other images posted to the wikiHow website. This image may not be used by other entities without the express written consent of wikiHow, Inc.<br>n</p><p><br />n</p></div>”}
2
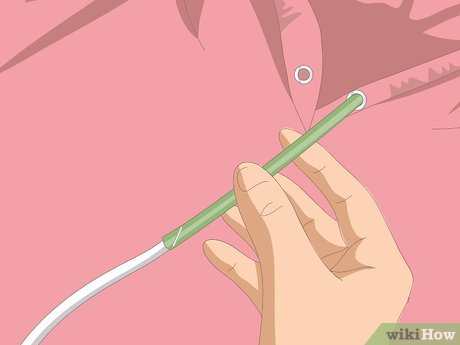
Use a straw if you’re having trouble feeding a safety pin through the casing. If you’re inserting a drawstring through a large casing or thick fabric, such as on a hoodie, it can be tricky to feel the safety pin through the fabric. To make it easier, push at least 1 inch (2.5 cm) of a drawstring end into a straw and staple the straw so it goes into the drawstring. Then, push the empty end of the straw through the eyelet. Keep pulling the straw through the casing so the drawstring comes out the other side.
Since the straw is larger than the safety pin, it’s easier to feel it through the heavier fabric. It also won’t snag on the seam allowance.
To remove the staple, pull it away with a staple remover. Keep in mind that this may damage delicate fabrics, but sturdy drawstring cords will be fine.
{“smallUrl”:”https://www.wikihow.com/images/thumb/b/b7/Insert-a-Drawstring-Step-9-Version-2.jpg/v4-460px-Insert-a-Drawstring-Step-9-Version-2.jpg”,”bigUrl”:”/images/thumb/b/b7/Insert-a-Drawstring-Step-9-Version-2.jpg/aid231009-v4-728px-Insert-a-Drawstring-Step-9-Version-2.jpg”,”smallWidth”:460,”smallHeight”:345,”bigWidth”:728,”bigHeight”:546,”licensing”:”<div class=”mw-parser-output”><p>u00a9 2023 wikiHow, Inc. All rights reserved. wikiHow, Inc. is the copyright holder of this image under U.S. and international copyright laws. This image is <b>not</b> licensed under the Creative Commons license applied to text content and some other images posted to the wikiHow website. This image may not be used by other entities without the express written consent of wikiHow, Inc.<br>n</p><p><br />n</p></div>”}
3
Bend a wire hanger to make a hook for pulling the drawstring through. If you’d like to make a sturdy tool that you can use again and again, find a wire coat hanger. Untwist the hook and shape it into a long straight wire. Then, bend the straight end to create a small hook and push the drawstring through the hook. Push the hook end of the wire through the eyelet and keep pushing the wire until the drawstring comes out the other side.[8] X Research source
If your drawstring keeps slipping off of the hook, bend the wire over the drawstring to keep it in place.
Feel free to bend the wire as you feed it through the casing, especially if you’re inserting the drawstring through the rounded part of a hoodie.
Tip: Use caution when you’re pushing the wire through the fabric since you don’t want to accidentally rip the material.
{“smallUrl”:”https://www.wikihow.com/images/thumb/f/fc/Insert-a-Drawstring-Step-10-Version-2.jpg/v4-460px-Insert-a-Drawstring-Step-10-Version-2.jpg”,”bigUrl”:”/images/thumb/f/fc/Insert-a-Drawstring-Step-10-Version-2.jpg/aid231009-v4-728px-Insert-a-Drawstring-Step-10-Version-2.jpg”,”smallWidth”:460,”smallHeight”:345,”bigWidth”:728,”bigHeight”:546,”licensing”:”<div class=”mw-parser-output”><p>u00a9 2023 wikiHow, Inc. All rights reserved. wikiHow, Inc. is the copyright holder of this image under U.S. and international copyright laws. This image is <b>not</b> licensed under the Creative Commons license applied to text content and some other images posted to the wikiHow website. This image may not be used by other entities without the express written consent of wikiHow, Inc.<br>n</p><p><br />n</p></div>”}
4
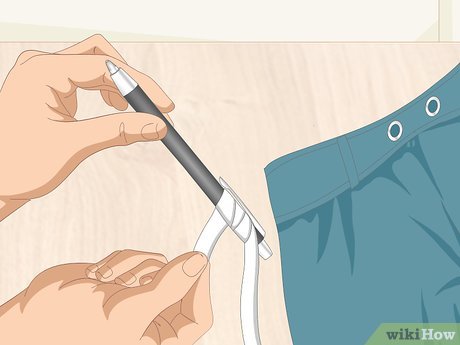
Wrap the drawstring around a rounded pen cap if you can’t find other tools. If you can’t find a safety pin, straw, or hanger, look for a pen that has a pocket clip and wrap the drawstring around the clip. Then, slide the opposite end of the pen through the casing. Feel the pen through the fabric and pull it through the casing until the pen and drawstring come out of the other end.[9] X Research source
Ensure that you’re using a pen with a pocket clip so you don’t accidentally push an exposed tip through your fabric.
Tips
If you don’t want the drawstring to slide around or come out, find the middle of the drawstring while it’s in the casing and stitch it in place.


