

[ad_1]
Steps
Part 1
Part 1 of 2:
Constructing the Bow
-
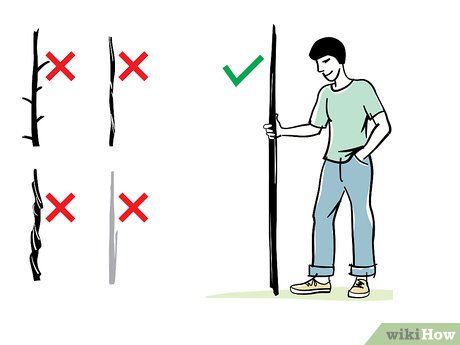
1Choose a long piece of wood for the bow. There are a few things to consider when selecting raw wood for your bow:[1]
- Find a piece of dry and dead (but not gray or cracking) hardwood (such as oak, lemon tree, hickory, yew, black locust, teak, ash, juniper, or madroño) about 6 feet (or 1.8 meters) [or as tall as you may be] in length. The wood should be free of knots, twists, or limbs, and it would be helpful if the branch is thick at its center.
- This piece of wood should be somewhat flexible, such as juniper or mulberry. You can even use a shaft of bamboo or cane but take care that it is not too thick. For that, you can use young bamboo which is strong as well as flexible.
- Green wood (living wood that you cut from a tree or sapling) can be used if absolutely necessary but should be avoided because it does not provide the same power as dry wood.
-
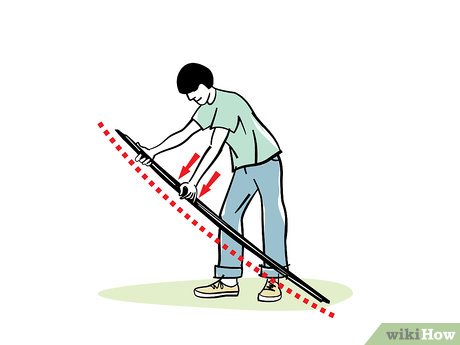 2Determine the natural curve of the stick. Every piece of wood will have a natural curve, no matter how slight. As you construct the bow, this curve will determine where you place its main features. To find the curve, place your wood on the ground, with one hand holding it in place at the top. With your other hand, press lightly against its middle. It will swivel so that its natural belly faces you, and its back faces out.[2]
-
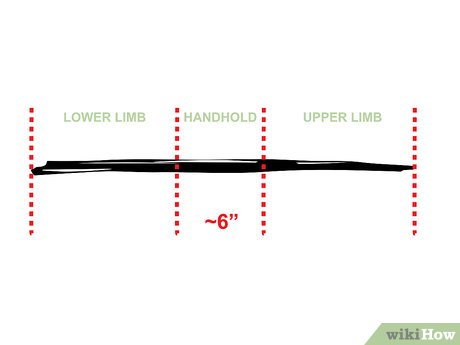 3Determine the handhold and limbs. These parts are essential to the shaping process. To find the handhold, make marks three inches above and below the center point of the bow. Anything within these marks is the handhold, above them is the upper limb, and below is the lower limb.[3]
-
 4Shape the bow. Place the bottom end of the bow on your foot, and one hand atop the bow. With your other hand, press outward, the belly facing you. Use this exercise to catalog where the bow is flexible and where it is not. Using a knife or similar tool, shave wood off the unyielding spots on the belly only, until both the upper and lower limbs curve similarly to each other. Check your progress frequently. When both limbs are more flexible and are mirror images of each other in curve and diameter, you are ready for the next step.[4]
- You want the bow to be strongest (thickest) at the handhold.
- Be careful to only carve from the belly. An inordinate amount of pressure is exerted on the back of the bow, and even the slightest damage to its structure can promote breakage.
-
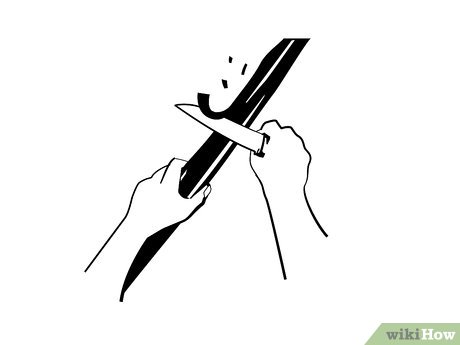
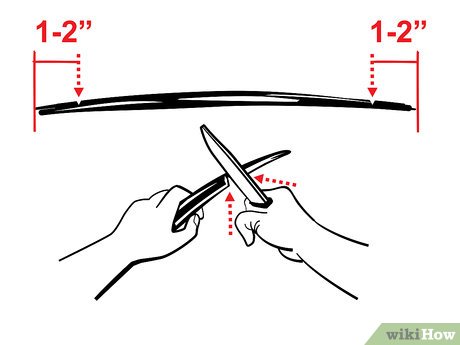 5Cut notches to hold the bow string. Use your knife to cut notches that begin at the sides and curve around toward the belly of the bow and in toward the handhold as they go. There should be one on each side about 1 to 2 inches (2.5 to 5 cm) from each end of the bow. Remember not to cut into its back, and do not make the notches deep enough to compromise the strength of the tips. Make them just deep enough to hold the string in place.
 -
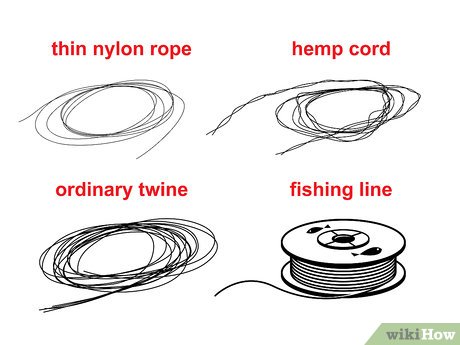 6Select a bow string. The string should not be stretchy, as the power comes from the wood, not the string. If you are stranded in the wilderness, it may be difficult to find a suitable string, and you may need to try a variety of materials before you find one that has the necessary strength. Some bowstring material possibilities are:[5]
- rawhide
- thin nylon rope
- hemp cord
- fishing line
- strands of cotton or silk from caterpillars
- ordinary twine
-
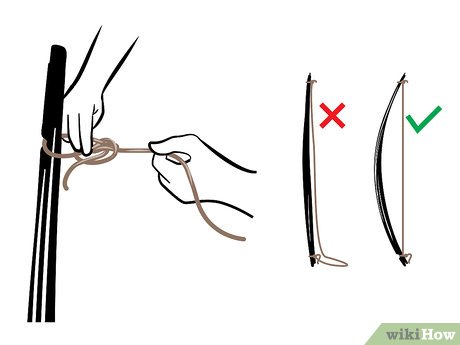 7String the bow. You will need to tie a loose loop with a very secure knot at both ends of your bowstring before slipping it over the lower, and then upper, limb of your bow. Make your string slightly shorter than the length of your unflexed bow, so that both bow and string are taut.
 -
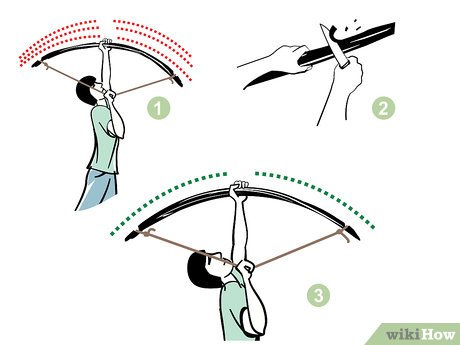 8Tiller the bow. Hang it upside down by the handhold from a tree branch or something similar so that you can pull downward on the string. Pull downward slowly, checking to make sure that the limbs bend evenly and carving away wood as required, until you can pull it as far down as the distance between your hand and your jaw (arm fully extended out from shoulder).[6]
Part 2
Part 2 of 2:
Constructing the Arrows
-
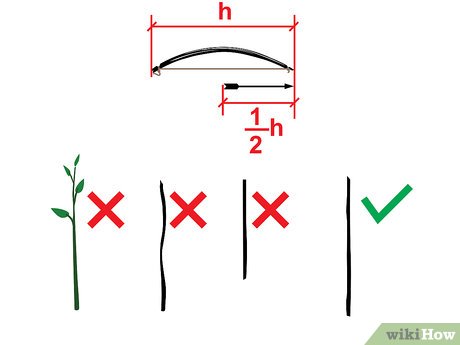 1Select sticks for arrows.[7]
Arrows should be formed from the straightest sticks you can find. The wood should be dry and dead. Each arrow should be about half as long as the bow, or as long as the bow can draw back. It does not work to have arrows that can’t be pulled back to the bow’s potential. Consider these items as well:- Green wood does work if you can give it some extra time to dry out naturally, as the sap may ignite if placed over a fire to dry.
- Some strong, straight plants for arrows are goldenrod and Mullen . They can be found in fields.
-
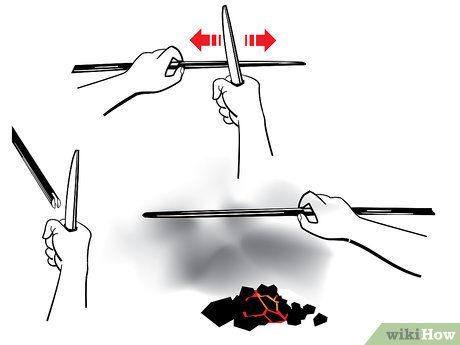 2Shape the arrows. You will need to whittle the wood smooth around the circumference of the arrow. You can straighten an arrow by gently heating the shaft over hot coals–do not scorch or burn the wood–and then holding the arrow straight while the wood cools. Carve a small notch in the back tip of each arrow to accommodate the bow string. This is called a nock.
 -
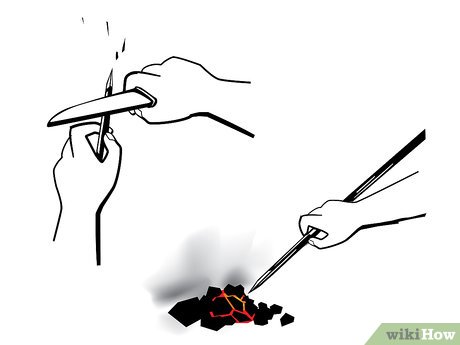 3Sharpen the point of the arrow. The simplest arrowhead is simply a carved point on the front of the arrow shaft. You can whittle such a point with a knife and then fire harden it by gently heating it in coals (again, be careful not to burn or scorch the wood).
 -
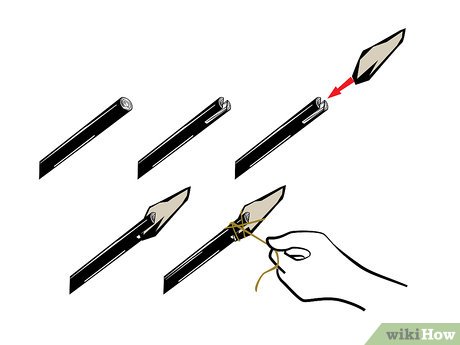 4Construct an arrowhead if possible. (This is optional). You can do this with metal, stone, glass, or bone. Carefully use a small rock or hammer to chip your material into a point and attach it to the arrow’s tip. You can do this by notching the wood, inserting the arrowhead into the notch, and then lashing the arrowhead to the wood with some sort of string or cord.[8]
-
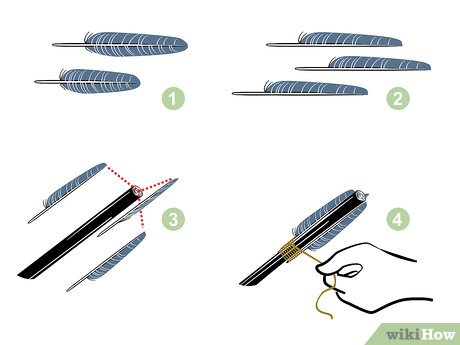 5Make fletchings (optional). While fletchings improve the arrow’s flight, they are not necessary for a field-expedient weapon. Find some feathers to make the fletchings and glue them (if possible) onto the back ends of the arrows. You could also split the back of the arrow, slide the feather in, and tightly wrap a thin thread (possibly obtained from your own clothes) around the fletching. If you use this method, you can use just about anything as your fletching.[9]
- Fletchings act similarly to rudders on a ship or small plane, guiding the arrow through the air for pinpoint accuracy.
- They also have a similar effect to a glider, as they vastly improve an arrow’s range of flight.
- They are, however, somewhat difficult to perfect. If your weapon is meant for survival, this is not a priority.
Video
Tips
-
You can get more of a curve if you wet the bow then curve until you like the curve. Just be sure to let it dry.⧼thumbs_response⧽
-
Remember not to make your bow too big- if you do that, you won’t be able to hold it.⧼thumbs_response⧽
-
Try to get smooth wood. Rough wood will make your hands scratchy and will damage the feathers making it go slightly off and you won’t hit the target.⧼thumbs_response⧽
Warnings
-
The bow and arrow detailed here are meant to be temporary and will not have a long life.The more you use your bow, the more likely it is that it will snap. Change bows about every 3-5 months to avoid this.⧼thumbs_response⧽
-
If shooting with others, always wait for everyone to finish shooting to collect arrows.⧼thumbs_response⧽
-
You may want to carry a bowstring with you when camping as they are hard to make from scratch.⧼thumbs_response⧽
-
Use extreme caution when working with sharp tools.⧼thumbs_response⧽
-
The bow and arrow constitute a lethal weapon. Exercise caution when using, and never aim at anything you do not intend to kill.⧼thumbs_response⧽
-
Keep bow and arrows out of the reach of small children.⧼thumbs_response⧽
-
The bow and arrow is not easy to use effectively. If you find yourself in a situation where you need to hunt to survive, you may be better off constructing traps or a more easily-used weapon.⧼thumbs_response⧽
Things You’ll Need
-
A hardwood stick: About 6 feet (1.80 meters) in length. Common woods include osage, yew, and oak. Must be as straight as possible and about 2 inches in diameter (5 cm)
-
Non-stretchy string: Weed eater line, nylon bowstring, catgut, sinew, twine, etc.
-
Woodcutting tools: An axe, a draw knife, planes (small and big) set of files and sandpaper
-
Straight branches for arrows: About 3 feet (0.80 meters) in length.
-
Feathers (optional)
-
Arrowhead materials: Flint, metal, plastic, etc. (optional)
-
Steel Wool (optional)
[ad_2]
Source link : https://www.wikihow.com/Make-a-Bow-and-Arrow

