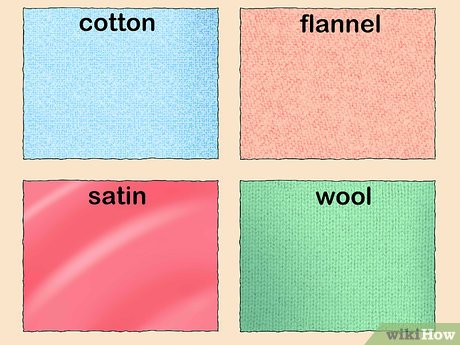
Choose your fabric. Great fabric choices include: cotton, flannel, satin, and wool.[1] X Research source
You will need fabric for the main, outer part of your cape, and a lighter fabric for the lining. They can be matching colors and patterns, or contrasting ones.
Consider using a pattern for one side and a solid color for the other.
You can use cotton for both sides of the cape since it is light enough.
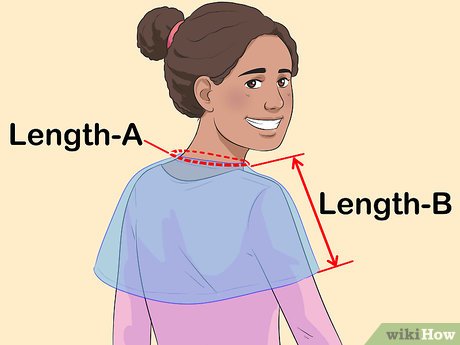
Figure out the neck and length measurements. Measure around the base of your neck. Next, measure down from your shoulder down to where you want the cape to end. Record both of your measurements.[2] X Research source
For something more cloak-like, measure down to your ankles or mid-calves.
For something more like a caplet, measure down to just past your elbows.
For a fashion cape, measure from your shoulders down to your knees, since this is probably the most flattering style.
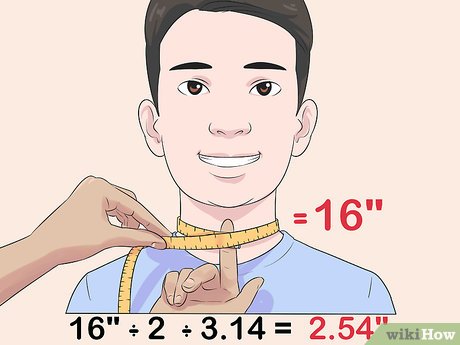
Use your neck measurement to figure out the radius. Use a calculator to divide your neck measurement by 2. Divide the answer by pi or 3.14. Round the measurement up to the nearest quarter inch (half centimeter). This is your radius.[3] X Research source
{“smallUrl”:”https://www.wikihow.com/images/thumb/b/b0/Make-a-Cape-Step-4-Version-4.jpg/v4-460px-Make-a-Cape-Step-4-Version-4.jpg”,”bigUrl”:”/images/thumb/b/b0/Make-a-Cape-Step-4-Version-4.jpg/aid663999-v4-728px-Make-a-Cape-Step-4-Version-4.jpg”,”smallWidth”:460,”smallHeight”:345,”bigWidth”:728,”bigHeight”:546,”licensing”:”<div class=”mw-parser-output”><p>u00a9 2023 wikiHow, Inc. All rights reserved. wikiHow, Inc. is the copyright holder of this image under U.S. and international copyright laws. This image is <b>not</b> licensed under the Creative Commons license applied to text content and some other images posted to the wikiHow website. This image may not be used by other entities without the express written consent of wikiHow, Inc.<br>n</p><p><br />n</p></div>”}
4
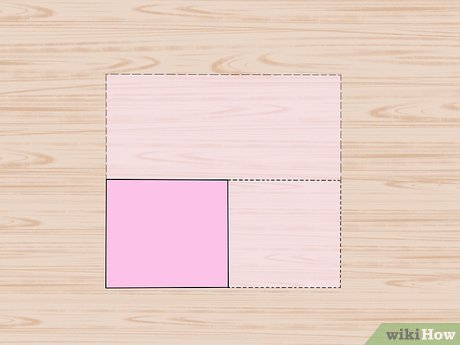
Fold your main fabric into quarters. Begin by folding the fabric in half widthwise. Fold it in half again, also widthwise, to form a square. Rotate the fabric so that the folded corner is in the upper left-hand corner.[4] X Research source
Don’t fold the lining fabric just yet.
{“smallUrl”:”https://www.wikihow.com/images/thumb/5/56/Make-a-Cape-Step-5-Version-4.jpg/v4-460px-Make-a-Cape-Step-5-Version-4.jpg”,”bigUrl”:”/images/thumb/5/56/Make-a-Cape-Step-5-Version-4.jpg/aid663999-v4-728px-Make-a-Cape-Step-5-Version-4.jpg”,”smallWidth”:460,”smallHeight”:345,”bigWidth”:728,”bigHeight”:546,”licensing”:”<div class=”mw-parser-output”><p>u00a9 2023 wikiHow, Inc. All rights reserved. wikiHow, Inc. is the copyright holder of this image under U.S. and international copyright laws. This image is <b>not</b> licensed under the Creative Commons license applied to text content and some other images posted to the wikiHow website. This image may not be used by other entities without the express written consent of wikiHow, Inc.<br>n</p><p><br />n</p></div>”}
5
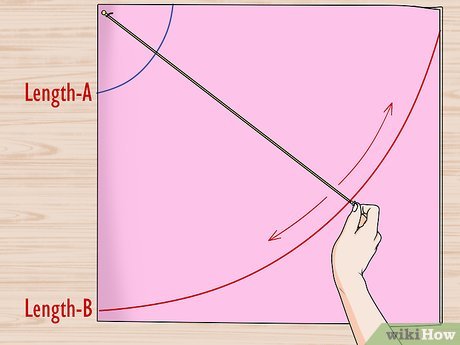
Start drawing the neck part of your pattern. Pin a piece of string to the top-left corner of your fabric, where the folds are. Tie a dressmaker’s chalk or pen to the string so that it’s the same length as your neck radius. Use the chalk/pen like a compass to draw an arch from the top edge of the fabric over to the left side edge.[5] X Research source
{“smallUrl”:”https://www.wikihow.com/images/thumb/3/36/Make-a-Cape-Step-6-Version-4.jpg/v4-460px-Make-a-Cape-Step-6-Version-4.jpg”,”bigUrl”:”/images/thumb/3/36/Make-a-Cape-Step-6-Version-4.jpg/aid663999-v4-728px-Make-a-Cape-Step-6-Version-4.jpg”,”smallWidth”:460,”smallHeight”:345,”bigWidth”:728,”bigHeight”:546,”licensing”:”<div class=”mw-parser-output”><p>u00a9 2023 wikiHow, Inc. All rights reserved. wikiHow, Inc. is the copyright holder of this image under U.S. and international copyright laws. This image is <b>not</b> licensed under the Creative Commons license applied to text content and some other images posted to the wikiHow website. This image may not be used by other entities without the express written consent of wikiHow, Inc.<br>n</p><p><br />n</p></div>”}
6
Finish drawing your pattern. Add your radius measurement to your desired length measurement. Lengthen the string according to that new measurement. Draw a second arch to make the bottom of your cape.[6] X Research source
{“smallUrl”:”https://www.wikihow.com/images/thumb/3/3e/Make-a-Cape-Step-7-Version-4.jpg/v4-460px-Make-a-Cape-Step-7-Version-4.jpg”,”bigUrl”:”/images/thumb/3/3e/Make-a-Cape-Step-7-Version-4.jpg/aid663999-v4-728px-Make-a-Cape-Step-7-Version-4.jpg”,”smallWidth”:460,”smallHeight”:345,”bigWidth”:728,”bigHeight”:546,”licensing”:”<div class=”mw-parser-output”><p>u00a9 2023 wikiHow, Inc. All rights reserved. wikiHow, Inc. is the copyright holder of this image under U.S. and international copyright laws. This image is <b>not</b> licensed under the Creative Commons license applied to text content and some other images posted to the wikiHow website. This image may not be used by other entities without the express written consent of wikiHow, Inc.<br>n</p><p><br />n</p></div>”}
7
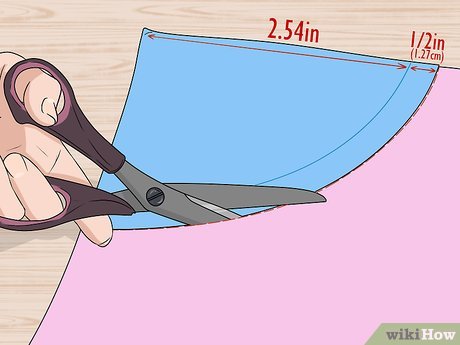
Cut your fabric adding ½-inch (1.27-centimeter) seam allowances. When you are done, fold your lining fabric into fourths, then place your cut fabric on top. Cut your lining using the cut outer fabric as a guide.[7] X Research source
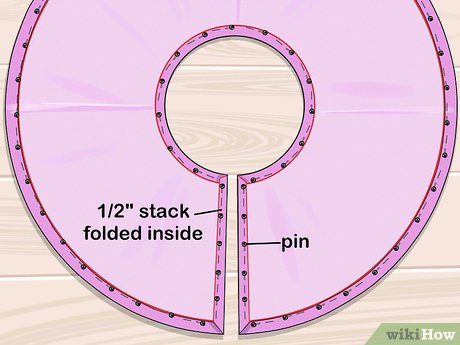
Cut the front of your cape open. Unfold your outer and lining pieces and stack them together. Fold them in half widthwise so that you get a semi-circle. Cut along the left folded edge; leave the other one alone. This will create the opening of your cape.
Save a step and stack your fabric together with the right sides facing in.
Stack and pin your fabric together. Unfold your fabric semi-circles. Stack them together, right sides facing in. Make sure that all of the edges are aligned, then start pinning them together.
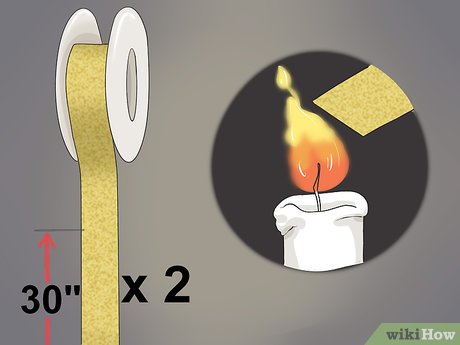
Consider adding a ribbon closure. Cut two 30-inch (76.2-centimeter) long pieces of ribbon. Unpin your cape at the top two corners to either side of the opening. Tuck the ribbons into the cape. Make sure that the ends are aligned with the edges of the cape, then pin them shut. The ribbons should be sandwiched between both layers of fabric.[8] X Research source
Give your ribbons a nicer finish by sealing the ends with a flame first.
Choose a wide ribbon that coordinates with your cape. Something around 2 inches (5.08 centimeters) wide would be ideal.
If you don’t want a ribbon closure, skip this step.
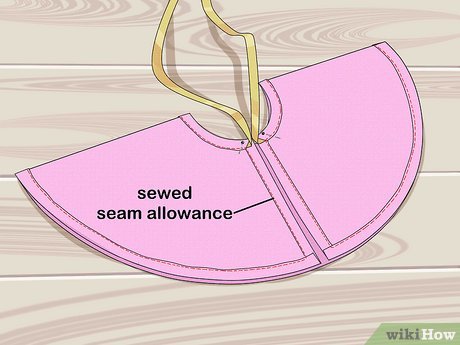
Sew the cape using a ½-inch (1.27-centimeter) seam allowance. You want to sew along the inside collar, bottom edge, and the two straight edges. Leave a 4-inch (10.16-centimeter) gap along the bottom of one straight edge for turning.[9] X Research source
Make you sewing stronger by backstitching at the start and end.
If you added a ribbon closure, be careful not to sew across the ribbons!
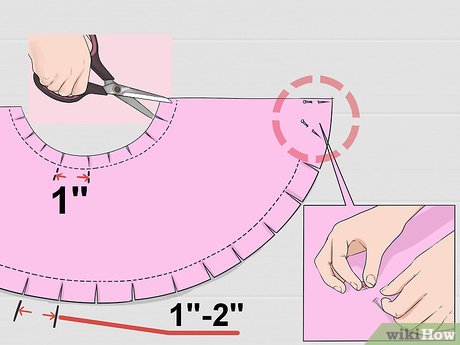
Cut notches and slits into the curves, and clip the corners. Cut some notches into the collar, about 1 inch (2.54 centimeters) apart. Cut some slits into the bottom curve, about 1 to 2 inches (2.54 to 5.08 centimeters) apart. At the end, clip the top and bottom corners of your opening. This will help the cape lay smoother.
Try to cut as close to the stitching as you can without actually cutting through it.
{“smallUrl”:”https://www.wikihow.com/images/thumb/f/f1/Make-a-Cape-Step-13-Version-4.jpg/v4-460px-Make-a-Cape-Step-13-Version-4.jpg”,”bigUrl”:”/images/thumb/f/f1/Make-a-Cape-Step-13-Version-4.jpg/aid663999-v4-728px-Make-a-Cape-Step-13-Version-4.jpg”,”smallWidth”:460,”smallHeight”:345,”bigWidth”:728,”bigHeight”:546,”licensing”:”<div class=”mw-parser-output”><p>u00a9 2023 wikiHow, Inc. All rights reserved. wikiHow, Inc. is the copyright holder of this image under U.S. and international copyright laws. This image is <b>not</b> licensed under the Creative Commons license applied to text content and some other images posted to the wikiHow website. This image may not be used by other entities without the express written consent of wikiHow, Inc.<br>n</p><p><br />n</p></div>”}
13
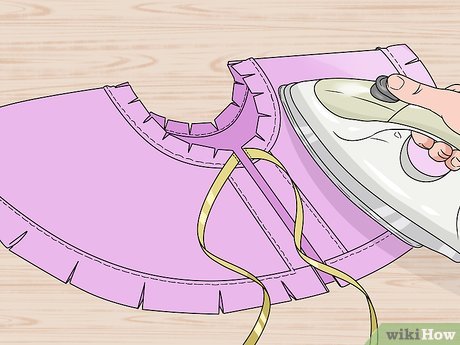
Turn the cape inside out, then press it flat with an iron. Use something blunt but pointy, such as a knitting needle, to help fill out the corners. Tuck the raw edges of your turning gap in until they match up with the rest of the cape, and pin them in place. Iron your cape flat.
{“smallUrl”:”https://www.wikihow.com/images/thumb/d/d5/Make-a-Cape-Step-14-Version-4.jpg/v4-460px-Make-a-Cape-Step-14-Version-4.jpg”,”bigUrl”:”/images/thumb/d/d5/Make-a-Cape-Step-14-Version-4.jpg/aid663999-v4-728px-Make-a-Cape-Step-14-Version-4.jpg”,”smallWidth”:460,”smallHeight”:345,”bigWidth”:728,”bigHeight”:546,”licensing”:”<div class=”mw-parser-output”><p>u00a9 2023 wikiHow, Inc. All rights reserved. wikiHow, Inc. is the copyright holder of this image under U.S. and international copyright laws. This image is <b>not</b> licensed under the Creative Commons license applied to text content and some other images posted to the wikiHow website. This image may not be used by other entities without the express written consent of wikiHow, Inc.<br>n</p><p><br />n</p></div>”}
14
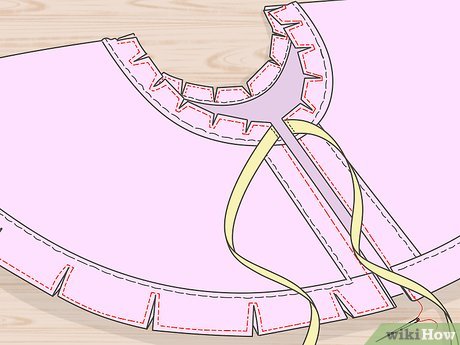
Stitch the gap shut. You can do this by hand using a ladder stitch. You can also topstitch all the way around the cape using a matching thread color and a ⅛-inch (0.32-centimeter) seam allowance. Remove the pins when you are done.
{“smallUrl”:”https://www.wikihow.com/images/thumb/5/53/Make-a-Cape-Step-15-Version-4.jpg/v4-460px-Make-a-Cape-Step-15-Version-4.jpg”,”bigUrl”:”/images/thumb/5/53/Make-a-Cape-Step-15-Version-4.jpg/aid663999-v4-728px-Make-a-Cape-Step-15-Version-4.jpg”,”smallWidth”:460,”smallHeight”:345,”bigWidth”:728,”bigHeight”:546,”licensing”:”<div class=”mw-parser-output”><p>u00a9 2023 wikiHow, Inc. All rights reserved. wikiHow, Inc. is the copyright holder of this image under U.S. and international copyright laws. This image is <b>not</b> licensed under the Creative Commons license applied to text content and some other images posted to the wikiHow website. This image may not be used by other entities without the express written consent of wikiHow, Inc.<br>n</p><p><br />n</p></div>”}
15
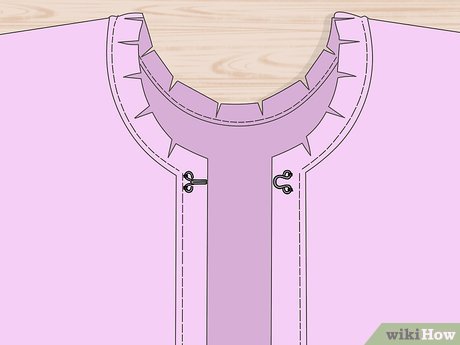
Add a closure if you have not yet already. You can stitch in a clasp-style close, a hook-and-eye-closure, or even a corded frog closure. Choose one that matches the style of your cape the best.
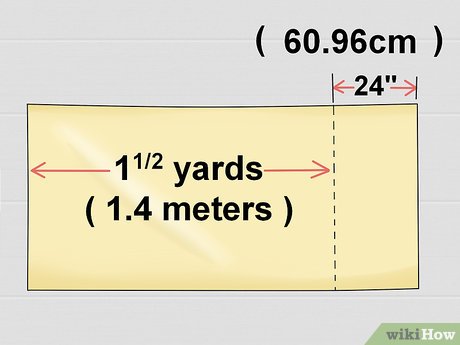
Choose and buy your fabric. You will need at least 1½ yards (1.4 meters) of fabric. Something cozy, like wool felt, fleece, or flannel, would work best. Keep the fabric folded as it came on the bolt.
If you want a longer cape, buy more fabric, but be sure to subtract 24 inches (60.96 centimeters) for the hood and seam allowances.
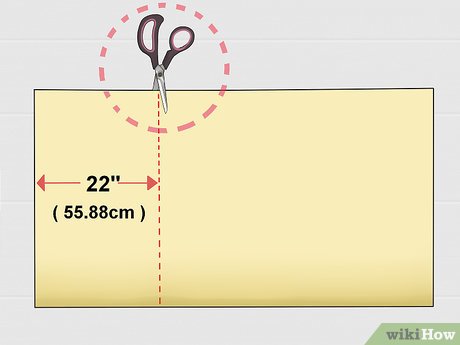
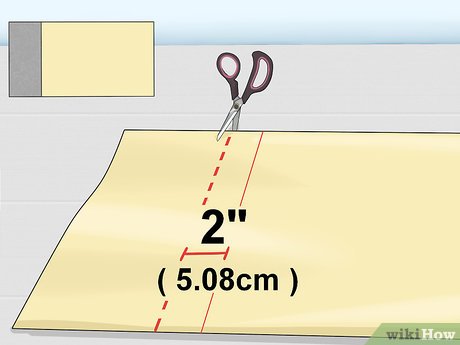
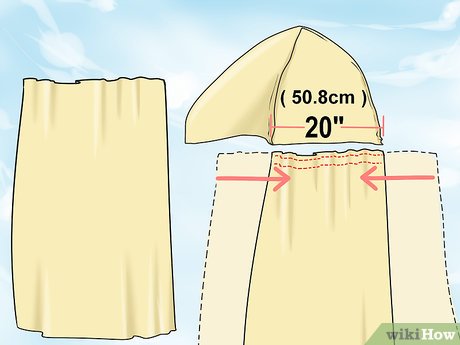
Cut off 22 inches (55.88 centimeters) from the side of your fabric. Measure 22 inches (55.88 centimeters) from one of the narrow ends. Cut off the 22-inch (55.88-centimeter) wide rectangle. This will eventually become your hood. Save the big piece for later.
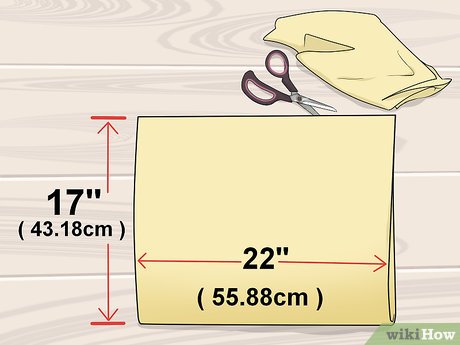
Cut the hood piece so that it’s 17 inches (43.18 centimeters) tall. Take the 22-inch (55.88-centimeter) rectangle you just cut off from your main piece. Turn it so that the folded edge is facing you. Cut it down so that it is 17 inches (43.18 centimeters) tall and 22 inches (55.88 centimeters) wide. Make sure that the 22-inch (55.88-centimeter) edge is along the fold. Discard the little scrap from the top.
Cut down the cape body, if needed. The big rectangle that’s left over will make the main part of your cape. Measure the fabric along the folded edge. If it is too long for your liking, cut it down so that it’s the right length. Remember to add 2 inches (5.08 centimeters) for seam allowances.
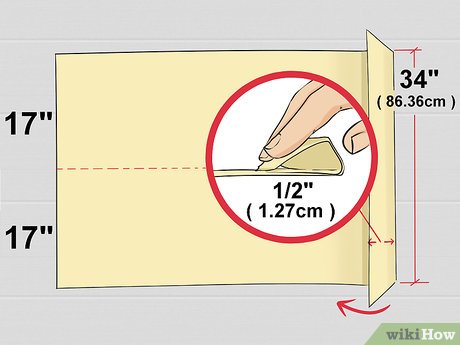
Hem the raw edges on your cape. Unfold the cape and turn it so that the wrong sides are facing you. Fold one of the long edges down by ½-inch (1.27-centimeter), and press it flat with an iron. Fold it by another ½-inch (1.27-centimeter), and press it flat again. Topstitch the hem down, ⅛-inch (0.32-centimeter) from the inside fold. Repeat this step for the two side edges.
Backstitch at the start and end of your sewing to make your stitches stronger.
Unfold your hood and hem one of the long edges. Unfold your hood first, and turn it so that the wrong side is facing you. Hem one of the 34-inch (86.36-centimeter) edges the same way you did the cape body. Leave the other three edges alone.
The 34-inch (86.36-centimeter) edge is the side that was 17 inches (43.18 centimeters) when folded.
Remember to backstitch at the start and end of your sewing.
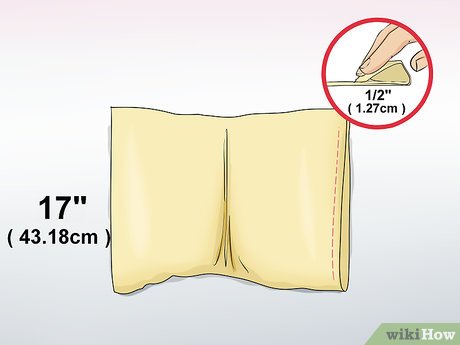
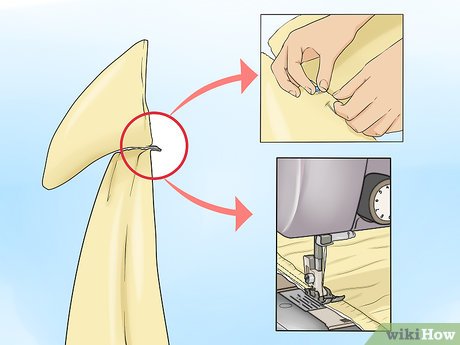
Fold the hood, then sew up one of the narrow edges. Fold the hood back in half again, with the wrong side facing out. The 22-inch (55.88-centimeter) edge should be back along the fold, and one of the 17-inch (43.18-centimeter) edges should be hemmed. Sew the other 17-inch (43.18-centimeter) edge using a ½-inch (1.27-centimeter) seam allowance.
Remember to backstitch at the start and end of your sewing.
If your fabric is fraying a lot, you will need to go over the seams using a serger or zigzag stitch.
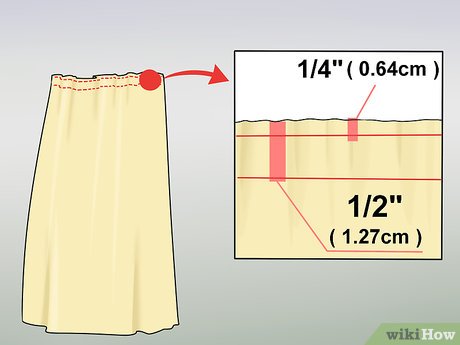
Sew two gathering stitches along the top of your cape. Sew straight or basting stitches along the top, raw edge of your cape. The first one needs to be ¼-inch (0.64-centimeter) from the raw edge, and the second one needs to be ½-inch (1.27-centimeter) from the raw edge.
Gather the top of your cape until it fits the hood. Find the bobbin threads on one side of your cape. Grab both of them, then start tugging on them. Keep gathering the fabric until it is the same width as your hood base, about 20 inches (50.8 centimeters). Tie off the threads, then snip the excess off.
You can gather the fabric from both sides of your cape, but make sure that you are only pulling the bobbin threads.
When you are done, take the time to adjust the gathers so that they are even.
Sew the hood to the cape. Pin the hood and the cape together, right sides touching. Make sure that the raw edge of the hood is aligned with the gathered edge of the cape. Sew the two together using a 1-inch (2.54-centimeter) seam allowance. Make sure that the gathered edges don’t fold or bunch up while you sew.
Remember to backstitch at the start and end of your sewing.
If your fabric frays a lot, you can go over the raw edge with a serger or zigzag stitch. You can also bind the seam with bias tape or hem tape instead.
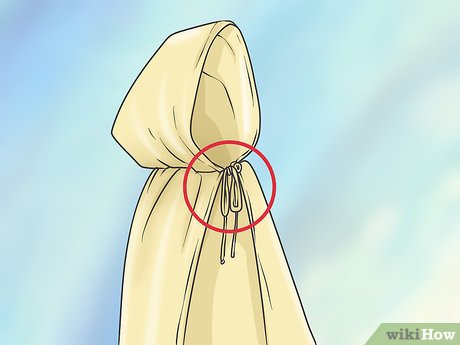
Add a clasp or closure. Here is where you can get creative. You can hand-stitch a simple frog closure to the front of your cape. You can also sew on two pieces of ribbons instead, if you prefer to tie the cape shut. Another option would be to add a looped cord on one side of the opening, and a large button on the other.
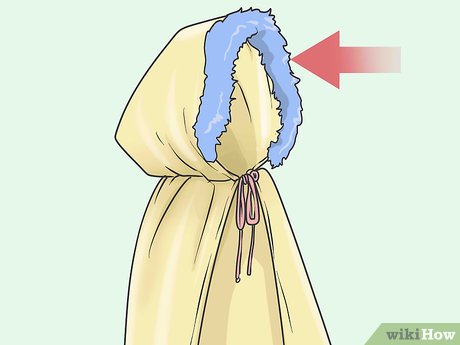
Add some finishing touches, if desired. You can consider your cape finished at this point, or you can add some embellishments to make it fancier. Here are some ideas to get you started:
Add a beaded fringe along the bottom for a gypsy cape.
Iron appliques to added design.
Sew on a fake fur trim to the hood fo a cozy cape.
Add some embroidery to the edges of your cape to make it fancier.
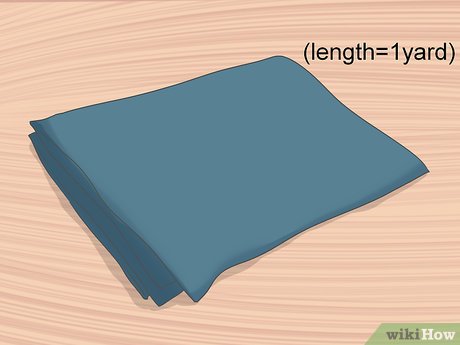
Choose your fabric. Since you won’t be sewing this, it would be best to use a fabric that does not fray, such as felt or flannel. You will need about 1 yard (0.91 meters) of fabric for this.[10] X Research source
You can use this method to create an adult-sized cape too, but you will need to use larger measurements.
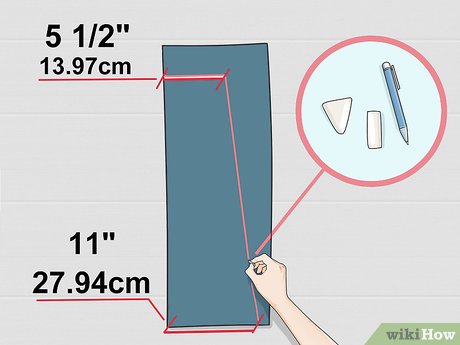
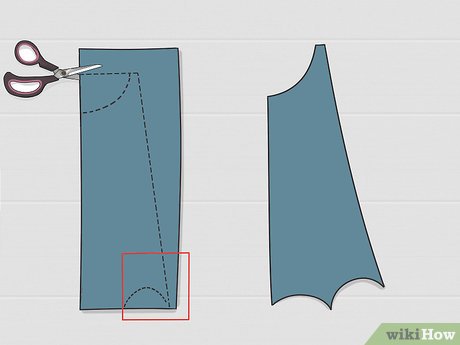
Draw your side edge. Use a dressmaker’s chalk or pen to make a mark along the bottom edge, 11 inches (27.94 centimeters) from the fold. How far down you make it is up to you; the further down it is, the longer the cape will be. Make another mark along the top edge, 5½ inches (13.97 centimeters) from the fold. Connect the lines using a straight edge.[11] X Research source
If you want a wider cape, and if you have enough fabric, you can make the bottom mark further from the folded edge.
For a more accurate length, add 5½ inches (13.97 centimeters) to your cape length. This will account for the neck opening.
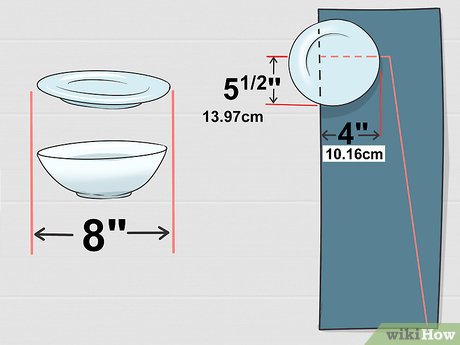
Use a plate or bowl to trace your collar. Find an 8-inch (20.32-centimeter) place or bowl. Place it along the top corner of your folded cloak. The side edge of the plate/bowl should be 4 inches (10.16 centimeters) from the fold. The bottom edge of the plate/bowl should be 5½ inches (13.97 centimeters) down from the top of your fabric. Trace the plate/bowl using a dressmaker’s chalk or pen.[12] X Research source
Cut along the lines that you drew. Try to cut just inside the lines. This way, they won’t show on your finished cape. You can leave your cap as is, or try one of the variations below for more character:
Round the top and bottom corners of your cape for a nicer touch.[13] X Research source
Add scalloped edge to the bottom of your cape.[14] X Research source
This is great if your kid wants to be Batman.
Cut notches and slits into the bottom edge for a battle-won cape.
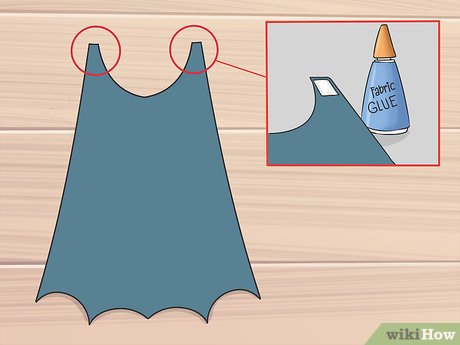
Add some Velcro closures. Get some Velcro squares or cut your own. Secure them to the top two “fingers” of your cape with hot glue or fabric glue. One goes on the top side, and the other goes on the underside.[15] X Research source
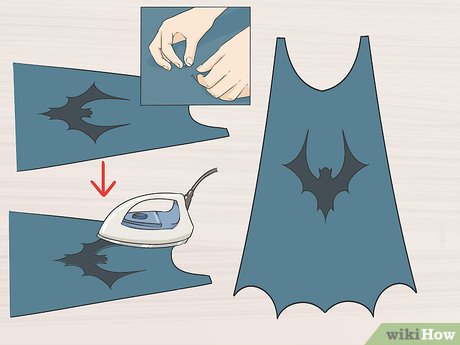
Consider adding a superhero emblem appliqué. Iron some fusible web interfacing to a piece of contrasting fabric. Draw and cut out your superhero’s emblem. Pin the emblem to the back of the cape. Iron it down, then remove the pins.
Each fusible web interfacing will be a little different, so be sure to follow the instruction on yours closely.
Alternatively, you can cut the emblem out of felt and glue it to the back of the cape with hot glue or fabric glue.[16] X Research source
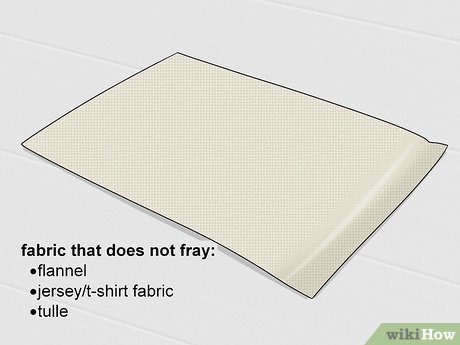
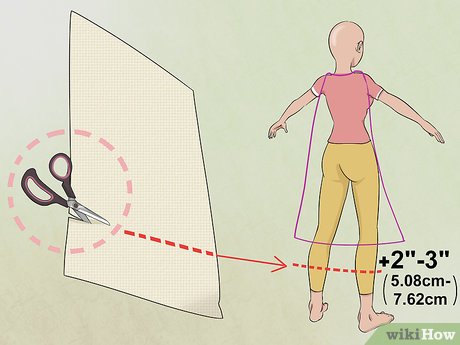
Choose your fabric. Since you won’t be doing any sewing for this, you want to find a fabric that does not fray, such as felt or flannel. Jersey/t-shirt fabric and tulle also make great choices.
This will create a child-sized cape. You can use larger measurements to make an adult cape.
Cut the fabric to length. Measure down from your child’s neck down to where you want the cape to end. Add 2 to 3 inches (5.08 to 7.62 centimeters) to your measurement. Cut the fabric according to that measurement.[17] X Research source
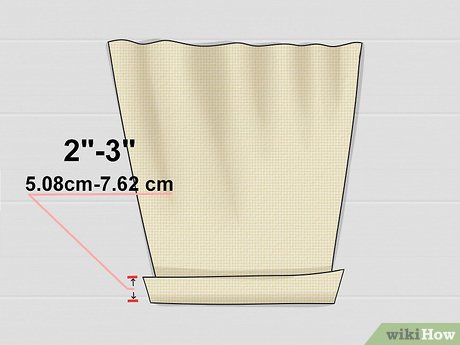
Make the casing. Turn the fabric so that the wrong side is facing you. Fold the top edge down by 2 to 3 inches (5.08 to 7.62 centimeters) to make the casing. Secure the bottom edge with fabric glue or iron-on hem tape.[18] X Research source
Hot glue is not recommended for this because it is not flexible enough to gather.
If you do know how to sew, you can sew the casing down, ¼-inch (0.64-centimeter) from the bottom edge.
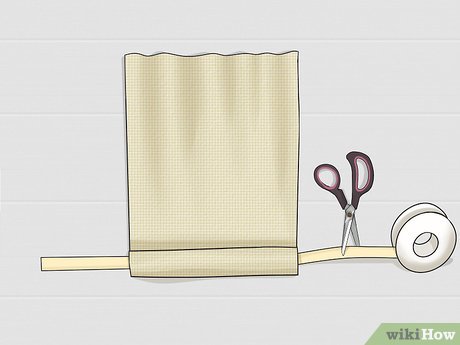
Cut a piece of ribbon that’s just a little longer than the casing. It can be the same color as the cape, or a contrasting one. Something between 1 and 2 inches (2.54 and 5.08 centimeters) would work best.
If you want to tie the ribbon into a bow, cut it twice the length as the casing. You can also use a piece of silver or gold cording instead.
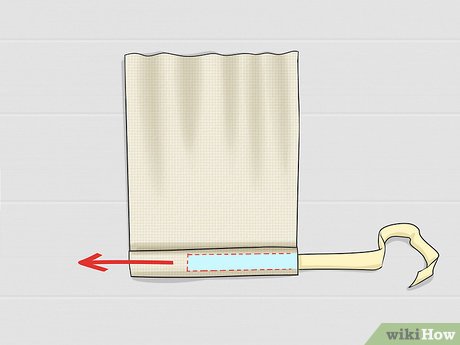
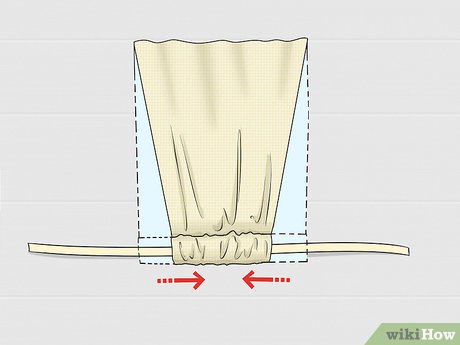
Scrunch the cape to gather it. Slide the cape so that it is centered on the ribbon. Next, scrunch the cape on the ribbon so that it gathers. It should be about half the width it used to be.[19] X Research source
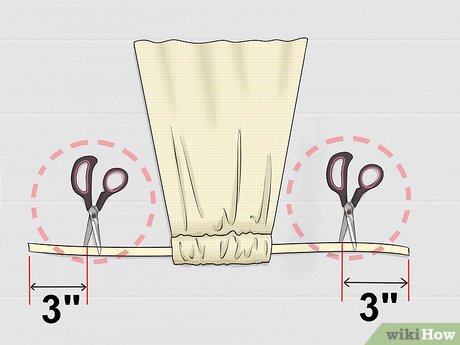
Trim the ribbon down to make the closure. Cut the ribbon down to 3 inches (7.62 centimeters) on each side. Seal the ends with a lighter to keep them from fraying.
If you will be tying the ribbon into a bow, skip this step.
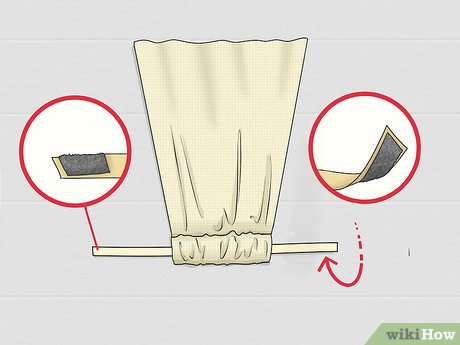
Add Velcro closures to the ribbon. Place one Velcro closure on the front of one ribbon, and the other on the back of the other ribbon. Self-adhesive Velcro would work best. If you can’t find any, you can glue on the regular kind with hot glue or fabric glue.
Consider hot gluing some pretty rhinestones over the front of one ribbon to make it fancier.
If you left the ribbon long, cut the ends at angles, then seal them with a lighter.
If you used cording instead of a ribbon, tie a knot into each end of the cord to keep it from fraying.
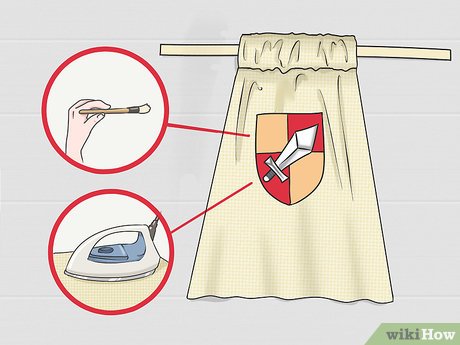
Add the finishing touches. You can leave your cape as is, or you can add some finishing touches, such as rhinestones or paint. Use colors that go well with your cape, and remember, less is more. Here are some ideas to get you started:[20] X Research source
Paint on designs using fabric glue or puff paint. You can free-hand them or use fabric stencils.
Use iron-on transfers to add designs to your cape.
Glue rhinestones along the edges using fabric glue or hot glue.
Use fusible web interfacing to glue appliqués onto the cape.
Hot glue a feather boa to the bottom of the cape.
Video
By using this service, some information may be shared with YouTube.
Tips
If you want to make a poncho, simply make a circle cape, but don’t cut the front opening. Skip the closure as well.
If a cape is meant for a child, always make sure that clasps or ties used around the neckline are safe and cannot be a source of choking. The same goes for any wearer, except that clearly older persons are capable of working out for themselves whether or not the neck attachment is unsafe.


