


[ad_1]
Steps
Method 1
Method 1 of 3:
Designing a Paper Collage
-

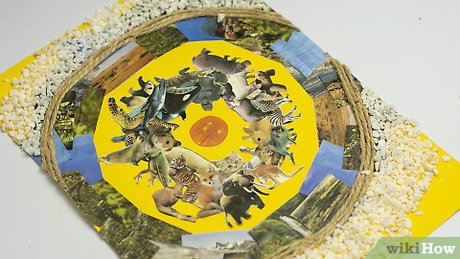
1Come up with a central design or theme for the collage. A collage can be about anything you want. Paper gives you no shortage of different options, so it’s about whatever sparks your creativity. Perhaps you feel like collecting pictures of your favorite actor or want to make a message out of words cut from magazines. You could also arrange old photos to make a collage about your family, for instance.[3]
- There aren’t many limits to what you can do. For example, you could cut out small pieces of paper and arrange them so they form a bigger image.
- One option is to find an image that really speaks to you and design the rest of the collage around it.
-
 2Collect pictures and other images to make the collage. There are many different inexpensive and accessible sources you can use to find images. Flip through old magazines, newspapers, and even picture books for anything that inspires you. Try stashing your favorite images in a shoebox until you’re ready to use them.[4]
- Consider adding textural elements to your collage, like fabric, ribbon, or natural materials.[5]
- Search through magazines and newsprint for cut-outs. Newsprint adds a unique texture to a collage, but the ink may rub off on your fingers sometimes.
- Use photographs to capture a retro feel, but be careful about what you use. Make copies of your favorites to cut up instead of the originals.
- For something unique, find some old scraps of wallpaper. You can often get free sample swatches from home improvement stores and other places that sell wallpaper.
- Consider adding textural elements to your collage, like fabric, ribbon, or natural materials.[5]
-
 3Select a sturdy piece of paper for the base of the collage. Choose something thick to serve as a background for your collage. Thicker paper is less likely to fall apart after you add glue to it. Stick with a white background in order to avoid color contrasts with any pictures you plan on using.[6]
- Some background materials to consider include cardboard, cardstock, construction paper, and canvas. Anything thick and flat usually holds up well. You could even use something like a picture frame.
- Skip glossy paper like watercolor art paper. The material is more expensive and doesn’t hold up under glue as well.
-
4Cut out the images to fit in your collage. The way you cut out pictures affects how they look in the collage. Most of the time, you will end up cutting out the entire image without leaving space around it. Some images have borders you can save to add effects. You could also cut an image in a unique way to highlight certain parts of it.[7]
- For example, you might cut a hole in a picture to expose the paper or another image placed underneath it.
-
5Lay out your images on the paper without gluing them. Try placing your main image in the center, then filling in the rest of the paper with other material. Build around each scrap you add to expand on the theme you chose. Plan out your final design, since you won’t be able to remove the images once you glue them in place![8]
- Wait until you’re satisfied with your design before you start gluing anything to the page. This will also give you extra time to find new materials in case you change your mind.
-
6Add embellishments like ribbons to make the collage more colorful. While embellishments aren’t essential, you can add plenty of unique items to your collage if you wish. Feathers, ribbons, and fabric are a few items you could use. Lay them around the images, matching them with your collage’s theme or using them for additional decorations.[9]
- Look for items around your home or take a walk through a nearby craft store. You are bound to find tons of interesting things to fit onto your collage!
- You could draw an animal on the paper and fill it in with paper or stamps. Another option is to create a mosaic out of small cuts of paper.
-
7Glue material onto the paper using white glue. Start with the background and work forward. Spread a little bit of an ordinary store-bought glue or glue stick on the back of each image as you press it onto the paper. This type of glue isn’t visible on the collage as long as you use it in small quantities. For heavier decorations, you may need to switch to a craft glue to pin them to the paper.[10]
- Switch to a thick craft glue in order to secure embellishments like heavy beads and buttons. Look for some bottles of glue or rubber cement at your local craft store.
- Remember that not every piece has to be glued flat. Try crumpling or folding decorations to give your collage some extra flair.
-
 8Let the collage dry overnight to settle the glue. Since your collage probably contains several layers of glue, it needs plenty of time to dry. Come back the next day and take a look at your work. If the paper is dry and the decorations stay in place, your collage is set and ready to be put on display.[11]
- For a small collage, an hour is often enough drying time. If you think the glue still looks wet, give it more drying time to be sure.
- If you made a large collage, point a fan at it. The air blown on a low setting encourages the glue to dry a little faster.

Method 2
Method 2 of 3:
Creating a Digital Collage
-
1Pick a central theme for your collage. Photo collages are usually fun and commemorative. You could choose a theme like your family, your pets, a trip you took, or something you like. Many photo collages come from personal experiences using photos you took, but you don’t have to make yours that way. You could make something cool using random images you found online.[12]
- For example, you might make a photo collage about puppies. Everyone loves looking at pictures of puppies. All you have to do is track down pictures you like and paste them together.
-
2Choose an easy-to-use photo editing program like word processor. Edit and combine photos using one of the many different editing programs available. For the best result, stick with a basic program like Word if you’re making the collage on your computer. You could also try uploading pictures to online websites like Canva or Shutterfly. There are also apps you can download on your phone for a quick way to make your own collage.
- You could work with a photo editing program like Photoshop if you have it and know how to use it.
-
3Collect photos and images to use in your collage. Search around online for cool things to put on your collage. You could also scan in old photos, fabric swatches, magazine clippings, or other items you would normally use on a paper collage. Use your collection as a source of inspiration for your art.[13]
- Visit your favorite social media site for posts you could save for your project.. Also, search for photos of themes you like, whether that’s cupcakes, video games, cars, or something else that inspires you.
- Save online images by right-clicking on them and selecting the “save as” option.
-
4Choose 5 to 7 images to develop a collage theme. If you don’t have an assigned theme already, think of what you want your finished collage to display. You might have a specific idea, image, or pattern that inspires you. Build around it to give your collage some meaning. Find images that share colors, shapes, or patterns to make your collage a consistent whole.[14]
- While you can use more photos than this, adding too many may make the collage feel crowded. Using too few makes it feel empty.
- For example, you might select a series of pictures from a trip you took recently. Select pictures that show off your trip, what you saw, and the people who live there.
-
5Alter the images using shaping and coloring tools. Track the images down on your computer. Right click on them or drag them into your editing program to open them. Chances are the pictures need a little work to make them mesh well. When you open them, you will see options to change the sizing and coloring to until you’re happy with the way they look.[15]
- Use the resizing and crop tools, for example, to cut the image down to a manageable size.
- Change the colors of the images to make your collage unique. For example, make photos look faded and grey to contrast them with bright text or images.
-
6Change the resolution of all the images to match one another. All your images look different because of resolution differences. To change the resolution, click on the file option on your editor’s taskbar. In Word, the resolution option is under the “Advanced” and “Image Size and Quality” options. This will change the resolution of any images you have selected.[16]
- Lower-resolution pictures tend to look blurry, but this depends on the size of the image and where you plan on displaying it.
- If you plan on posting your collage online, consider setting the images to a resolution of 72 pixels per inch (ppi). If you plan on printing it, set the resolution to 300 ppi.
-
7Include text and other features if you wish to customize your collage. This part is optional, but if you have space for extra design work, mess around with the editor. Clicking the “Insert” button in Word allows you to add text boxes, image borders, background colors, and other design elements. Make these new features fit in with the images to create an unforgettable collage.[17]
- For example, add a title to your collage. You could let the pictures speak for themselves, but the title could add flair. You might add a title to a traveling collage to tell a viewer where you went and when you took the pictures.
-
8Save the collage to post or print it. Click the save button often to keep your hard work safe in case your computer crashes! When you’re done editing, display your collage with pride if you wish. Go online, such as onto social media, and post your work for others to see. Otherwise, print it using the print feature on the editor to display it around your home.[18]
- The printing paper you choose affects the final appearance of your collage. Choose a high-gloss paper to give it a shiny sheen. Use a matte-style paper to give it a dimmer, less colorful look.
Method 3
Method 3 of 3:
Using Natural Materials in a Collage
-
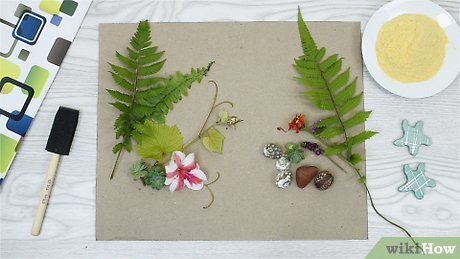 1Pick a natural theme for your collage. Since you’re using materials like plants for this collage, make it nature-themed. You could design a landscape or seascape by adding different things you find, from sand to shells and leaves. This is the easiest way to incorporate found things into a collage, but it don’t let your creativity be limited.[19]
- You don’t even have to have a theme if you don’t want one. You could arrange cool things on a page. Most collages, however, have themes to make them look more complete.
-
2Choose cardstock or another solid paper for a base. The base paper, the background for your collage, has to be strong to hold up the sand you add to it. Pick something thick and sturdy at a craft store. Cardboard and construction paper are a few other materials you might choose.[20]
- Regular printer paper is not a good choice if you plan on gluing heavy items. If it feels thin, expect it to be too flimsy for your collage.
-
3Sketch a design onto paper using a pencil. Draw the scene you wish to create with your collage. In particular, outline any areas you plan on covering with found items. This will help you place them until you’re ready to glue them later.[21]
- For example, if you’re drawing a seascape, sketch the sand bed at the bottom of the page. Then, outline where you plan on making fish or adding details like shells.
- Simpler designs are better for small kids. If you don’t have a specific design in mind, let them have fun drawing whatever they like.
-
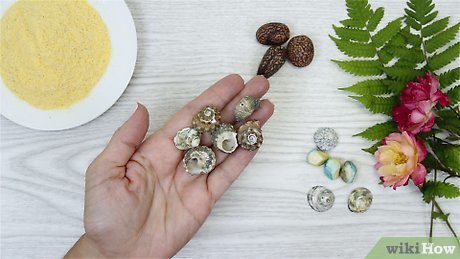 4Find shells and other items to add to your collage. Sand is a great touch, but you don’t have to stop there. Customize your collage with all sorts of items. Shells and plants are a few things you can find to make your art more unique. Match the material to the theme of your collage in order to make it stand out.[22]
- Some examples of items to include are seashells, insect shells, flowers, leaves, and seeds.
- Many of these items are available for purchase at craft supply stores, but take a walk around your neighborhood. You may find something unique that gives your collage a special twist.
-
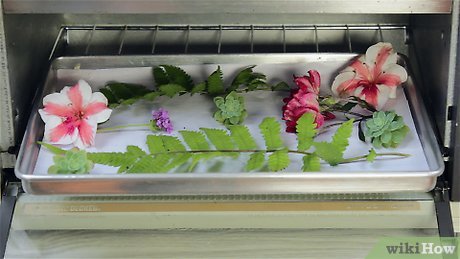 5Dry your items off with paper towels or heat before using them. If your items aren’t dry, they may rot or collect mildew. Preserve your collage by wiping everything dry with a paper towel, then baking things like flowers that would normally decay. For example, lay plants on a paper towel and heat them in the microwave for 1 to 5 minutes. Another option is to put them on a drying rack in an oven set to 150 °F (66 °C) and keep them in for about 2 hours.[23]
- Pressing is another way to preserve plants. Keep them weighed down between a piece of paper and a heavy book for at least 7 days.
- Objects like shells and rocks don’t really need to be heat-dried since they won’t rot. However, you can wash shells by boiling them in water for about 5 minutes, then soaking them for a week in clean, cold water.
-
6Brush a craft or PVC glue over the outlined area. Select a clean glue brush and a bottle of your favorite craft glue. For loose material like sand, add the glue in an even layer on the page. Otherwise, you can add some of the glue directly to bigger items like shells and plants.[24]
- If you’re making something large and intricate, do this in small sections to prevent the glue from drying out before you add your decorations.
- Regular glue sticks and glue are usually too weak to support found items.
-
7Sprinkle sand onto the collage if you are using any. Open up a bag of craft sand and begin pouring it onto the paper to give your collage some style. Dip your hand in or use a small paper cup to scatter the sand. It will stick to any spots where you added glue. When you’re done, tip the paper over to brush away the excess.[25]
- This part can get a little messy, so keep a paper plate underneath your collage to collect the sand. Try to add small amounts of sand at a time to avoid using too much of it.
-
8Secure the remaining items in place to complete the collage. For an easy way to attach solid objects like shells to your project, break out a hot glue gun. Spread a bead of the glue on your item, then quickly press it to the paper before it dries. You could also use the same craft or PVC glue you used if you customized the background. Remember to hold your collage’s decorations in place for at least a minute to stick them in place.
- Wood glue is great for preserving plants used in collages. Brush it over the plant to create a “glaze” capable of keeping it fresh and shiny for years.
-
 9Allow the glue to dry overnight before handling the collage. Set your collage aside in an open spot on a countertop. Wait for it to feel dry to the touch before attempting to move it. Once it’s done, place your collage on display or take photos of it to show it off![26]
Video
Tips
-
If you’re not sure where to start, try a collage warm up. Cut 3-4 shapes out of colored paper and move them around until you find a layout you like.[27]
⧼thumbs_response⧽ -
Don’t feel pressured to glue anything down right away. Just have fun experimenting.[28]
⧼thumbs_response⧽ -
If the materials on the collage don’t stick even after you glue them, brush them with a diluted glue mixture. Combine about 3 parts water to 1 part PVA glue over the finished collage to seal it.⧼thumbs_response⧽

Warnings
-
Take care when using scissors or glue. Supervise young children when handling dangerous tools.⧼thumbs_response⧽
Things You’ll Need
Creating a Digital Collage
-
Computer
-
Photo editing software
-
Images
-
Scanner for photos (optional)
Designing a Paper Collage
-
White glue or paste
-
Scissors or a craft knife
-
A base of stiff paper or cardstock
-
Cut out images or letters
Using Natural Materials in a Collage
-
Cardstock or other stiff paper
-
Craft or wood glue
-
Glue brush
-
Paper towels
-
Water
-
Shells, flowers, twigs, and other material
-
Craft sand (optional)
-
Paper plate (optional)
[ad_2]
Source link : https://www.wikihow.com/Make-a-Collage

