


[ad_1]
Ingredients
-
2 cups (470 mL) of water
-
2 cups (250 g) of all-purpose flour
-
3/4 cup (230 g) of salt
-
4 tsp (14 g) of cream of tartar
-
2 tablespoons (30 mL) of vegetable oil
-
Food coloring (optional)
-
Vanilla extract (optional)
-
Non-stick pot
-
Wooden spoon
-
Plastic resealable bag
-
4 cups (480 g) of all-purpose flour
-
1.5 cups (417 g) of salt
-
1.5 cups (350 mL) of water
-
2 cups of salt (550 g)
-
2⁄3 cup (160 mL) of water
-
1 cup (120 g) cornstarch
-
.5 cups (120 mL) of cold water
-
Food coloring (optional)
-
Clay-rich soil
-
Water
Steps
Making Flour, Salt, and Cream of Tartar Clay
-

1Combine all-purpose flour, salt, and cream of tartar in a large pot. Use measuring cups to add 2 cups (250 g) of all-purpose flour and 3/4 cup (230 g) of table salt to a large non-stick pot. Then, measure out 4 tsp (14 g) of cream of tartar with a spoon and add it to the pot. Use a wooden spoon to stir the ingredients until they’re combined.[1]
-
 2Add 2 cups (470 mL) of water and 2 US tbsp (30 mL) of vegetable oil. Use a measuring cup to pour 2 cups (470 mL) of room temperature water into the pot, then measure out 2 US tbsp (30 mL) of vegetable oil with a spoon. Stir the ingredients with your wooden spoon to combine them.[2]
- Stir the ingredients until all of the dry ingredients are moist from the wet ingredients.
-
3Heat the ingredients over medium heat while stirring with a wooden spoon. Place the pot on your stove and turn burner on medium heat. Use a wooden spoon to stir the ingredients continuously as you heat them. [3]
Don’t let the clay sit against the sides of the pot, as it will burn. Stir it continuously so it heats evenly.
-
 4Stop stirring and turn off the burner when the clay is a thick ball. Once the ingredients are well-combined, they’ll start to form a lump that sticks to your spoon. When your clay ball forms, turn off the heat and move the pot to a cool burner.[4]
- Be careful with the clay and the pot, as they are both hot. Don’t burn yourself!
-
 5Place the clay on wax paper so it can cool for 1-2 minutes. Use your wooden spoon to remove the clay ball from the pot. Place the clay ball on a sheet of wax paper so it can cool for about 2 minutes. Then, use your fingertip to see if the ball feels warm to the touch but not hot. Handle the clay when it feels about room temperature.[5]
- The clay will be hot when you first take it out of the pot. Don’t touch it because it will likely burn your hand.
-
6Knead the room temperature clay until it’s soft and smooth. Use your hands to press and squish the clay to push out air bubbles, improve the consistency, and eliminate clumping. Continue to work the clay until it feels soft and pliable.[6]
- You can also pick up your clay and throw it down on the counter to work out any air bubbles that might be present. This will help your clay stay moist longer.
-
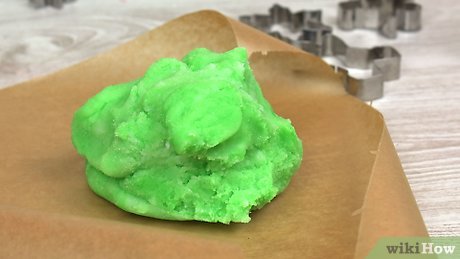
7Dye your clay using 5-6 drops of food coloring if you like. Place the clay into a plastic, resealable bag. Then, add 5-6 drops of food coloring to the bag. Seal the bag and knead the clay between your hands until the color is evenly distributed.[7]
- If you want your clay to smell good, you can add a few drops of vanilla to it.
-
 8Store your clay in a resealable plastic bag for up to 3 months. When you’re not using your clay, keep it in an airtight container so it won’t dry out. If you store it correctly, your clay should last for several months.[8]
- You can also store your clay in an airtight food storage container.
-
 9Allow your clay to air dry if you want to create a sculpture or keepsake. If you want to use your clay to create a figurine, keepsake, or project, you can preserve your work by letting it air dry for about 2 days. Leave the clay untouched during this time, then check on it. If it still feels a little moist, it may need more drying time.[9]
Making Flour and Salt Clay
-
1Mix 4 c (480 g) of flour and 1.5 c (417 g) of salt in a large bowl. Add both dry ingredients to a large mixing bowl. Then, use a big plastic or wooden spoon to stir the dry ingredients until they are thoroughly mixed.[10]
Make sure the flour and salt are mixed well before you add the water because it will be harder to redistribute one of the ingredients once the clay starts to form.
-
2Add 1.5 c (350 mL) of water gradually as you stir the mixture. Pour small amounts of water into the bowl at a time, stirring between pours. Blend the mixture as well as you can before you add more water. By the time all of the water is added to the bowl, your clay should be forming a ball.[11]
- It should get harder to stir each time you add more water.
-
3Knead the clay until it reaches an even consistency. Take your clay out of the bowl and place it on a flat surface, like the kitchen counter. Use your hands to push and pull the clay to work it into a nice consistency.[12]
- You can also pick up your clay and throw it down on the counter to work out any air bubbles that might be present. This will help your clay stay moist longer.
-
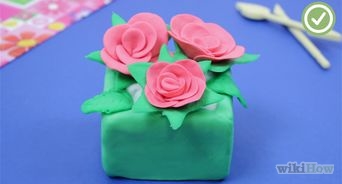
4Sculpt the clay as you desire. Now that your clay is ready, you can mold it into a figure, create ornaments, or just play around. Use it as you would use a store-bought clay.[13]
- This kind of clay can make great keepsakes. For example, press your child’s foot or hand into the dough until there is an imprint, then let the mold harden to make a gift.
Tip: Use cookie cutters or a glass to cut out shapes, if you like. Start by rolling your clay out flat using a rolling pin. Then, cut your clay into shapes using a cookie cutter or a drinking glass, which can make circles for ornaments. If you wish to hang the shapes as ornaments, poke a hole near the top of the shape using a drinking straw or a toothpick.
-
 5Allow the clay to air dry for 2 days to preserve your model. If you want to create a sculpture or keepsake, you’ll need to let your clay dry. This kind of clay dries out pretty quickly, but it’s best to leave it untouched for at least 2 days to make sure it’s fully dry.[14]
Variation: If you need to speed up the drying process, bake your clay at 212 °F (100 °C) for 3 hours. If it still feels soft after 3 hours, you can put it back in the oven for up to 2 more hours.
-
 6Store unused clay in an airtight container. You can preserve your clay for a few weeks by keeping it in an airtight container. Make sure you leave the clay in the container whenever you’re not playing with it, as it will dry a little bit whenever it’s exposed to the air.[15]
- For instance, you can use a plastic bag with a zipper or a Tupperware container. For extra longevity, place the clay in the refrigerator.
Making Cornstarch, Salt, and Water Clay
-
1Heat 2⁄3 c (160 mL) of water and 2 c (550 g) of salt for 4 minutes. Pour the water into a saucepan, then stir in the salt to create a lumpy consistency. Place the saucepan on your stove and heat it over medium heat for 4 minutes. Stir the mixture as it heats to prevent it from burning.[16]
- Use potholders or a towel to handle the pot so you don’t accidentally get burned.
Variation: If you want to heat the mixture in the microwave, you can warm it for 30 seconds at a time until it feels hot to the touch. However, don’t microwave it for longer than 2 minutes.
-
2Move the pot to a cool surface and add 1 c (120 g) of cornstarch and .5 c (120 mL) of cold water. Remove the pot from the heat source, then pour in the cornstarch and cold water. Use a big plastic or wooden spoon to stir the mixture together.[17]
- It should feel difficult to stir the clay, as it’s going to have a thick consistency.
-
3Knead the mixture until it feels smooth. Put the clay on a flat surface, such as the countertop. Then, use your hands to push and pull the clay until it reaches an even consistency. It should feel very pliable in your hands.[18]
As you knead the clay, it helps to throw it down against the counter to push out any air pockets.
-
 4Add a few drops of food coloring if you’d like colored clay. Squeeze a few drops of food coloring over the clay, then knead to mix in the color. Continue to add food coloring until you reach your desired color.[19]
- If you like, you can also add glitter to your clay to make it sparkly.
-
 5Heat the mixture until it starts to feel thick, if necessary. Put the clay back into the pot and heat it over medium heat. Stir the clay as it warms to prevent it from sticking to the saucepan and burning. Remove the pot from the heat when your clay reaches the consistency you like.[20]
- You can skip this step if you’re already happy with your clay.
-
 6Let the clay cool to room temperature before you play with it. Don’t touch the clay while it’s hot, as you could get burned. Instead, spread the clay out on a baking sheet or the counter to let it cool down. When it feels just slightly warm, it’s ready for use.[21]
-
 7Allow your clay to air dry for 2 days if you want to preserve it. You can play with your clay or sculpt something out of it. If you do make a model or keepsake, you can preserve it by letting it dry. The clay will air dry if you let it sit out.[22]
- Make sure you leave the clay untouched for at least 2 days so your sculpture doesn’t get messed up.
-
 8Store your clay in an airtight container when you’re not using it. Your clay will dry out in the air, so it’s important to put it away between uses. You can expect your clay to last for about 2 weeks if you consistently put it away in an airtight container.[23]
- The best storage containers for this type of clay are plastic bags with a zipper or Tupperware.
Creating Pottery Clay
-
1Collect soil that contains clay into a bucket. Look for a spot near running water where the sand has washed away from the clay, or dig down until you see white, grey, or red clay. Use your hands or a bucket to dig out the clay and put it into a large bucket.[24]
- It’s likely that some debris will also get into the bucket. That’s okay because you’ll remove it later.
Variation: If you have dry clay soil in your area, simply scoop up the clay and add water to it. If it holds its shape, you can use it for pottery![25]
-
2Remove any sticks and debris from the soil. Use your hands to sift through the clay and soil to remove rocks, branches, leaves, and other debris from the clay. Move the clay around to find as much of the debris as you can. Toss the debris away.[26]
- It’s okay if you miss some of the debris because you’re going to rinse the clay with water.
-
3Stir enough water into the soil to cover it. Use a water hose or bucket to add water to the clay. Then, use your arm or a shovel to stir the water into the clay. Keep mixing until you have muddy water.[27]
- The water will start to dissolve the clay, which will help remove any trapped debris.
-
 4Let the water settle for 2 minutes so debris will come out. Set a timer and wait for 2 minutes as the debris settles to the bottom of the bucket. The clay will stay suspended in the water.[28]
- It’s okay if there’s a thin layer of water on top of the muddy clay water.
-
5Pour the muddy water into a second bucket, but leave the debris in the first. Carefully tip the bucket over and let the muddy clay water slosh into a clean bucket. Pour the muddy water slowly so that none of the debris gets into the bucket. Stop pouring when you reach the debris at the bottom of the first bucket.[29]
- Use a strainer to make it easier to collect the debris.
- It’s okay if a small amount of clay remains in the first bucket. Similarly, it’s normal for there to still be debris in the clay after one rinse.
-
 6Dump the debris and rinse out the bucket. Empty the contents of the first bucket onto the ground or into a trash can. Then, use a water hose or tap to rinse out the bucket until it’s clean.[30]
- Don’t worry about soaping up the bucket. You’re just going to use it to rinse the clay again.
-
7Repeat the process until there’s no more debris in your muddy water. Continue to add water and let the debris settle until your clay appears relatively free of debris. Dip your hand into the clay and slosh it around to check that it’s clear.[31]
- You’ll likely need to rinse the clay at least 2-3 times to get it clean.
-
 8Leave the bucket of clay-water to dry overnight. At this point, the clay should be very watery. Set the bucket uncovered in a place it won’t be disturbed. Then, let it sit for at least 8 hours so that the water can evaporate away.[32]
- Your clay will still be really runny after it sits out overnight.
-
9Pour off the excess water on top of the clay. Once your clay has been drying out for at least 8 hours, check for a thin layer of water at the top. Gently tip the bucket over to drain away the water. At this point, you should see a lumpy clay mixture.[33]
- Your clay still needs to dry out a lot before you can use it.
-
10Put the lumpy clay mixture into a piece of fabric to dry for 2 days. Lay out a big piece of fabric, like an old t-shirt. Then, pour the clay mixture onto the fabric, being careful not to lose any. Quickly wrap the fabric around the clay to trap it inside. Hang the fabric up outside so that the water can drip out of the fabric. [34]
- Some of the clay will be quite runny, so be careful as you pour.
-
 11Leave your clay in the sun until it reaches your desired consistency. Open the fabric and lay the clay out on the ground. Use your hand to spread out the clay over the fabric so it suns evenly. Check the clay every 6-8 hours during daylight to see if it feels like it’s ready for pottery. Expect it to take about a day to reach the right consistency.[35]
- It’s okay to start using your clay for pottery as soon as you’re happy with the consistency.
Video
Things You’ll Need
Combining Flour and Salt
-
Large bowl
-
Plastic or wooden spoon
-
Airtight container
Mixing Cornstarch, Salt, and Water
-
Pot
-
Plastic or wooden spoon
-
Baking sheet
-
Airtight container
Using Flour, Salt, and Cream of Tartar
-
Pot
-
Large bowl
-
Plastic or wooden spoon
-
Baking sheet
-
Airtight container
Creating Pottery Clay
-
Clay-rich soil
-
2 buckets
-
Water hose or tap
-
Piece of fabric, like an old t-shirt
-
Timer
-
Shovel (optional)
Tips
-
You can add food coloring or glitter to your clay to make it prettier.⧼thumbs_response⧽
-
Store your clay in an airtight container when you aren’t using it so that it lasts longer. However, keep in mind that your clay will still spoil eventually.⧼thumbs_response⧽
-
Stir the mixture every 15-30 seconds to avoid burning the clay.⧼thumbs_response⧽

Warnings
-
Never leave your stove or oven while it’s on.⧼thumbs_response⧽
-
This clay may grow mold if you leave it out for a long time.⧼thumbs_response⧽
You Might Also Like


[ad_2]
Source link : https://www.wikihow.com/Make-Clay

