
[ad_1]
Ingredients
-
12 wafer ice cream cones
-
1 tube of ready-to-use icing
-
12 round shortbread cookies
-
6 round miniature chocolate-covered pretzels
Makes 12 teacups
-
1 cup (226 g) of prepared gum paste
-
Powdered sugar for dusting
-
1 ounce (30 g) of white chocolate, melted, optional
Makes 1 teacup and saucer
-
14 ounces (420 g) of white chocolate, tempered
Makes 4 teacups and saucers
Steps
Making Teacups with Cones and Cookies
-
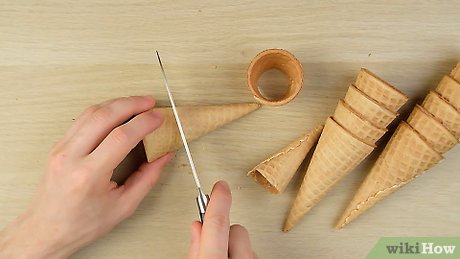
1Cut the base from each wafer cone. Get out 12 wafer ice cream cones and use a serrated knife to carefully cut just below the line where the base of the cone meets the rounded cup part of the cone. Do this for each cone and discard the longer base pieces.[1] -
 2Squeeze icing along the base of each cup and press it onto a cookie. Take a tube of ready-to-use icing in any color and squirt it along the base of the wafer cone cup that you just cut. Then push it onto 1 round shortbread cookie to form the base of the teacup. Repeat this for each of the wafer cone cups.[2]
Variation: To use sandwich cookies, such as golden Oreos, pull apart 6 sandwich cookies and remove the cream filling. Then use the cookie portions for your teacups.
-
3Cut 6 chocolate-covered pretzels in half and attach them to the teacups. Use the serrated knife to cut each of the mini chocolate-covered pretzels in half. Squirt a dab of icing onto each end of a pretzel half and then push it onto the side of a teacup so it forms a handle. Hold it in place for a minute and then continue with the remaining pretzels and teacups.[3]
-
4Chill the teacups for 2 hours before using them. Put the assembled teacups into an airtight container and refrigerate them until the icing is completely hard. This will ensure that the teacups won’t break apart if you choose to fill them.
- Once the icing has set, you can store the teacups at room temperature until you’re ready to serve them.
Crafting a Teacup and Saucer with Gum Paste
-
1Roll the gum paste into an 1⁄8 inch (0.32 cm) circle. Put 1 cup (226 g) of prepared gum paste onto a rolling mat and use a fondant rolling pin to roll it into a thin circle. The circle needs to be slightly larger than your saucer.[4]
Did You Know? Although you can use fondant instead of gum paste, the gum paste is stabilized with egg whites, shortening, and powdered sugar which will make it easier to roll thin. Gum paste will also show detail better than fondant.
-
2Press the gum paste onto a saucer and cut around the edge. Dust a little powdered sugar onto the saucer and then tap it out. Gently lay the rolled gum paste onto the saucer and press down firmly so the paste molds to the saucer. Then use a knife or blade tool to cut the excess gum paste from around the edge of the saucer. Set the excess aside and smooth the edges of the gum paste saucer.[5]
-
3Roll gum paste to make a thin handle. Take some of the remaining gum paste and roll it into a 3 in (7.6 cm) log that’s as thin as you like. Bend the log into a question mark shape that will form the handle for your teacup. Set the handle aside along with the saucer to set while you work on the teacup’s base.[6]
-
4Form a circular base for the teacup. Cut another small rope that you can wrap into a circle. Squirt a few drops of edible glue onto 1 end of the rope and attach the other end so you have a ring. Then roll out more gum paste as thinly as you made the saucer and cut it into a circle that’s the same size as the base of the teacup. Squeeze edible glue onto it and stick it onto the ring you made.[7]
-
5Cut thinly rolled gum paste into a rainbow that fits inside the teacup. Use the fondant rolling pin to roll the leftover gum paste into an oval that’s as thin as the saucer you made. Then cut a large rainbow out and place it inside the teacup so the wider side faces the lip of the cup.
- You may need to trim or make adjustments to the shape of the gum paste so it covers the inside of the teacup. Keep in mind that there will be a small hole at the bottom of the cup.[8]
- To ensure the rainbow is the right size before cutting the gum paste, cut out a paper template and nestle it into the teacup first.
-
6Press the gum paste in place and let it set. Use your fingers to push the gum paste evenly into the teacup so there aren’t any gaps. Push the gum paste down to cover the hole at the bottom of the cup. Pay attention to joining the edges where the ends of the gum paste meet. Then set the teacup aside to set up overnight.[9]
-
7Glue the pieces of the teacup together with edible glue and let them set. Once the teacup is hard, gently pull it out of the actual teacup. Then squirt a little edible glue onto the circular base you made and set the gum paste teacup on it. Take the handle and squeeze a little edible glue on it before you press it against the side of the teacup. Leave the teacup for a few hours so the glue hardens.[10]
Tip: For an extra-strong hold, melt about 1 ounce (30 g) of white chocolate and paint it around the teacup’s handle and base. Then let the chocolate harden.
Creating Chocolate Teacups
-
1Put 1 tablespoon (15 ml) of chocolate into each cavity of a dome mold. Set a silicone dome mold on your work surface and scoop 1 tablespoon (15 ml) of tempered chocolate into each cavity.[11]
Variation: To make dark teacups, use milk or semisweet chocolate.
-
2Spread the chocolate in the cavities and chill the mold for 15 minutes. Take a silicone brush or use the back of a spoon to spread the chocolate throughout the mold so each cavity is covered. Then put the mold in the refrigerator until the chocolate hardens.[12]
-
3Peel the chocolate cups out of the mold. Remove the mold from the refrigerator and turn it upside-down on your work surface. Gently hold the mold in place with 1 hand and use your other hand to slowly peel the mold away. The chocolate cups should separate from the mold.[13]
-
4Spoon 4 circles of chocolate onto parchment paper and pipe 4 handles. To make the saucers, lay a sheet of parchment paper onto a baking sheet and spread some of the remaining tempered chocolate into 4 even circles on the paper. Each circle should be about 4 to 5 inches (10 to 13 cm) in diameter. Then pipe or spoon more chocolate onto the parchment paper to make 4 handle shapes.[14]
-
5Chill the saucers and handles for 10 minutes. Put the baking sheet into the refrigerator and leave the saucers and handles to set. Remove the baking sheet once the chocolate is completely hard. Carefully peel the chocolates off of the sheet so you can assemble the teacups.[15]
-
6Attach the handles to the cups and set them on the saucers. To assemble the teacups, dip the ends of the handles into a little of the tempered chocolate. Hold the handles against the sides of the chocolate cups until they stay attached. Then set each teacup onto the chocolate saucers.[16]
Video
Tips
-
To decorate the gum paste teacups, make edible food paint and paint floral designs on the cup.[17]⧼thumbs_response⧽
-
If any of the handles or cookies come a little loose, simply add more frosting to attach them again.⧼thumbs_response⧽
-
Fill your edible teacups with ice cream, frozen yogurt, candy, or fresh fruit just before serving.⧼thumbs_response⧽

Things You’ll Need
Cone and Cookie Teacups
-
Serrated knife
-
Cutting board
Gum Paste Teacup and Saucer
-
Rolling mat
-
Teacup and saucer
-
Fondant rolling pin
-
Knife or blade tool
-
Edible Glue
Chocolate Teacups
-
Silicone dome mold
-
Spoon
-
Parchment paper
-
Spoon
-
Pastry brush
-
Baking sheet
[ad_2]
Source link : https://www.wikihow.com/Make-Edible-Teacups