{“smallUrl”:”https://www.wikihow.com/images/thumb/1/17/Put-a-Bandaid-on-Your-Fingertip-Step-1-Version-2.jpg/v4-460px-Put-a-Bandaid-on-Your-Fingertip-Step-1-Version-2.jpg”,”bigUrl”:”/images/thumb/1/17/Put-a-Bandaid-on-Your-Fingertip-Step-1-Version-2.jpg/aid11636512-v4-728px-Put-a-Bandaid-on-Your-Fingertip-Step-1-Version-2.jpg”,”smallWidth”:460,”smallHeight”:345,”bigWidth”:728,”bigHeight”:546,”licensing”:”<div class=”mw-parser-output”><p>u00a9 2023 wikiHow, Inc. All rights reserved. wikiHow, Inc. is the copyright holder of this image under U.S. and international copyright laws. This image is <b>not</b> licensed under the Creative Commons license applied to text content and some other images posted to the wikiHow website. This image may not be used by other entities without the express written consent of wikiHow, Inc.<br>n</p><p><br />n</p></div>”}
1
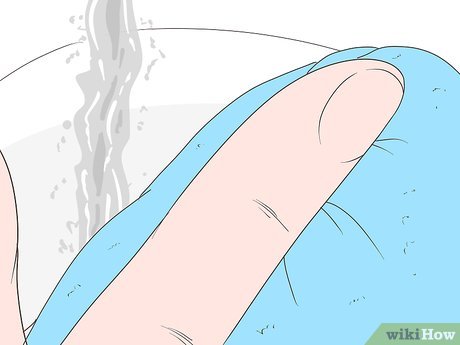
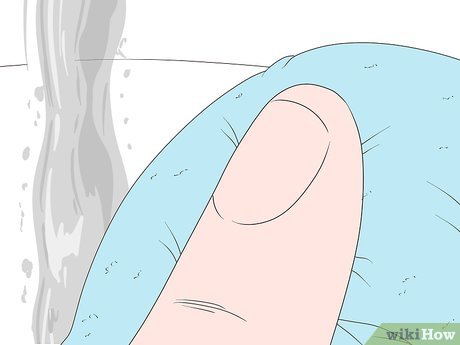
Rinse the fingertip and pat it dry. Hold your fingertip under clean running water to remove dirt and slow the bleeding. Then, press your finger on a clean cotton or gauze pad to dry it before putting on the bandage. If the fingertip is still bleeding a lot, apply pressure with the pad to stop the bleeding.[1] X
Trustworthy Source
University of Rochester Medical Center Leading academic medical center in the U.S. focused on clinical care and research
There’s no need to wash your fingertip with soapy water because the soap might irritate the wound.
{“smallUrl”:”https://www.wikihow.com/images/thumb/8/84/Put-a-Bandaid-on-Your-Fingertip-Step-2-Version-2.jpg/v4-460px-Put-a-Bandaid-on-Your-Fingertip-Step-2-Version-2.jpg”,”bigUrl”:”/images/thumb/8/84/Put-a-Bandaid-on-Your-Fingertip-Step-2-Version-2.jpg/aid11636512-v4-728px-Put-a-Bandaid-on-Your-Fingertip-Step-2-Version-2.jpg”,”smallWidth”:460,”smallHeight”:345,”bigWidth”:728,”bigHeight”:546,”licensing”:”<div class=”mw-parser-output”><p>u00a9 2023 wikiHow, Inc. All rights reserved. wikiHow, Inc. is the copyright holder of this image under U.S. and international copyright laws. This image is <b>not</b> licensed under the Creative Commons license applied to text content and some other images posted to the wikiHow website. This image may not be used by other entities without the express written consent of wikiHow, Inc.<br>n</p><p><br />n</p></div>”}
2
Remove a strip bandage from its outer packaging. Peel apart the outer packaging and take the bandage out. Leave the plastic strips that cover the adhesive on the bandage for now.[2] X Research source
Tip: Always use a new bandage when you wrap a wound. Don’t use one that’s already open since it may have dirt or germs on it.
{“smallUrl”:”https://www.wikihow.com/images/thumb/7/74/Put-a-Bandaid-on-Your-Fingertip-Step-3-Version-2.jpg/v4-460px-Put-a-Bandaid-on-Your-Fingertip-Step-3-Version-2.jpg”,”bigUrl”:”/images/thumb/7/74/Put-a-Bandaid-on-Your-Fingertip-Step-3-Version-2.jpg/aid11636512-v4-728px-Put-a-Bandaid-on-Your-Fingertip-Step-3-Version-2.jpg”,”smallWidth”:460,”smallHeight”:345,”bigWidth”:728,”bigHeight”:546,”licensing”:”<div class=”mw-parser-output”><p>u00a9 2023 wikiHow, Inc. All rights reserved. wikiHow, Inc. is the copyright holder of this image under U.S. and international copyright laws. This image is <b>not</b> licensed under the Creative Commons license applied to text content and some other images posted to the wikiHow website. This image may not be used by other entities without the express written consent of wikiHow, Inc.<br>n</p><p><br />n</p></div>”}
3
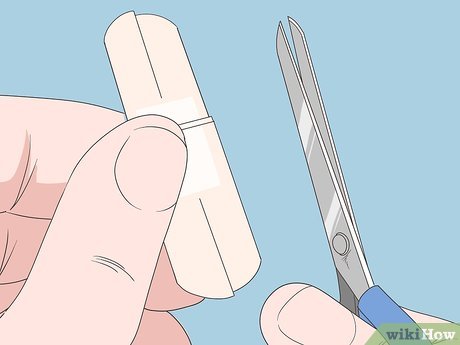
Cut a lengthwise slit down the center of each adhesive end. Hold the center of the bandage and use scissors to cut a slit in the middle of each end. Stop cutting before you reach the gauze center of the bandage. You’re not trying to shorten the bandage. Instead, the slits make it easier to wrap around your fingertip.[3] X Research source
Slicing the bandage ends makes it easier to wrap around your fingertip since you can bend and overlap them.
{“smallUrl”:”https://www.wikihow.com/images/thumb/d/d9/Put-a-Bandaid-on-Your-Fingertip-Step-4-Version-2.jpg/v4-460px-Put-a-Bandaid-on-Your-Fingertip-Step-4-Version-2.jpg”,”bigUrl”:”/images/thumb/d/d9/Put-a-Bandaid-on-Your-Fingertip-Step-4-Version-2.jpg/aid11636512-v4-728px-Put-a-Bandaid-on-Your-Fingertip-Step-4-Version-2.jpg”,”smallWidth”:460,”smallHeight”:345,”bigWidth”:728,”bigHeight”:546,”licensing”:”<div class=”mw-parser-output”><p>u00a9 2023 wikiHow, Inc. All rights reserved. wikiHow, Inc. is the copyright holder of this image under U.S. and international copyright laws. This image is <b>not</b> licensed under the Creative Commons license applied to text content and some other images posted to the wikiHow website. This image may not be used by other entities without the express written consent of wikiHow, Inc.<br>n</p><p><br />n</p></div>”}
4
Peel off the plastic strips and press the center of the bandage on your wound. Slowly pull off the plastic that’s covering the adhesive on both ends of the bandage. Then, press the white center of the bandage directly onto the cut on your fingertip.[4] X Research source
The bandage should stick lightly to your fingertip at this point. Now you can secure the ends to the rest of your finger.
{“smallUrl”:”https://www.wikihow.com/images/thumb/0/09/Put-a-Bandaid-on-Your-Fingertip-Step-5-Version-2.jpg/v4-460px-Put-a-Bandaid-on-Your-Fingertip-Step-5-Version-2.jpg”,”bigUrl”:”/images/thumb/0/09/Put-a-Bandaid-on-Your-Fingertip-Step-5-Version-2.jpg/aid11636512-v4-728px-Put-a-Bandaid-on-Your-Fingertip-Step-5-Version-2.jpg”,”smallWidth”:460,”smallHeight”:345,”bigWidth”:728,”bigHeight”:546,”licensing”:”<div class=”mw-parser-output”><p>u00a9 2023 wikiHow, Inc. All rights reserved. wikiHow, Inc. is the copyright holder of this image under U.S. and international copyright laws. This image is <b>not</b> licensed under the Creative Commons license applied to text content and some other images posted to the wikiHow website. This image may not be used by other entities without the express written consent of wikiHow, Inc.<br>n</p><p><br />n</p></div>”}
5
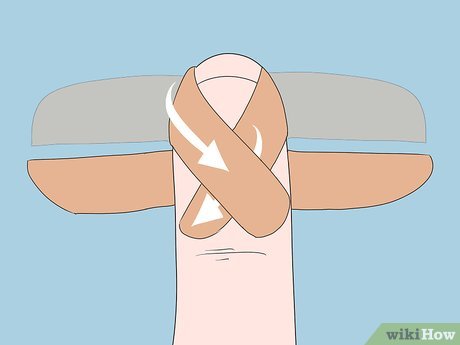
Fold the top ends of the bandage over your fingernail so they crisscross. Take the top thin portion of an adhesive end and bring it over your fingernail. Repeat this for the other side of the bandage so the top strips form an X across your fingernail.[5] X Research source
Wrapping the ends crosswise prevents the bandage from slipping off of your fingertip.
{“smallUrl”:”https://www.wikihow.com/images/thumb/2/26/Put-a-Bandaid-on-Your-Fingertip-Step-6-Version-2.jpg/v4-460px-Put-a-Bandaid-on-Your-Fingertip-Step-6-Version-2.jpg”,”bigUrl”:”/images/thumb/2/26/Put-a-Bandaid-on-Your-Fingertip-Step-6-Version-2.jpg/aid11636512-v4-728px-Put-a-Bandaid-on-Your-Fingertip-Step-6-Version-2.jpg”,”smallWidth”:460,”smallHeight”:345,”bigWidth”:728,”bigHeight”:546,”licensing”:”<div class=”mw-parser-output”><p>u00a9 2023 wikiHow, Inc. All rights reserved. wikiHow, Inc. is the copyright holder of this image under U.S. and international copyright laws. This image is <b>not</b> licensed under the Creative Commons license applied to text content and some other images posted to the wikiHow website. This image may not be used by other entities without the express written consent of wikiHow, Inc.<br>n</p><p><br />n</p></div>”}
6
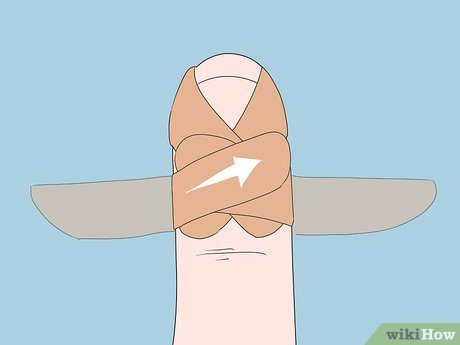
Bring the bottom ends of the bandage down onto your finger. Grasp 1 of the thin bottom ends of the bandage and bring it down across the front of your finger. Do this with the other end and bring it in the opposite direction so it also makes an X.[6] X Research source
Weaving the ends across each other helps them stay in place and reduces the bulk of the bandage around your fingertip so it’s more comfortable to wear.
Method 2
Method 2 of 2:
Applying a Fingertip Bandage
{“smallUrl”:”https://www.wikihow.com/images/thumb/d/d7/Put-a-Bandaid-on-Your-Fingertip-Step-7-Version-2.jpg/v4-460px-Put-a-Bandaid-on-Your-Fingertip-Step-7-Version-2.jpg”,”bigUrl”:”/images/thumb/d/d7/Put-a-Bandaid-on-Your-Fingertip-Step-7-Version-2.jpg/aid11636512-v4-728px-Put-a-Bandaid-on-Your-Fingertip-Step-7-Version-2.jpg”,”smallWidth”:460,”smallHeight”:345,”bigWidth”:728,”bigHeight”:546,”licensing”:”<div class=”mw-parser-output”><p>u00a9 2023 wikiHow, Inc. All rights reserved. wikiHow, Inc. is the copyright holder of this image under U.S. and international copyright laws. This image is <b>not</b> licensed under the Creative Commons license applied to text content and some other images posted to the wikiHow website. This image may not be used by other entities without the express written consent of wikiHow, Inc.<br>n</p><p><br />n</p></div>”}
1
Clean your fingertip under cool water and pat it dry. You don’t want to bandage your fingertip if there’s dirt in the wound so hold your finger under cool running water. Then, place it against a clean cotton or gauze pad. Press firmly if your fingertip is still bleeding since the pressure can make the bleeding stop.[7] X Research source
You don’t need to use soap, which might irritate your skin.
{“smallUrl”:”https://www.wikihow.com/images/thumb/9/92/Put-a-Bandaid-on-Your-Fingertip-Step-8-Version-2.jpg/v4-460px-Put-a-Bandaid-on-Your-Fingertip-Step-8-Version-2.jpg”,”bigUrl”:”/images/thumb/9/92/Put-a-Bandaid-on-Your-Fingertip-Step-8-Version-2.jpg/aid11636512-v4-728px-Put-a-Bandaid-on-Your-Fingertip-Step-8-Version-2.jpg”,”smallWidth”:460,”smallHeight”:345,”bigWidth”:728,”bigHeight”:546,”licensing”:”<div class=”mw-parser-output”><p>u00a9 2023 wikiHow, Inc. All rights reserved. wikiHow, Inc. is the copyright holder of this image under U.S. and international copyright laws. This image is <b>not</b> licensed under the Creative Commons license applied to text content and some other images posted to the wikiHow website. This image may not be used by other entities without the express written consent of wikiHow, Inc.<br>n</p><p><br />n</p></div>”}
2
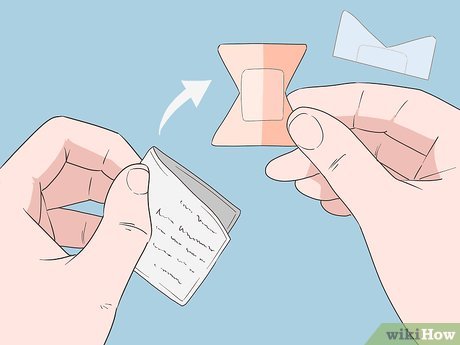
Open a new fingertip bandage and peel off 1 of the plastic coverings. Take a new fingertip bandage and pull apart the outer covering. Then, peel away just 1 of the plastic coverings that’s protecting the adhesive of the bandage.[8] X Research source
Fingertip bandages are shaped like an hourglass, which makes them easy to fold over the tip of your finger.
Tip: If you only have a large square or rectangular bandages, create your own fingertip bandage. Trim a triangle from 2 opposite sides of the bandage. This creates the hourglass shape of a fingertip bandage.
{“smallUrl”:”https://www.wikihow.com/images/thumb/e/e3/Put-a-Bandaid-on-Your-Fingertip-Step-9-Version-2.jpg/v4-460px-Put-a-Bandaid-on-Your-Fingertip-Step-9-Version-2.jpg”,”bigUrl”:”/images/thumb/e/e3/Put-a-Bandaid-on-Your-Fingertip-Step-9-Version-2.jpg/aid11636512-v4-728px-Put-a-Bandaid-on-Your-Fingertip-Step-9-Version-2.jpg”,”smallWidth”:460,”smallHeight”:345,”bigWidth”:728,”bigHeight”:546,”licensing”:”<div class=”mw-parser-output”><p>u00a9 2023 wikiHow, Inc. All rights reserved. wikiHow, Inc. is the copyright holder of this image under U.S. and international copyright laws. This image is <b>not</b> licensed under the Creative Commons license applied to text content and some other images posted to the wikiHow website. This image may not be used by other entities without the express written consent of wikiHow, Inc.<br>n</p><p><br />n</p></div>”}
3
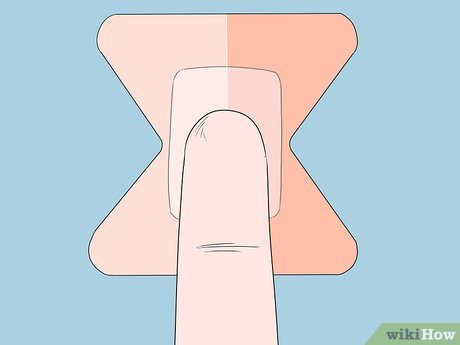
Place your fingernail onto the bottom half of the bandage so it’s centered. Before you unpeel the other plastic cover, lay your fingernail on the bandage’s gauze center. Position your fingertip so it’s near the bottom of the bandage.[9] X Research source
This allows you to fold the bandage over your fingertip so the gauze covers the wound.
{“smallUrl”:”https://www.wikihow.com/images/thumb/a/a7/Put-a-Bandaid-on-Your-Fingertip-Step-10-Version-2.jpg/v4-460px-Put-a-Bandaid-on-Your-Fingertip-Step-10-Version-2.jpg”,”bigUrl”:”/images/thumb/a/a7/Put-a-Bandaid-on-Your-Fingertip-Step-10-Version-2.jpg/aid11636512-v4-728px-Put-a-Bandaid-on-Your-Fingertip-Step-10-Version-2.jpg”,”smallWidth”:460,”smallHeight”:345,”bigWidth”:728,”bigHeight”:546,”licensing”:”<div class=”mw-parser-output”><p>u00a9 2023 wikiHow, Inc. All rights reserved. wikiHow, Inc. is the copyright holder of this image under U.S. and international copyright laws. This image is <b>not</b> licensed under the Creative Commons license applied to text content and some other images posted to the wikiHow website. This image may not be used by other entities without the express written consent of wikiHow, Inc.<br>n</p><p><br />n</p></div>”}
4
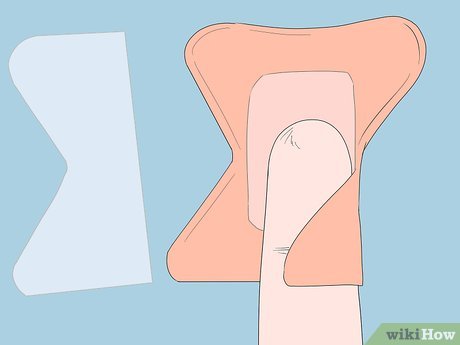
Wrap the bottom onto your fingertip and peel off the other cover. Bring the bottom corner of the bandage that has the adhesive exposed over onto your fingertip and press it in place. This secures the bandage so you can pull off the plastic covering from the other side of the bandage.[10] X Research source
Although you could pull both of the plastic coverings off at the same time, it might make it harder to handle the sticky bandage.
{“smallUrl”:”https://www.wikihow.com/images/thumb/a/a7/Put-a-Bandaid-on-Your-Fingertip-Step-11-Version-2.jpg/v4-460px-Put-a-Bandaid-on-Your-Fingertip-Step-11-Version-2.jpg”,”bigUrl”:”/images/thumb/a/a7/Put-a-Bandaid-on-Your-Fingertip-Step-11-Version-2.jpg/aid11636512-v4-728px-Put-a-Bandaid-on-Your-Fingertip-Step-11-Version-2.jpg”,”smallWidth”:460,”smallHeight”:345,”bigWidth”:728,”bigHeight”:546,”licensing”:”<div class=”mw-parser-output”><p>u00a9 2023 wikiHow, Inc. All rights reserved. wikiHow, Inc. is the copyright holder of this image under U.S. and international copyright laws. This image is <b>not</b> licensed under the Creative Commons license applied to text content and some other images posted to the wikiHow website. This image may not be used by other entities without the express written consent of wikiHow, Inc.<br>n</p><p><br />n</p></div>”}
5
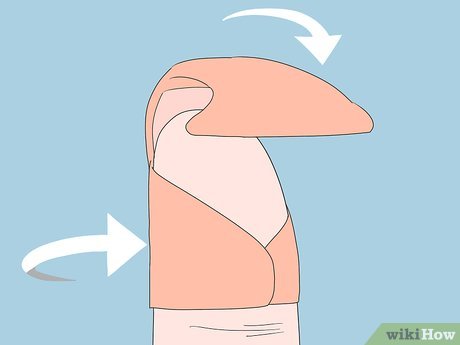
Bring the other corner onto your fingertip and fold the top onto your finger. Wrap the other corner over onto your fingertip and press it firmly in place so the bottom half of the bandage is secure. Take the top half of the bandage and fold it over onto your fingertip so the gauze covers the wound.[11] X Research source
The top corners of the bandage should still be sticking out once you’ve folded the bandage over.
{“smallUrl”:”https://www.wikihow.com/images/thumb/a/ad/Put-a-Bandaid-on-Your-Fingertip-Step-12-Version-2.jpg/v4-460px-Put-a-Bandaid-on-Your-Fingertip-Step-12-Version-2.jpg”,”bigUrl”:”/images/thumb/a/ad/Put-a-Bandaid-on-Your-Fingertip-Step-12-Version-2.jpg/aid11636512-v4-728px-Put-a-Bandaid-on-Your-Fingertip-Step-12-Version-2.jpg”,”smallWidth”:460,”smallHeight”:345,”bigWidth”:728,”bigHeight”:546,”licensing”:”<div class=”mw-parser-output”><p>u00a9 2023 wikiHow, Inc. All rights reserved. wikiHow, Inc. is the copyright holder of this image under U.S. and international copyright laws. This image is <b>not</b> licensed under the Creative Commons license applied to text content and some other images posted to the wikiHow website. This image may not be used by other entities without the express written consent of wikiHow, Inc.<br>n</p><p><br />n</p></div>”}
6
Wrap the exposed wings onto your fingertip to secure the bandage. Take each of the corners with adhesive and bring them in towards the center of your fingernail. Press each in place so the bandage fits snugly on your finger.[12] X Research source
The bandage won’t slide around because it’s anchored to your finger with the corners of the fingertip bandage.
Video
By using this service, some information may be shared with YouTube.
Don’t apply too much pressure when you secure the bandage. Ensure that the bandage is snug against your fingertip, but not so snug that it’s cutting off circulation.
If you suspect that the cut on your fingertip is deep, you can’t move your finger, or you think an object might be stuck in the tissue, contact your doctor immediately.[13] X Research source


