[ad_1]
Steps
{“smallUrl”:”https://www.wikihow.com/images/thumb/1/1c/Remove-a-Blank-Page-in-Word-Step-7-Version-4.jpg/v4-460px-Remove-a-Blank-Page-in-Word-Step-7-Version-4.jpg”,”bigUrl”:”/images/thumb/1/1c/Remove-a-Blank-Page-in-Word-Step-7-Version-4.jpg/aid1672325-v4-728px-Remove-a-Blank-Page-in-Word-Step-7-Version-4.jpg”,”smallWidth”:460,”smallHeight”:345,”bigWidth”:728,”bigHeight”:546,”licensing”:”<div class=”mw-parser-output”><p>License: <a target=”_blank” rel=”nofollow noreferrer noopener” class=”external text” href=”https://en.wikipedia.org/wiki/Fair_use”>Fair Use</a> (screenshot)<br>n</p></div>”}
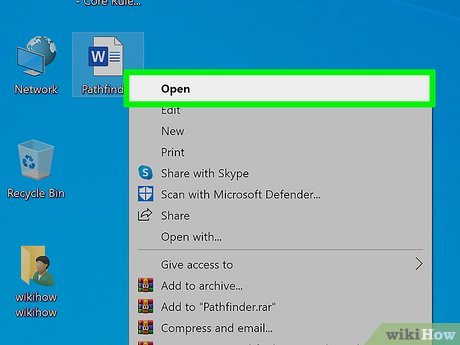
1
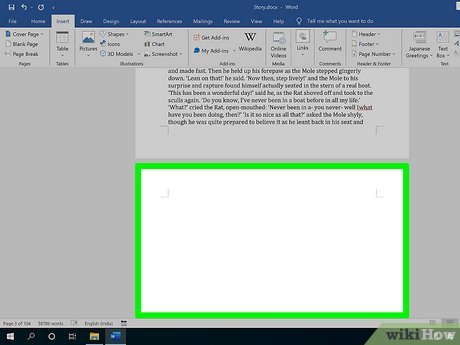
Go to the blank page in your document. If a strange blank page appears in the middle of your Word document, it’s likely due to an unintentional page break or extra paragraph markers that you can’t see.
{“smallUrl”:”https://www.wikihow.com/images/thumb/b/b1/Remove-a-Blank-Page-in-Word-Step-8-Version-4.jpg/v4-460px-Remove-a-Blank-Page-in-Word-Step-8-Version-4.jpg”,”bigUrl”:”/images/thumb/b/b1/Remove-a-Blank-Page-in-Word-Step-8-Version-4.jpg/aid1672325-v4-728px-Remove-a-Blank-Page-in-Word-Step-8-Version-4.jpg”,”smallWidth”:460,”smallHeight”:345,”bigWidth”:728,”bigHeight”:546,”licensing”:”<div class=”mw-parser-output”><p>License: <a target=”_blank” rel=”nofollow noreferrer noopener” class=”external text” href=”https://en.wikipedia.org/wiki/Fair_use”>Fair Use</a> (screenshot)<br>n</p></div>”}
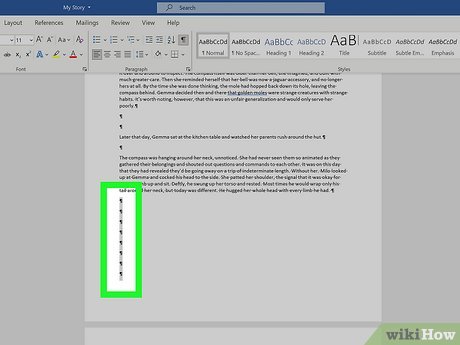
2
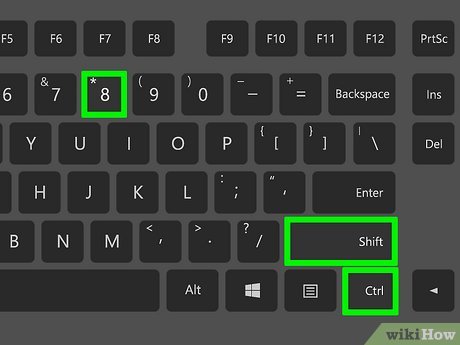
Press Ctrl +⇧ Shift8 ⌘ Cmd8 This displays paragraph markers (¶) at the beginning of each blank line, as well as at the end of every paragraph. If there are any page breaks on this page, you’ll see them marked by dotted lines and the word “Page Break.”
{“smallUrl”:”https://www.wikihow.com/images/thumb/f/f6/Remove-a-Blank-Page-in-Word-Step-3-Version-6.jpg/v4-460px-Remove-a-Blank-Page-in-Word-Step-3-Version-6.jpg”,”bigUrl”:”/images/thumb/f/f6/Remove-a-Blank-Page-in-Word-Step-3-Version-6.jpg/aid1672325-v4-728px-Remove-a-Blank-Page-in-Word-Step-3-Version-6.jpg”,”smallWidth”:460,”smallHeight”:345,”bigWidth”:728,”bigHeight”:546,”licensing”:”<div class=”mw-parser-output”><p>License: <a target=”_blank” rel=”nofollow noreferrer noopener” class=”external text” href=”https://en.wikipedia.org/wiki/Fair_use”>Fair Use</a> (screenshot)<br>n</p></div>”}
3
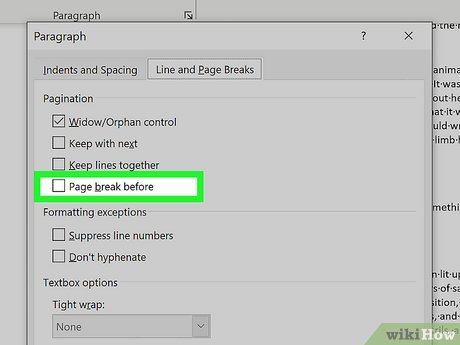
Look for a small black square next to a paragraph marker. You’ll want to look for this on both the blank page and the page after it. If you see a paragraph marker with a black square beside it, the paragraph has the “Page break before” setting turned on. You’ll want to turn this off. To do so:
Click the Home tab at the top of Word.
Right-click the paragraph marker ¶ that has the corresponding black bullet point.
Select Paragraph… on the menu.
Click the Lines and Page Breaks tab.
Remove the check next to “Page break before” (if there is one) and click OK .
{“smallUrl”:”https://www.wikihow.com/images/thumb/2/20/Remove-a-Blank-Page-in-Word-Step-9-Version-4.jpg/v4-460px-Remove-a-Blank-Page-in-Word-Step-9-Version-4.jpg”,”bigUrl”:”/images/thumb/2/20/Remove-a-Blank-Page-in-Word-Step-9-Version-4.jpg/aid1672325-v4-728px-Remove-a-Blank-Page-in-Word-Step-9-Version-4.jpg”,”smallWidth”:460,”smallHeight”:345,”bigWidth”:728,”bigHeight”:546,”licensing”:”<div class=”mw-parser-output”><p>License: <a target=”_blank” rel=”nofollow noreferrer noopener” class=”external text” href=”https://en.wikipedia.org/wiki/Fair_use”>Fair Use</a> (screenshot)<br>n</p></div>”}
4
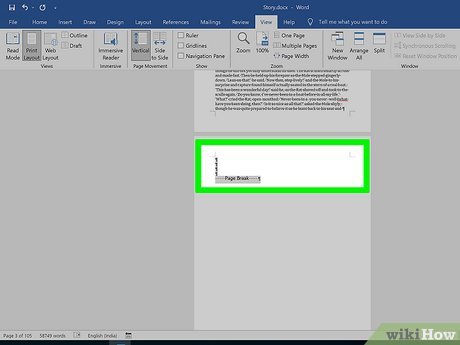
Highlight the ¶ marks and/or Page Break lines with your mouse. If you see both (or more than one of each), highlight it all at once.
Also check the page right before your blank one for extra page breaks and delete those as well.
Don’t select paragraph markers that appear on lines that contain actual content.
{“smallUrl”:”https://www.wikihow.com/images/thumb/d/d1/Remove-a-Blank-Page-in-Word-Step-10-Version-5.jpg/v4-460px-Remove-a-Blank-Page-in-Word-Step-10-Version-5.jpg”,”bigUrl”:”/images/thumb/d/d1/Remove-a-Blank-Page-in-Word-Step-10-Version-5.jpg/aid1672325-v4-728px-Remove-a-Blank-Page-in-Word-Step-10-Version-5.jpg”,”smallWidth”:460,”smallHeight”:345,”bigWidth”:728,”bigHeight”:546,”licensing”:”<div class=”mw-parser-output”><p>License: <a target=”_blank” rel=”nofollow noreferrer noopener” class=”external text” href=”https://en.wikipedia.org/wiki/Fair_use”>Fair Use</a> (screenshot)<br>n</p></div>”}
5
Hit the Delete This should delete all the ¶ marks and page breaks, which should delete the blank page.
If the blank page is still there, double-check the pages before for page breaks.
{“smallUrl”:”https://www.wikihow.com/images/thumb/8/88/Remove-a-Blank-Page-in-Word-Step-6-Version-3.jpg/v4-460px-Remove-a-Blank-Page-in-Word-Step-6-Version-3.jpg”,”bigUrl”:”/images/thumb/8/88/Remove-a-Blank-Page-in-Word-Step-6-Version-3.jpg/aid1672325-v4-728px-Remove-a-Blank-Page-in-Word-Step-6-Version-3.jpg”,”smallWidth”:460,”smallHeight”:345,”bigWidth”:728,”bigHeight”:546,”licensing”:”<div class=”mw-parser-output”><p>License: <a target=”_blank” rel=”nofollow noreferrer noopener” class=”external text” href=”https://en.wikipedia.org/wiki/Fair_use”>Fair Use</a> (screenshot)<br>n</p></div>”}
6
Press Ctrl +⇧ Shift8 ⌘ Cmd8 This hides the paragraph markers again.
{“smallUrl”:”https://www.wikihow.com/images/thumb/d/df/Remove-a-Blank-Page-in-Word-Step-1-Version-5.jpg/v4-460px-Remove-a-Blank-Page-in-Word-Step-1-Version-5.jpg”,”bigUrl”:”/images/thumb/d/df/Remove-a-Blank-Page-in-Word-Step-1-Version-5.jpg/aid1672325-v4-728px-Remove-a-Blank-Page-in-Word-Step-1-Version-5.jpg”,”smallWidth”:460,”smallHeight”:345,”bigWidth”:728,”bigHeight”:546,”licensing”:”<div class=”mw-parser-output”><p>License: <a target=”_blank” rel=”nofollow noreferrer noopener” class=”external text” href=”https://en.wikipedia.org/wiki/Fair_use”>Fair Use</a> (screenshot)<br>n</p></div>”}
1
Go to the blank last page in your document. If a strange blank page appears at the end of your Word document, it could be due to Word’s hidden undeletable end paragraph.
[1] According to Microsoft, the most reliable way to get rid of that blank page is to make the hidden paragraph very small.
The undeletable hidden paragraph usually occurs when the content of your last real page (not the blank page) goes all the way to the bottom of that page.
{“smallUrl”:”https://www.wikihow.com/images/thumb/d/df/Remove-a-Blank-Page-in-Word-Step-2-Version-5.jpg/v4-460px-Remove-a-Blank-Page-in-Word-Step-2-Version-5.jpg”,”bigUrl”:”/images/thumb/d/df/Remove-a-Blank-Page-in-Word-Step-2-Version-5.jpg/aid1672325-v4-728px-Remove-a-Blank-Page-in-Word-Step-2-Version-5.jpg”,”smallWidth”:460,”smallHeight”:345,”bigWidth”:728,”bigHeight”:546,”licensing”:”<div class=”mw-parser-output”><p>License: <a target=”_blank” rel=”nofollow noreferrer noopener” class=”external text” href=”https://en.wikipedia.org/wiki/Fair_use”>Fair Use</a> (screenshot)<br>n</p></div>”}
2
Press Ctrl +⇧ Shift8 ⌘ Cmd8 This displays paragraph markers (¶) at the beginning of each blank line, as well as at the end of every paragraph. Since you have a blank page at the end of your document, you’ll see at least one paragraph marker on that page.
{“smallUrl”:”https://www.wikihow.com/images/thumb/f/fe/Remove-a-Blank-Page-in-Word-Step-9-Version-5.jpg/v4-460px-Remove-a-Blank-Page-in-Word-Step-9-Version-5.jpg”,”bigUrl”:”/images/thumb/f/fe/Remove-a-Blank-Page-in-Word-Step-9-Version-5.jpg/aid1672325-v4-728px-Remove-a-Blank-Page-in-Word-Step-9-Version-5.jpg”,”smallWidth”:460,”smallHeight”:345,”bigWidth”:728,”bigHeight”:546,”licensing”:”<div class=”mw-parser-output”><p>License: <a target=”_blank” rel=”nofollow noreferrer noopener” class=”external text” href=”https://en.wikipedia.org/wiki/Fair_use”>Fair Use</a> (screenshot)<br>n</p></div>”}
3
Delete all of the paragraph markers on the blank page (if there are multiple). If more than one paragraph marker appears on the blank page, deleting all of them will get usually get rid of the blank page. Try that first.
If there’s only one paragraph marker at the top of the page, deleting it won’t help—continue with this method, if so.
{“smallUrl”:”https://www.wikihow.com/images/thumb/2/20/Remove-a-Blank-Page-in-Word-Step-10-Version-6.jpg/v4-460px-Remove-a-Blank-Page-in-Word-Step-10-Version-6.jpg”,”bigUrl”:”/images/thumb/2/20/Remove-a-Blank-Page-in-Word-Step-10-Version-6.jpg/aid1672325-v4-728px-Remove-a-Blank-Page-in-Word-Step-10-Version-6.jpg”,”smallWidth”:460,”smallHeight”:345,”bigWidth”:728,”bigHeight”:546,”licensing”:”<div class=”mw-parser-output”><p>License: <a target=”_blank” rel=”nofollow noreferrer noopener” class=”external text” href=”https://en.wikipedia.org/wiki/Fair_use”>Fair Use</a> (screenshot)<br>n</p></div>”}
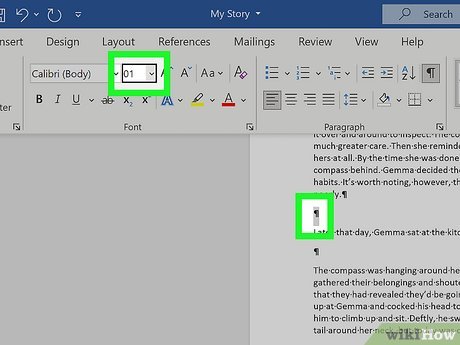
4
Change the font size of the paragraph marker to 01 . Here’s how:
Click the Home tab if you’re not already there.
Highlight the paragraph marker.
Click the font size next to the font’s name.
Replace it with 01 and press Enter or Return .
{“smallUrl”:”https://www.wikihow.com/images/thumb/f/f9/Remove-a-Blank-Page-in-Word-Step-11-Version-5.jpg/v4-460px-Remove-a-Blank-Page-in-Word-Step-11-Version-5.jpg”,”bigUrl”:”/images/thumb/f/f9/Remove-a-Blank-Page-in-Word-Step-11-Version-5.jpg/aid1672325-v4-728px-Remove-a-Blank-Page-in-Word-Step-11-Version-5.jpg”,”smallWidth”:460,”smallHeight”:345,”bigWidth”:728,”bigHeight”:546,”licensing”:”<div class=”mw-parser-output”><p>License: <a target=”_blank” rel=”nofollow noreferrer noopener” class=”external text” href=”https://en.wikipedia.org/wiki/Fair_use”>Fair Use</a> (screenshot)<br>n</p></div>”}
5
Press Ctrl +⇧ Shift8 ⌘ Cmd8 This hides the paragraph markers again, which should delete the blank page at the end by fitting the hidden paragraph on the last page that contains content.
If you still have a blank page after this, you can reduce the size of the bottom margin instead. To do this, click the Layout tab, select Margins , click Custom Margins , and change the bottom margin to 0.3 inches.
{“smallUrl”:”https://www.wikihow.com/images/thumb/4/44/Remove-a-Blank-Page-in-Word-Step-17.jpg/v4-460px-Remove-a-Blank-Page-in-Word-Step-17.jpg”,”bigUrl”:”/images/thumb/4/44/Remove-a-Blank-Page-in-Word-Step-17.jpg/aid1672325-v4-728px-Remove-a-Blank-Page-in-Word-Step-17.jpg”,”smallWidth”:460,”smallHeight”:345,”bigWidth”:728,”bigHeight”:546,”licensing”:”<div class=”mw-parser-output”><p>License: <a target=”_blank” rel=”nofollow noreferrer noopener” class=”external text” href=”https://en.wikipedia.org/wiki/Fair_use”>Fair Use</a> (screenshot)<br>n</p></div>”}
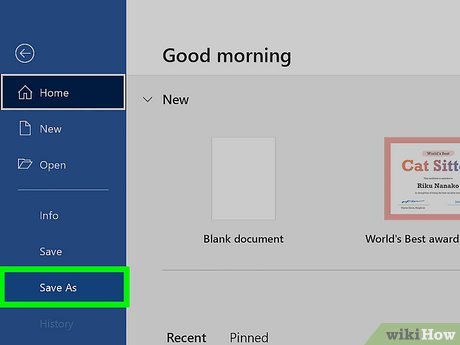
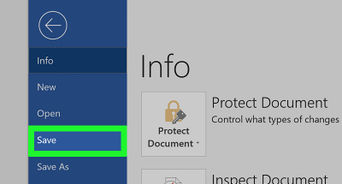
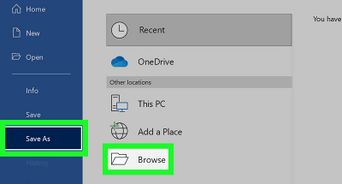
1
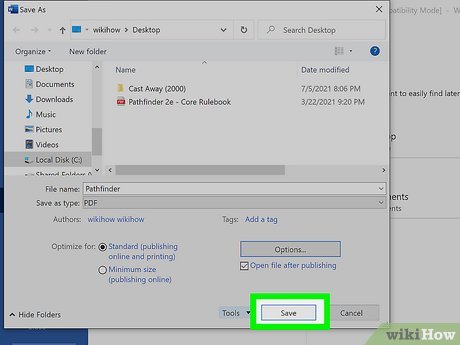
Click the File menu and choose Save as If you still have a blank page at the end of your document after
fixing hidden end paragraphs, you can omit the last page when saving your document as a PDF.
This only works on the desktop version of Word—the web version doesn’t let you choose which pages to include in a PDF.
If your file is synced to One Drive, you won’t see Save as . Click Save as copy instead.
If the document must be in the Word format, you can convert the PDF back to the Word format after you save it as a PDF.
{“smallUrl”:”https://www.wikihow.com/images/thumb/4/4f/Remove-a-Blank-Page-in-Word-Step-18.jpg/v4-460px-Remove-a-Blank-Page-in-Word-Step-18.jpg”,”bigUrl”:”/images/thumb/4/4f/Remove-a-Blank-Page-in-Word-Step-18.jpg/aid1672325-v4-728px-Remove-a-Blank-Page-in-Word-Step-18.jpg”,”smallWidth”:460,”smallHeight”:345,”bigWidth”:728,”bigHeight”:546,”licensing”:”<div class=”mw-parser-output”><p>License: <a target=”_blank” rel=”nofollow noreferrer noopener” class=”external text” href=”https://en.wikipedia.org/wiki/Fair_use”>Fair Use</a> (screenshot)<br>n</p></div>”}
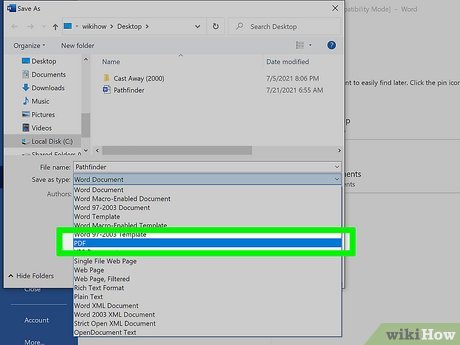
2
Select PDF Depending on your version of Word, the file type menu may be in the upper-right corner of the page, or in the “Save as type” menu toward the bottom.
{“smallUrl”:”https://www.wikihow.com/images/thumb/d/d7/Remove-a-Blank-Page-in-Word-Step-19.jpg/v4-460px-Remove-a-Blank-Page-in-Word-Step-19.jpg”,”bigUrl”:”/images/thumb/d/d7/Remove-a-Blank-Page-in-Word-Step-19.jpg/aid1672325-v4-728px-Remove-a-Blank-Page-in-Word-Step-19.jpg”,”smallWidth”:460,”smallHeight”:345,”bigWidth”:728,”bigHeight”:546,”licensing”:”<div class=”mw-parser-output”><p>License: <a target=”_blank” rel=”nofollow noreferrer noopener” class=”external text” href=”https://en.wikipedia.org/wiki/Fair_use”>Fair Use</a> (screenshot)<br>n</p></div>”}
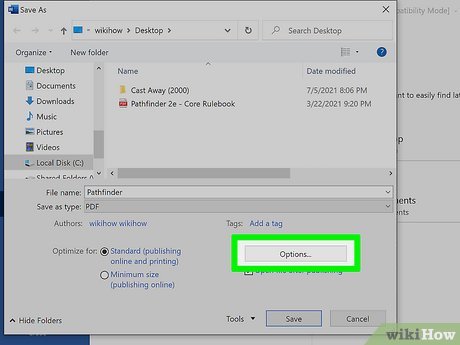
3
Click Options More options You’ll see one of these two options near the menu from which you selected PDF .
{“smallUrl”:”https://www.wikihow.com/images/thumb/0/02/Remove-a-Blank-Page-in-Word-Step-20.jpg/v4-460px-Remove-a-Blank-Page-in-Word-Step-20.jpg”,”bigUrl”:”/images/thumb/0/02/Remove-a-Blank-Page-in-Word-Step-20.jpg/aid1672325-v4-728px-Remove-a-Blank-Page-in-Word-Step-20.jpg”,”smallWidth”:460,”smallHeight”:345,”bigWidth”:728,”bigHeight”:546,”licensing”:”<div class=”mw-parser-output”><p>License: <a target=”_blank” rel=”nofollow noreferrer noopener” class=”external text” href=”https://en.wikipedia.org/wiki/Fair_use”>Fair Use</a> (screenshot)<br>n</p></div>”}
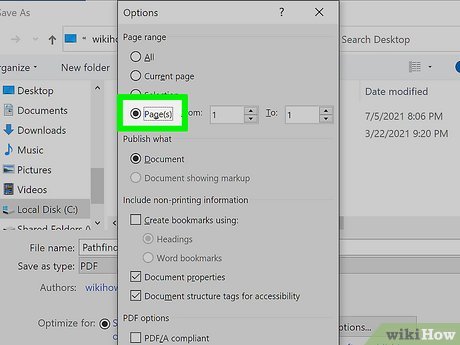
4
Click the radio option next to “Page(s).” This allows you to select a range of include in your PDF.
{“smallUrl”:”https://www.wikihow.com/images/thumb/8/89/Remove-a-Blank-Page-in-Word-Step-21.jpg/v4-460px-Remove-a-Blank-Page-in-Word-Step-21.jpg”,”bigUrl”:”/images/thumb/8/89/Remove-a-Blank-Page-in-Word-Step-21.jpg/aid1672325-v4-728px-Remove-a-Blank-Page-in-Word-Step-21.jpg”,”smallWidth”:460,”smallHeight”:345,”bigWidth”:728,”bigHeight”:546,”licensing”:”<div class=”mw-parser-output”><p>License: <a target=”_blank” rel=”nofollow noreferrer noopener” class=”external text” href=”https://en.wikipedia.org/wiki/Fair_use”>Fair Use</a> (screenshot)<br>n</p></div>”}
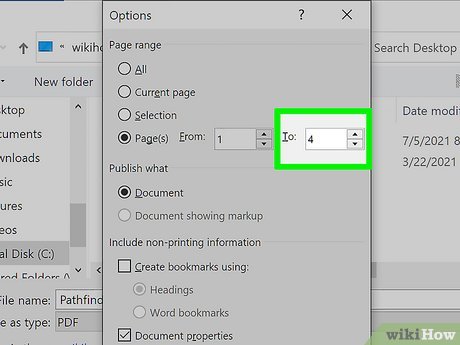
5
Enter the page range, minus the last page. Type “1” in the “From” box, and the last real page (before the blank page) into the “To” box.
{“smallUrl”:”https://www.wikihow.com/images/thumb/a/a6/Remove-a-Blank-Page-in-Word-Step-23.jpg/v4-460px-Remove-a-Blank-Page-in-Word-Step-23.jpg”,”bigUrl”:”/images/thumb/a/a6/Remove-a-Blank-Page-in-Word-Step-23.jpg/aid1672325-v4-728px-Remove-a-Blank-Page-in-Word-Step-23.jpg”,”smallWidth”:460,”smallHeight”:345,”bigWidth”:728,”bigHeight”:546,”licensing”:”<div class=”mw-parser-output”><p>License: <a target=”_blank” rel=”nofollow noreferrer noopener” class=”external text” href=”https://en.wikipedia.org/wiki/Fair_use”>Fair Use</a> (screenshot)<br>n</p></div>”}
6
Click Ok This saves your document as a PDF, minus the blank page(s) at the end.
Thanks for submitting a tip for review!


