{“smallUrl”:”https://www.wikihow.com/images/thumb/0/0c/Solve-a-Puzzle-Ball-Step-1.jpg/v4-460px-Solve-a-Puzzle-Ball-Step-1.jpg”,”bigUrl”:”/images/thumb/0/0c/Solve-a-Puzzle-Ball-Step-1.jpg/aid13105001-v4-728px-Solve-a-Puzzle-Ball-Step-1.jpg”,”smallWidth”:460,”smallHeight”:345,”bigWidth”:728,”bigHeight”:546,”licensing”:”<div class=”mw-parser-output”><p>u00a9 2023 wikiHow, Inc. All rights reserved. wikiHow, Inc. is the copyright holder of this image under U.S. and international copyright laws. This image is <b>not</b> licensed under the Creative Commons license applied to text content and some other images posted to the wikiHow website. This image may not be used by other entities without the express written consent of wikiHow, Inc.<br>n</p><p><br />n</p></div>”}
1
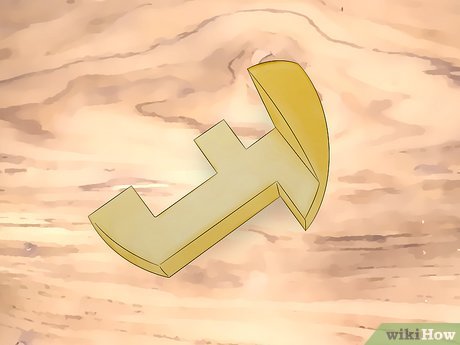
Piece A: This piece looks like an open umbrella that’s been cut in half lengthwise. It has three notches cut out of the umbrella’s half-canopy on top. Compared to the other umbrella-like piece (Piece C), this one has a thicker umbrella handle.[1] X Research source
{“smallUrl”:”https://www.wikihow.com/images/thumb/b/bf/Solve-a-Puzzle-Ball-Step-2.jpg/v4-460px-Solve-a-Puzzle-Ball-Step-2.jpg”,”bigUrl”:”/images/thumb/b/bf/Solve-a-Puzzle-Ball-Step-2.jpg/aid13105001-v4-728px-Solve-a-Puzzle-Ball-Step-2.jpg”,”smallWidth”:460,”smallHeight”:345,”bigWidth”:728,”bigHeight”:546,”licensing”:”<div class=”mw-parser-output”><p>u00a9 2023 wikiHow, Inc. All rights reserved. wikiHow, Inc. is the copyright holder of this image under U.S. and international copyright laws. This image is <b>not</b> licensed under the Creative Commons license applied to text content and some other images posted to the wikiHow website. This image may not be used by other entities without the express written consent of wikiHow, Inc.<br>n</p><p><br />n</p></div>”}
2
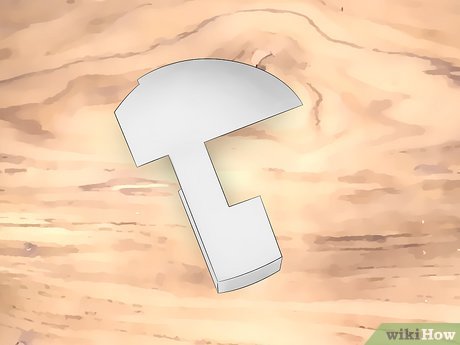
Piece B: If you hold this piece vertically, with the larger rounded side pointing up, it looks kind of like either a number “3” or a capital letter “E”.
{“smallUrl”:”https://www.wikihow.com/images/thumb/b/b1/Solve-a-Puzzle-Ball-Step-3.jpg/v4-460px-Solve-a-Puzzle-Ball-Step-3.jpg”,”bigUrl”:”/images/thumb/b/b1/Solve-a-Puzzle-Ball-Step-3.jpg/aid13105001-v4-728px-Solve-a-Puzzle-Ball-Step-3.jpg”,”smallWidth”:460,”smallHeight”:345,”bigWidth”:728,”bigHeight”:546,”licensing”:”<div class=”mw-parser-output”><p>u00a9 2023 wikiHow, Inc. All rights reserved. wikiHow, Inc. is the copyright holder of this image under U.S. and international copyright laws. This image is <b>not</b> licensed under the Creative Commons license applied to text content and some other images posted to the wikiHow website. This image may not be used by other entities without the express written consent of wikiHow, Inc.<br>n</p><p><br />n</p></div>”}
3
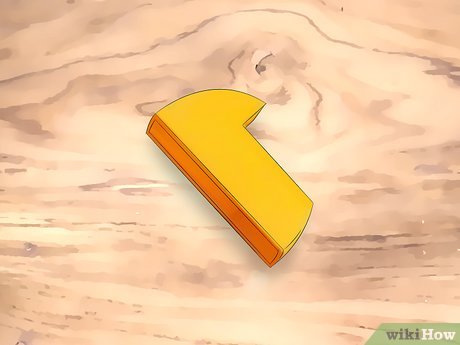
Piece C: This is the other piece (along with Piece A) that looks like an umbrella cut in half lengthwise. Compared to Piece A, this one has two notches instead of three cut out of the half-canopy. It also has a thinner overall handle with more of a hook shape at the bottom.
{“smallUrl”:”https://www.wikihow.com/images/thumb/1/1e/Solve-a-Puzzle-Ball-Step-4.jpg/v4-460px-Solve-a-Puzzle-Ball-Step-4.jpg”,”bigUrl”:”/images/thumb/1/1e/Solve-a-Puzzle-Ball-Step-4.jpg/aid13105001-v4-728px-Solve-a-Puzzle-Ball-Step-4.jpg”,”smallWidth”:460,”smallHeight”:345,”bigWidth”:728,”bigHeight”:546,”licensing”:”<div class=”mw-parser-output”><p>u00a9 2023 wikiHow, Inc. All rights reserved. wikiHow, Inc. is the copyright holder of this image under U.S. and international copyright laws. This image is <b>not</b> licensed under the Creative Commons license applied to text content and some other images posted to the wikiHow website. This image may not be used by other entities without the express written consent of wikiHow, Inc.<br>n</p><p><br />n</p></div>”}
4
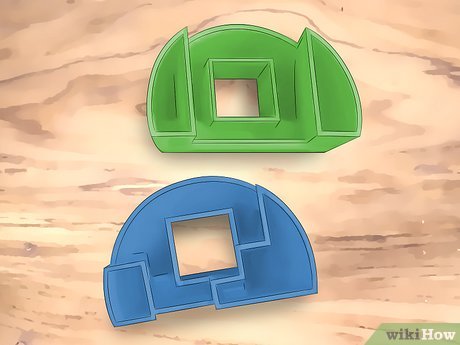
Pieces D and E: These pieces look very similar—they both have a rounded dome-like shape with a square cutout that goes all the way through the dome. Here’s how to tell them apart:
Piece D has a notch that goes two-thirds of the way across the piece on the front side below the square cutout, and two uneven (asymmetrical) bump-outs on the back side below the square cutout.
Piece E has a notch that goes all away across the piece on the front side below the square cutout, and two even (symmetrical) bump-outs to either side of the square cutout on the back side
{“smallUrl”:”https://www.wikihow.com/images/thumb/8/86/Solve-a-Puzzle-Ball-Step-5.jpg/v4-460px-Solve-a-Puzzle-Ball-Step-5.jpg”,”bigUrl”:”/images/thumb/8/86/Solve-a-Puzzle-Ball-Step-5.jpg/aid13105001-v4-728px-Solve-a-Puzzle-Ball-Step-5.jpg”,”smallWidth”:460,”smallHeight”:345,”bigWidth”:728,”bigHeight”:546,”licensing”:”<div class=”mw-parser-output”><p>u00a9 2023 wikiHow, Inc. All rights reserved. wikiHow, Inc. is the copyright holder of this image under U.S. and international copyright laws. This image is <b>not</b> licensed under the Creative Commons license applied to text content and some other images posted to the wikiHow website. This image may not be used by other entities without the express written consent of wikiHow, Inc.<br>n</p><p><br />n</p></div>”}
5
Piece F: You’ll know which one this is because it’s the only piece left! Also, it looks like a number “1” if you hold it vertically with the larger curved side pointed up and to the left.
Part 2
Part 2 of 3:
Putting the Ball Together
{“smallUrl”:”https://www.wikihow.com/images/thumb/3/3a/Solve-a-Puzzle-Ball-Step-6.jpg/v4-460px-Solve-a-Puzzle-Ball-Step-6.jpg”,”bigUrl”:”/images/thumb/3/3a/Solve-a-Puzzle-Ball-Step-6.jpg/aid13105001-v4-728px-Solve-a-Puzzle-Ball-Step-6.jpg”,”smallWidth”:460,”smallHeight”:345,”bigWidth”:728,”bigHeight”:546,”licensing”:”<div class=”mw-parser-output”><p>u00a9 2023 wikiHow, Inc. All rights reserved. wikiHow, Inc. is the copyright holder of this image under U.S. and international copyright laws. This image is <b>not</b> licensed under the Creative Commons license applied to text content and some other images posted to the wikiHow website. This image may not be used by other entities without the express written consent of wikiHow, Inc.<br>n</p><p><br />n</p></div>”}
1
Connect Piece A and Piece B. Hold Piece B so it looks like a capital letter “E” with the larger curved side facing up. Turn Piece A on its side so the umbrella shape is horizontal with the canopy to the left, the handle to the right, and the larger parts of both the canopy and handle pointing downward. You’ll see a notch in Piece A that almost looks like a lowercase letter “t”—slide Piece B into this notch.[2] X Research source
{“smallUrl”:”https://www.wikihow.com/images/thumb/f/f0/Solve-a-Puzzle-Ball-Step-7.jpg/v4-460px-Solve-a-Puzzle-Ball-Step-7.jpg”,”bigUrl”:”/images/thumb/f/f0/Solve-a-Puzzle-Ball-Step-7.jpg/aid13105001-v4-728px-Solve-a-Puzzle-Ball-Step-7.jpg”,”smallWidth”:460,”smallHeight”:345,”bigWidth”:728,”bigHeight”:546,”licensing”:”<div class=”mw-parser-output”><p>u00a9 2023 wikiHow, Inc. All rights reserved. wikiHow, Inc. is the copyright holder of this image under U.S. and international copyright laws. This image is <b>not</b> licensed under the Creative Commons license applied to text content and some other images posted to the wikiHow website. This image may not be used by other entities without the express written consent of wikiHow, Inc.<br>n</p><p><br />n</p></div>”}
2
Attach Piece C to Pieces A and B. Turn Piece C so the top of the umbrella canopy is pointed toward you, with the flat side (and two notches) facing down and the rounded side facing up. Slide the umbrella stem of Piece C into the long notch near the top of the A/B combination until the domed tops of all three pieces line up.[3] X Research source
{“smallUrl”:”https://www.wikihow.com/images/thumb/e/e4/Solve-a-Puzzle-Ball-Step-8.jpg/v4-460px-Solve-a-Puzzle-Ball-Step-8.jpg”,”bigUrl”:”/images/thumb/e/e4/Solve-a-Puzzle-Ball-Step-8.jpg/aid13105001-v4-728px-Solve-a-Puzzle-Ball-Step-8.jpg”,”smallWidth”:460,”smallHeight”:345,”bigWidth”:728,”bigHeight”:546,”licensing”:”<div class=”mw-parser-output”><p>u00a9 2023 wikiHow, Inc. All rights reserved. wikiHow, Inc. is the copyright holder of this image under U.S. and international copyright laws. This image is <b>not</b> licensed under the Creative Commons license applied to text content and some other images posted to the wikiHow website. This image may not be used by other entities without the express written consent of wikiHow, Inc.<br>n</p><p><br />n</p></div>”}
3
Fit Piece D onto Piece A. Find the bottom of the umbrella handle of Piece A. Point it straight toward you so it looks like a square. Position Piece D so its square cutout lines up with Piece A’s square protrusion, as well as the notches created by the other pieces. Slide Piece D into place so that the bottom of Piece A is flush (even) with the curved dome of Piece D.[4] X Research source
The puzzle should look like about three-fourths of a completed ball (sphere) now—just two pieces to go!
{“smallUrl”:”https://www.wikihow.com/images/thumb/c/cc/Solve-a-Puzzle-Ball-Step-9.jpg/v4-460px-Solve-a-Puzzle-Ball-Step-9.jpg”,”bigUrl”:”/images/thumb/c/cc/Solve-a-Puzzle-Ball-Step-9.jpg/aid13105001-v4-728px-Solve-a-Puzzle-Ball-Step-9.jpg”,”smallWidth”:460,”smallHeight”:345,”bigWidth”:728,”bigHeight”:546,”licensing”:”<div class=”mw-parser-output”><p>u00a9 2023 wikiHow, Inc. All rights reserved. wikiHow, Inc. is the copyright holder of this image under U.S. and international copyright laws. This image is <b>not</b> licensed under the Creative Commons license applied to text content and some other images posted to the wikiHow website. This image may not be used by other entities without the express written consent of wikiHow, Inc.<br>n</p><p><br />n</p></div>”}
4
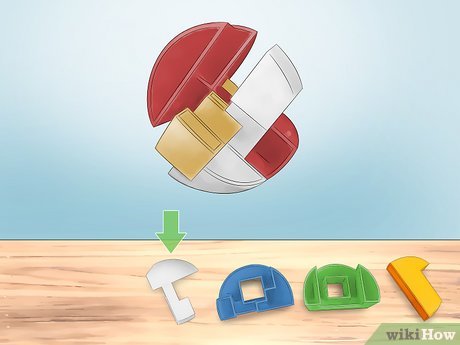
Slide Piece E into place. At this point, you should be able to clearly visualize where Piece E (one-fourth of a sphere) fits into the nearly-completed ball (three-fourths of a sphere). Line up the bump-outs on the back of Piece E with the notches created by the other assembled pieces, then slide Piece E down until it locks into place.[5] X Research source
{“smallUrl”:”https://www.wikihow.com/images/thumb/c/c8/Solve-a-Puzzle-Ball-Step-10.jpg/v4-460px-Solve-a-Puzzle-Ball-Step-10.jpg”,”bigUrl”:”/images/thumb/c/c8/Solve-a-Puzzle-Ball-Step-10.jpg/aid13105001-v4-728px-Solve-a-Puzzle-Ball-Step-10.jpg”,”smallWidth”:460,”smallHeight”:345,”bigWidth”:728,”bigHeight”:546,”licensing”:”<div class=”mw-parser-output”><p>u00a9 2023 wikiHow, Inc. All rights reserved. wikiHow, Inc. is the copyright holder of this image under U.S. and international copyright laws. This image is <b>not</b> licensed under the Creative Commons license applied to text content and some other images posted to the wikiHow website. This image may not be used by other entities without the express written consent of wikiHow, Inc.<br>n</p><p><br />n</p></div>”}
5
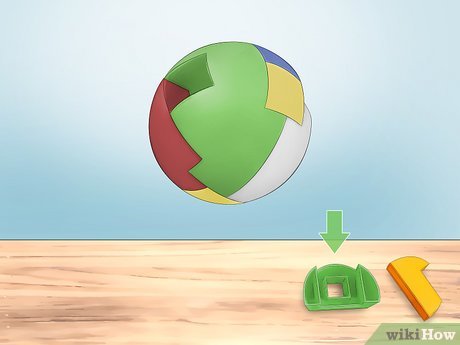
Slip Piece F into the opening through the sphere. One side of the opening that goes through the center of the ball is bigger than the other—hold the ball so you’re looking at that side. Feed the smaller end of Piece F into this larger opening and keep sliding it until it fits into place and completes the sphere.[6] X Research source
Now you can take a moment to congratulate yourself for solving the puzzle!
Part 3
Part 3 of 3:
Taking the Puzzle Apart
{“smallUrl”:”https://www.wikihow.com/images/thumb/1/12/Solve-a-Puzzle-Ball-Step-11.jpg/v4-460px-Solve-a-Puzzle-Ball-Step-11.jpg”,”bigUrl”:”/images/thumb/1/12/Solve-a-Puzzle-Ball-Step-11.jpg/aid13105001-v4-728px-Solve-a-Puzzle-Ball-Step-11.jpg”,”smallWidth”:460,”smallHeight”:345,”bigWidth”:728,”bigHeight”:546,”licensing”:”<div class=”mw-parser-output”><p>u00a9 2023 wikiHow, Inc. All rights reserved. wikiHow, Inc. is the copyright holder of this image under U.S. and international copyright laws. This image is <b>not</b> licensed under the Creative Commons license applied to text content and some other images posted to the wikiHow website. This image may not be used by other entities without the express written consent of wikiHow, Inc.<br>n</p><p><br />n</p></div>”}
1
Find the square on the sphere that will push inward. There are four squares visible on the ball, but only one of them will push inward when you press on it. When you find that one, press it all the way in until the piece pops out the other side.[7] X Research source
This is Piece F.
{“smallUrl”:”https://www.wikihow.com/images/thumb/a/a3/Solve-a-Puzzle-Ball-Step-12.jpg/v4-460px-Solve-a-Puzzle-Ball-Step-12.jpg”,”bigUrl”:”/images/thumb/a/a3/Solve-a-Puzzle-Ball-Step-12.jpg/aid13105001-v4-728px-Solve-a-Puzzle-Ball-Step-12.jpg”,”smallWidth”:460,”smallHeight”:345,”bigWidth”:728,”bigHeight”:546,”licensing”:”<div class=”mw-parser-output”><p>u00a9 2023 wikiHow, Inc. All rights reserved. wikiHow, Inc. is the copyright holder of this image under U.S. and international copyright laws. This image is <b>not</b> licensed under the Creative Commons license applied to text content and some other images posted to the wikiHow website. This image may not be used by other entities without the express written consent of wikiHow, Inc.<br>n</p><p><br />n</p></div>”}
2
Stick your finger into the square opening you just made. This should be the opening where you pushed on Piece F, not the opening where it popped out. Press against the inner walls of the square opening until the piece that surrounds it on three sides slides free and out of place.[8] X Research source
This is Piece E.
{“smallUrl”:”https://www.wikihow.com/images/thumb/0/09/Solve-a-Puzzle-Ball-Step-13.jpg/v4-460px-Solve-a-Puzzle-Ball-Step-13.jpg”,”bigUrl”:”/images/thumb/0/09/Solve-a-Puzzle-Ball-Step-13.jpg/aid13105001-v4-728px-Solve-a-Puzzle-Ball-Step-13.jpg”,”smallWidth”:460,”smallHeight”:345,”bigWidth”:728,”bigHeight”:546,”licensing”:”<div class=”mw-parser-output”><p>u00a9 2023 wikiHow, Inc. All rights reserved. wikiHow, Inc. is the copyright holder of this image under U.S. and international copyright laws. This image is <b>not</b> licensed under the Creative Commons license applied to text content and some other images posted to the wikiHow website. This image may not be used by other entities without the express written consent of wikiHow, Inc.<br>n</p><p><br />n</p></div>”}
3
Press on the remaining squares on the sphere’s surface. There are three left, but (like before) only one of them will push inward when you press on it. Keep pressing on it until two pieces come free.[9] X Research source
These are Pieces B and C.
{“smallUrl”:”https://www.wikihow.com/images/thumb/0/08/Solve-a-Puzzle-Ball-Step-14.jpg/v4-460px-Solve-a-Puzzle-Ball-Step-14.jpg”,”bigUrl”:”/images/thumb/0/08/Solve-a-Puzzle-Ball-Step-14.jpg/aid13105001-v4-728px-Solve-a-Puzzle-Ball-Step-14.jpg”,”smallWidth”:460,”smallHeight”:345,”bigWidth”:728,”bigHeight”:546,”licensing”:”<div class=”mw-parser-output”><p>u00a9 2023 wikiHow, Inc. All rights reserved. wikiHow, Inc. is the copyright holder of this image under U.S. and international copyright laws. This image is <b>not</b> licensed under the Creative Commons license applied to text content and some other images posted to the wikiHow website. This image may not be used by other entities without the express written consent of wikiHow, Inc.<br>n</p><p><br />n</p></div>”}
4
Separate the last two pieces. Here again, press on the square you can see—this time it’s the only one remaining. This will detach the final two pieces of the puzzle—Pieces A and D.[10] X Research source
What to do now? Try timing yourself to see how fast you can put the puzzle back together. Or give the pieces to a friend and let them try to solve the puzzle!
Tips
Submit a Tip
All tip submissions are carefully reviewed before being published


