Use a magnifying glass to inspect the surface of the silver for stamps. If you see a 920 stamp, the piece is 92.5% silver, 900 means 90% silver, and 800 is 80% silver.
Hold a magnet against the silver to see if it sticks. If it does, it’s not real silver.
Place an ice cube on the silver. If it melts immediately, it’s not real silver.
Apply a drop of bleach to the silver and watch for a reaction. If it tarnishes or blackens right away, it’s real silver.
Steps
Method 1
Method 1 of 6:
Authentication Stamp
{“smallUrl”:”https://www.wikihow.com/images/thumb/7/72/Test-Silver-Step-1-Version-5.jpg/v4-460px-Test-Silver-Step-1-Version-5.jpg”,”bigUrl”:”/images/thumb/7/72/Test-Silver-Step-1-Version-5.jpg/v4-728px-Test-Silver-Step-1-Version-5.jpg”,”smallWidth”:460,”smallHeight”:345,”bigWidth”:728,”bigHeight”:546,”licensing”:”<div class=”mw-parser-output”><p>u00a9 2023 wikiHow, Inc. All rights reserved. wikiHow, Inc. is the copyright holder of this image under U.S. and international copyright laws. This image is <b>not</b> licensed under the Creative Commons license applied to text content and some other images posted to the wikiHow website. This image may not be used by other entities without the express written consent of wikiHow, Inc.<br>n</p><p><br />n</p></div>”}
1
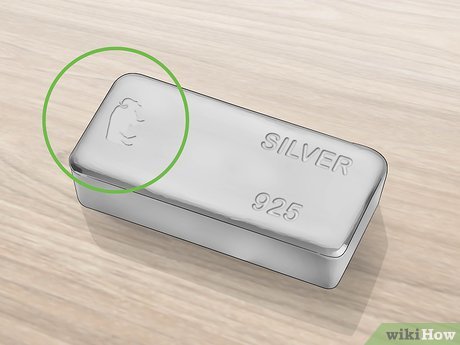
Look for a stamp, engraving, or marking on the surface. Items advertised as silver and sold internationally have stamps that state the silver content. If there’s no stamp on your silver piece, be leery.[1] X Research source
{“smallUrl”:”https://www.wikihow.com/images/thumb/1/1e/Test-Silver-Step-2-Version-5.jpg/v4-460px-Test-Silver-Step-2-Version-5.jpg”,”bigUrl”:”/images/thumb/1/1e/Test-Silver-Step-2-Version-5.jpg/v4-728px-Test-Silver-Step-2-Version-5.jpg”,”smallWidth”:460,”smallHeight”:345,”bigWidth”:728,”bigHeight”:546,”licensing”:”<div class=”mw-parser-output”><p>u00a9 2023 wikiHow, Inc. All rights reserved. wikiHow, Inc. is the copyright holder of this image under U.S. and international copyright laws. This image is <b>not</b> licensed under the Creative Commons license applied to text content and some other images posted to the wikiHow website. This image may not be used by other entities without the express written consent of wikiHow, Inc.<br>n</p><p><br />n</p></div>”}
2
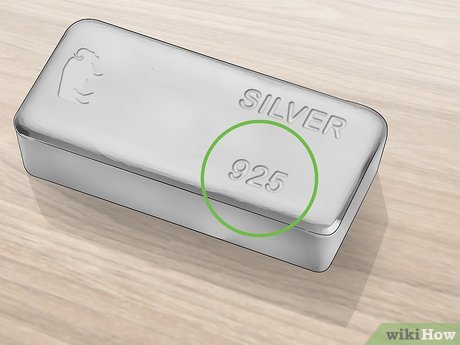
Interpret stamps like 925, 900, or 800 as the percentage of silver. Look at the silver piece with a magnifying glass. International sellers of silver will stamp silver as 925, 900, or 800. Read these numbers to figure out the percentage of fine silver in the piece.[2] X Research source
925 means that the piece is 92.5 percent silver (also known as sterling silver).[3] X Research source
A stamp of 900 or 800 means the piece is 90 percent or 80 percent silver, which is often called “coin” silver.
3
Check for letters like “STER” and “IS” on the silver. “STER” stands for sterling, which means the silver content is 92.5%. “IS” stands for “international silver,” which means the piece is made with real silver. “IS” without a number stamp could mean the silver percentage is low, or that you have a silver-plated object.[4] X Research source
To see if the item is silver-plated or pure, try the acid test and the magnet test.
Method 2
Method 2 of 6:
Magnet Test
{“smallUrl”:”https://www.wikihow.com/images/thumb/9/94/Test-Silver-Step-3-Version-5.jpg/v4-460px-Test-Silver-Step-3-Version-5.jpg”,”bigUrl”:”/images/thumb/9/94/Test-Silver-Step-3-Version-5.jpg/v4-728px-Test-Silver-Step-3-Version-5.jpg”,”smallWidth”:460,”smallHeight”:345,”bigWidth”:728,”bigHeight”:546,”licensing”:”<div class=”mw-parser-output”><p>u00a9 2023 wikiHow, Inc. All rights reserved. wikiHow, Inc. is the copyright holder of this image under U.S. and international copyright laws. This image is <b>not</b> licensed under the Creative Commons license applied to text content and some other images posted to the wikiHow website. This image may not be used by other entities without the express written consent of wikiHow, Inc.<br>n</p><p><br />n</p></div>”}
1
Place a magnet close to the silver to see if it sticks. Use a strong magnet, such as the rare-earth magnet made out of neodymium. Silver is paramagnetic and exhibits only weak magnetic effects. If your magnet sticks strongly to the piece, it has a ferromagnetic core made with a cheaper metal and isn’t pure silver.[5] X Research source
There are a few metals that don’t stick to a magnet that can look like silver. Do the magnetic test in conjunction with another test to make sure the core is not another metal.
{“smallUrl”:”https://www.wikihow.com/images/thumb/e/ec/Test-Silver-Step-4-Version-5.jpg/v4-460px-Test-Silver-Step-4-Version-5.jpg”,”bigUrl”:”/images/thumb/e/ec/Test-Silver-Step-4-Version-5.jpg/v4-728px-Test-Silver-Step-4-Version-5.jpg”,”smallWidth”:460,”smallHeight”:345,”bigWidth”:728,”bigHeight”:546,”licensing”:”<div class=”mw-parser-output”><p>u00a9 2023 wikiHow, Inc. All rights reserved. wikiHow, Inc. is the copyright holder of this image under U.S. and international copyright laws. This image is <b>not</b> licensed under the Creative Commons license applied to text content and some other images posted to the wikiHow website. This image may not be used by other entities without the express written consent of wikiHow, Inc.<br>n</p><p><br />n</p></div>”}
2
Tilt a silver bar to a 45-degree angle to see if the magnet slides down slowly. Turn one of your silver bars at a 45-degree angle and slide the magnet down it. If it’s real silver, the magnet should slide slowly down the face of the bar. If the silver is fake, the magnet won’t move.[6] X Research source
The magnet slides down slowly because silver is paramagnetic and the rare earth magnet induces electric eddy currents which act as an electromagnet. This creates a braking effect that slows the descent of the magnet.[7] X Research source
Method 3
Method 3 of 6:
Ice Cube Test
{“smallUrl”:”https://www.wikihow.com/images/thumb/e/ea/Test-Silver-Step-5-Version-3.jpg/v4-460px-Test-Silver-Step-5-Version-3.jpg”,”bigUrl”:”/images/thumb/e/ea/Test-Silver-Step-5-Version-3.jpg/v4-728px-Test-Silver-Step-5-Version-3.jpg”,”smallWidth”:460,”smallHeight”:345,”bigWidth”:728,”bigHeight”:546,”licensing”:”<div class=”mw-parser-output”><p>u00a9 2023 wikiHow, Inc. All rights reserved. wikiHow, Inc. is the copyright holder of this image under U.S. and international copyright laws. This image is <b>not</b> licensed under the Creative Commons license applied to text content and some other images posted to the wikiHow website. This image may not be used by other entities without the express written consent of wikiHow, Inc.<br>n</p><p><br />n</p></div>”}
1
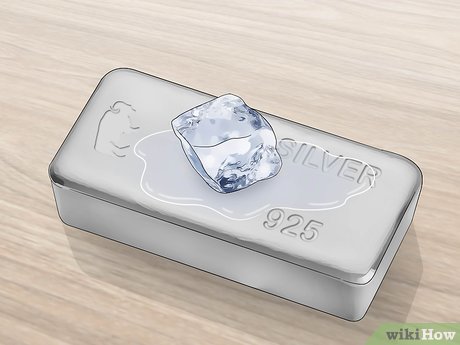
Grab some fresh ice for this test. Keep the ice in the freezer until you need it for the test. While it might not seem like ice and silver go together, silver has the highest thermal conductivity of any common metal or alloy (though copper is right behind).[8] X Research source
This test works well with coins and bars, but it’s tough to do on silver jewelry.
{“smallUrl”:”https://www.wikihow.com/images/thumb/5/5d/Test-Silver-Step-6-Version-5.jpg/v4-460px-Test-Silver-Step-6-Version-5.jpg”,”bigUrl”:”/images/thumb/5/5d/Test-Silver-Step-6-Version-5.jpg/v4-728px-Test-Silver-Step-6-Version-5.jpg”,”smallWidth”:460,”smallHeight”:345,”bigWidth”:728,”bigHeight”:546,”licensing”:”<div class=”mw-parser-output”><p>u00a9 2023 wikiHow, Inc. All rights reserved. wikiHow, Inc. is the copyright holder of this image under U.S. and international copyright laws. This image is <b>not</b> licensed under the Creative Commons license applied to text content and some other images posted to the wikiHow website. This image may not be used by other entities without the express written consent of wikiHow, Inc.<br>n</p><p><br />n</p></div>”}
2
Place a piece of ice on the silver and see if it melts quickly. If the silver is real, the ice will begin to melt immediately, as if it’s sitting on something hot, rather than something that’s just room temperature. This is because silver has very high heat conductivity.[9] X Research source
It can help to place another ice cube on a different room-temperature surface so you can see the different in melting times.
Method 4
Method 4 of 6:
Sound Test
{“smallUrl”:”https://www.wikihow.com/images/thumb/3/3c/Test-Silver-Step-7-Version-3.jpg/v4-460px-Test-Silver-Step-7-Version-3.jpg”,”bigUrl”:”/images/thumb/3/3c/Test-Silver-Step-7-Version-3.jpg/v4-728px-Test-Silver-Step-7-Version-3.jpg”,”smallWidth”:460,”smallHeight”:345,”bigWidth”:728,”bigHeight”:546,”licensing”:”<div class=”mw-parser-output”><p>u00a9 2023 wikiHow, Inc. All rights reserved. wikiHow, Inc. is the copyright holder of this image under U.S. and international copyright laws. This image is <b>not</b> licensed under the Creative Commons license applied to text content and some other images posted to the wikiHow website. This image may not be used by other entities without the express written consent of wikiHow, Inc.<br>n</p><p><br />n</p></div>”}
1
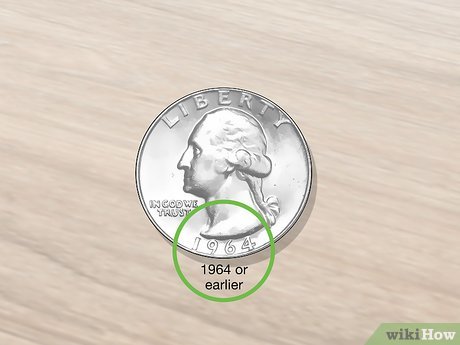
Perform a sound test on a silver coin. Silver makes a really lovely bell-like ringing sound when you tap on it, especially if you tap on it with another form of metal. If you want to try this out before tapping on your questionable silver, find a United States quarter made before 1965. These were made of 90% silver (US quarters made after 1965 are made of a copper-nickel alloy). The older quarter will emit a high-pitched, clear, ringing tone, while a newer quarter will just make a dull thump of a sound.[10] X Research source
{“smallUrl”:”https://www.wikihow.com/images/thumb/e/e3/Test-Silver-Step-8-Version-3.jpg/v4-460px-Test-Silver-Step-8-Version-3.jpg”,”bigUrl”:”/images/thumb/e/e3/Test-Silver-Step-8-Version-3.jpg/v4-728px-Test-Silver-Step-8-Version-3.jpg”,”smallWidth”:460,”smallHeight”:345,”bigWidth”:728,”bigHeight”:546,”licensing”:”<div class=”mw-parser-output”><p>u00a9 2023 wikiHow, Inc. All rights reserved. wikiHow, Inc. is the copyright holder of this image under U.S. and international copyright laws. This image is <b>not</b> licensed under the Creative Commons license applied to text content and some other images posted to the wikiHow website. This image may not be used by other entities without the express written consent of wikiHow, Inc.<br>n</p><p><br />n</p></div>”}
2
Drop the coin on a tabletop and listen for a high-pitched ringing sound. Hold the coin 6 in (15 cm) above a flat surface and drop it. If the coin makes a sound like a ringing bell, you have a real silver coin in your hand. If it sounds dull, the silver is most likely mixed with other metals.[11] X Research source
Method 5
Method 5 of 6:
Acid Test
{“smallUrl”:”https://www.wikihow.com/images/thumb/4/47/Test-Silver-Step-9-Version-3.jpg/v4-460px-Test-Silver-Step-9-Version-3.jpg”,”bigUrl”:”/images/thumb/4/47/Test-Silver-Step-9-Version-3.jpg/v4-728px-Test-Silver-Step-9-Version-3.jpg”,”smallWidth”:460,”smallHeight”:345,”bigWidth”:728,”bigHeight”:546,”licensing”:”<div class=”mw-parser-output”><p>u00a9 2023 wikiHow, Inc. All rights reserved. wikiHow, Inc. is the copyright holder of this image under U.S. and international copyright laws. This image is <b>not</b> licensed under the Creative Commons license applied to text content and some other images posted to the wikiHow website. This image may not be used by other entities without the express written consent of wikiHow, Inc.<br>n</p><p><br />n</p></div>”}
1
Perform a chemical test analysis on the item. Use chemical analysis if there’s no stamp signifying it is silver on your piece. Put on a pair of gloves first since you’ll be using a corrosive acid to test the piece for purity. These sorts of acids burn skin.
Note that this method has the potential to slightly damage your silver item. If you suspect you have a high-value item, you might be better off trying to determine the silver content using one of the other methods.
{“smallUrl”:”https://www.wikihow.com/images/thumb/1/15/Test-Silver-Step-10-Version-3.jpg/v4-460px-Test-Silver-Step-10-Version-3.jpg”,”bigUrl”:”/images/thumb/1/15/Test-Silver-Step-10-Version-3.jpg/v4-728px-Test-Silver-Step-10-Version-3.jpg”,”smallWidth”:460,”smallHeight”:345,”bigWidth”:728,”bigHeight”:546,”licensing”:”<div class=”mw-parser-output”><p>u00a9 2023 wikiHow, Inc. All rights reserved. wikiHow, Inc. is the copyright holder of this image under U.S. and international copyright laws. This image is <b>not</b> licensed under the Creative Commons license applied to text content and some other images posted to the wikiHow website. This image may not be used by other entities without the express written consent of wikiHow, Inc.<br>n</p><p><br />n</p></div>”}
2
Buy a silver acid test kit. You can purchase these tests online or at jewelry stores. Silver acid tests are great for pure silver, but if you think your piece is silver-plated, use a small jeweler’s file to make a mark and reveal what’s under the plating.[12] X Research source
{“smallUrl”:”https://www.wikihow.com/images/thumb/1/11/Test-Silver-Step-11-Version-3.jpg/v4-460px-Test-Silver-Step-11-Version-3.jpg”,”bigUrl”:”/images/thumb/1/11/Test-Silver-Step-11-Version-3.jpg/v4-728px-Test-Silver-Step-11-Version-3.jpg”,”smallWidth”:460,”smallHeight”:345,”bigWidth”:728,”bigHeight”:546,”licensing”:”<div class=”mw-parser-output”><p>u00a9 2023 wikiHow, Inc. All rights reserved. wikiHow, Inc. is the copyright holder of this image under U.S. and international copyright laws. This image is <b>not</b> licensed under the Creative Commons license applied to text content and some other images posted to the wikiHow website. This image may not be used by other entities without the express written consent of wikiHow, Inc.<br>n</p><p><br />n</p></div>”}
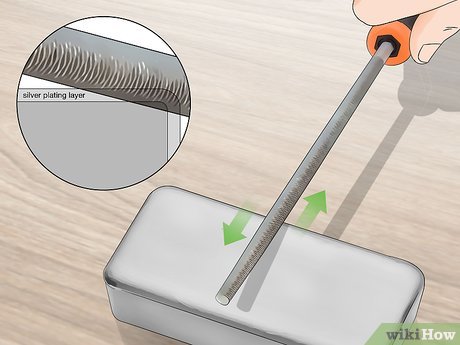
3
Find an inconspicuous place on the silver and make a small scratch. This scratch is necessary so the acid can get to the underlying metal on silver-plated items. Scratch the piece using a metal file and use a fair amount of pressure so that you can get beyond any silver plating layer.[13] X Research source
If you don’t want to scratch your piece, use a black stone plate. These usually come with the silver testing kit, or you can buy one. Rub your silver on the surface of the black stone so it leaves a thick and relatively large deposit on the stone. Aim for a line that is 1⁄2 to 1 in (1.3 to 2.5 cm) thick.
{“smallUrl”:”https://www.wikihow.com/images/thumb/7/73/Test-Silver-Step-12-Version-3.jpg/v4-460px-Test-Silver-Step-12-Version-3.jpg”,”bigUrl”:”/images/thumb/7/73/Test-Silver-Step-12-Version-3.jpg/v4-728px-Test-Silver-Step-12-Version-3.jpg”,”smallWidth”:460,”smallHeight”:345,”bigWidth”:728,”bigHeight”:546,”licensing”:”<div class=”mw-parser-output”><p>u00a9 2023 wikiHow, Inc. All rights reserved. wikiHow, Inc. is the copyright holder of this image under U.S. and international copyright laws. This image is <b>not</b> licensed under the Creative Commons license applied to text content and some other images posted to the wikiHow website. This image may not be used by other entities without the express written consent of wikiHow, Inc.<br>n</p><p><br />n</p></div>”}
4
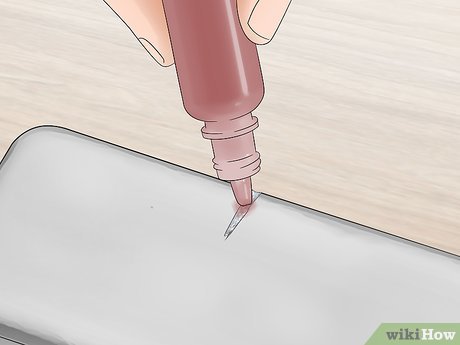
Apply a drop of acid to the scratched surface only. If the acid touches any area of the piece that isn’t scratched, it will affect the polished look of the piece. If you’re using a black stone, add a drop of the acid on the line you made with the stone.
Alternatively, use a drop of vinegar (which is highly acidic) on the scratched piece. If it’s real silver, the surface won’t get tarnished. If the silver is fake, it will tarnish.[14] X Research source
{“smallUrl”:”https://www.wikihow.com/images/thumb/5/5b/Test-Silver-Step-13-Version-3.jpg/v4-460px-Test-Silver-Step-13-Version-3.jpg”,”bigUrl”:”/images/thumb/5/5b/Test-Silver-Step-13-Version-3.jpg/v4-728px-Test-Silver-Step-13-Version-3.jpg”,”smallWidth”:460,”smallHeight”:345,”bigWidth”:728,”bigHeight”:546,”licensing”:”<div class=”mw-parser-output”><p>u00a9 2023 wikiHow, Inc. All rights reserved. wikiHow, Inc. is the copyright holder of this image under U.S. and international copyright laws. This image is <b>not</b> licensed under the Creative Commons license applied to text content and some other images posted to the wikiHow website. This image may not be used by other entities without the express written consent of wikiHow, Inc.<br>n</p><p><br />n</p></div>”}
5
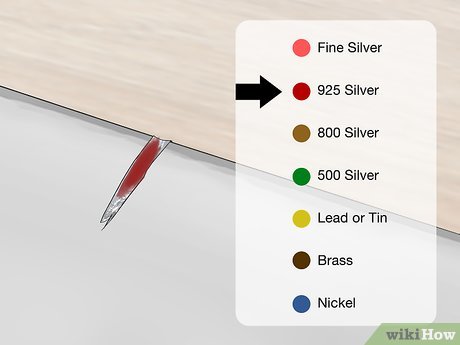
Analyze the scratched surface with the acid on it. Analyze the color that appears as the acid sinks into the piece. Be sure to follow the instructions and color scale of your specific silver testing kit. In general, the color scale is as follows:[15] X Research source
Bright Red: Fine Silver
Darker Red: 925 Silver
Brown: 800 Silver
Green: 500 Silver
Yellow: Lead or Tin
Dark brown: Brass
Blue: Nickel
Method 6
Method 6 of 6:
Bleach Test
{“smallUrl”:”https://www.wikihow.com/images/thumb/7/7e/Test-Silver-Step-14-Version-3.jpg/v4-460px-Test-Silver-Step-14-Version-3.jpg”,”bigUrl”:”/images/thumb/7/7e/Test-Silver-Step-14-Version-3.jpg/v4-728px-Test-Silver-Step-14-Version-3.jpg”,”smallWidth”:460,”smallHeight”:345,”bigWidth”:728,”bigHeight”:546,”licensing”:”<div class=”mw-parser-output”><p>u00a9 2023 wikiHow, Inc. All rights reserved. wikiHow, Inc. is the copyright holder of this image under U.S. and international copyright laws. This image is <b>not</b> licensed under the Creative Commons license applied to text content and some other images posted to the wikiHow website. This image may not be used by other entities without the express written consent of wikiHow, Inc.<br>n</p><p><br />n</p></div>”}
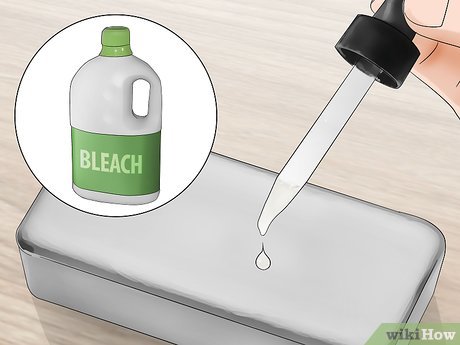
1
Put a drop of bleach on your silver item. Silver tarnishes extremely quickly when exposed to a powerful oxidizing agent such as common bleach.[16] X Research source
{“smallUrl”:”https://www.wikihow.com/images/thumb/0/0c/Test-Silver-Step-15-Version-3.jpg/v4-460px-Test-Silver-Step-15-Version-3.jpg”,”bigUrl”:”/images/thumb/0/0c/Test-Silver-Step-15-Version-3.jpg/v4-728px-Test-Silver-Step-15-Version-3.jpg”,”smallWidth”:460,”smallHeight”:345,”bigWidth”:728,”bigHeight”:546,”licensing”:”<div class=”mw-parser-output”><p>u00a9 2023 wikiHow, Inc. All rights reserved. wikiHow, Inc. is the copyright holder of this image under U.S. and international copyright laws. This image is <b>not</b> licensed under the Creative Commons license applied to text content and some other images posted to the wikiHow website. This image may not be used by other entities without the express written consent of wikiHow, Inc.<br>n</p><p><br />n</p></div>”}
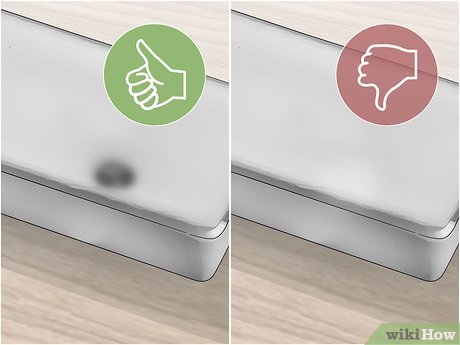
2
Watch to see if the silver tarnishes or has no reaction. If it rapidly tarnishes and turns black, then the item is real silver. Note that silver-plated items will pass this test.[17] X Research source
You can easily clean your tarnished silver with toothpaste, baking soda, or silver polish.
Video
By using this service, some information may be shared with YouTube.
Tips
If you’re worried the item is silver-plated and you have a pure silver item on hand for comparison, hold them up next to each other. Pure silver is a lot brighter and shinier than silver-plated items.[18] X Research source
If your skin comes into direct contact with the nitric acid, rinse the area with water for 20 minutes. Then, cover the area loosely with a bandage.[19] X
Trustworthy Source
Mayo Clinic Educational website from one of the world’s leading hospitals


