
[ad_1]
Like Adobe, ACDSee has been around since the early days of digital photography. Despite its comparative lack of name recognition, the company’s photo workflow and editing software, Photo Studio Ultimate, has partisans who prefer it to Lightroom. The 2023 version of the app includes Photoshop-like layer-editing capabilities, and some of the program’s tools, such as its Light EQ adjusters, are particularly good. But it falls short of top competitors in initial raw camera file conversion quality, import speed, effectiveness of some corrections, and interface usability. For those, look to our Editors’ Choice photo workflow app, Adobe Lightroom Classic.
How Much Does ACDSee Cost?
ACDSee offers its software as a one-time download for $149.99 or as a subscription starting at $89 per year (or $8.90 per month). The subscription lets you install the software on up to five devices (Mac or Windows) and gives you access to ACDSee Web galleries for showcasing your work, with 50GB of SeeDrive Cloud Storage included. You can buy 50GB more for $25 or 100GB for $50.

(Credit: ACD Systems/PCMag)
The versions for Windows and Mac are a little different. The Mac version, which you can buy separately, is called Photo Studio for Mac ($99.99). Now at version 9, it requires macOS 11 or later. That program converts raw camera images, just as the Windows version does, and it includes most but not all features of the Windows app.
The option to buy a permanent license for the software will appeal to Lightroom and Photoshop users who’d rather not pay Adobe every month, though ACDSee’s subscription option is nearly the same price as Adobe’s $9.99 per month for either of those applications. You’ll also pay less for Photoshop Elements ($99), CyberLink PhotoDirector ($99), On1 PhotoRaw ($99), or Skylum Luminar ($99). Pro-level software like Capture One ($299) and DxO PhotoLab ($219) cost more. Zoner Photo Studio is subscription-only, but it’s a more affordable $5.99 per month or $59 per year.
Similar Products


Adobe Lightroom Classic
See It
(Opens in a new window)
Read Our Adobe Lightroom Classic Review

Adobe Photoshop
Check Price
(Opens in a new window)
Read Our Adobe Photoshop Review

Adobe Photoshop Elements
See It
(Opens in a new window)
Read Our Adobe Photoshop Elements Review

Adobe Lightroom
Check Price
(Opens in a new window)
Read Our Adobe Lightroom Review

DxO PhotoLab
See It
(Opens in a new window)
Read Our DxO PhotoLab Review

Corel PaintShop Pro
See It
(Opens in a new window)
Read Our Corel PaintShop Pro Review

CyberLink PhotoDirector
See It
(Opens in a new window)
Read Our CyberLink PhotoDirector Review

Capture One Pro
See It
(Opens in a new window)
Read Our Capture One Pro Review

Skylum Luminar Neo
See It
(Opens in a new window)
Read Our Skylum Luminar Neo Review

Adobe Photoshop Express
See It
(Opens in a new window)
Read Our Adobe Photoshop Express Review
Can Your Computer Run ACDSee Photo Studio?
The Windows program, reviewed here, runs on Windows 7 SP1 through Windows 11, with 64-bit versions required. It also requires at least 4GB RAM (6GB RAM or more recommended), an Intel i5 or better processor, 512MB Video RAM (VRAM), a DirectX 10 compatible graphics adapter, 1,280-by-800 display resolution (1,920-by-1,080 recommended), and 4GB of available hard drive space.
I installed the application on a 3.4GHz Core i7-based PC with 16GB RAM and an Nvidia GeForce GTX 1650 graphics card, where it occupied a little over 1GB of disk space. That’s half Lightroom’s 2GB footprint, but about double CyberLink PhotoDirector’s.
Getting Set Up
No matter how you pay for the software, you need to sign up for an account and respond to a verification email. The program then restarts and has you choose a default photo folder. The next step is going through an introductory wizard with a quick start guide. It takes you through the program’s setup and features and is thorough and helpful. After that, you’re ready to edit photos.
After you decide which photo folders you want the program to monitor, ACDSee builds a catalog. This is a database that enables nondestructive editing, saving your edits separately from the original photo files. After editing, you simply export a version of the edited image. Lightroom uses a catalog in the same way. With either app, you can keep photos on whatever storage you like, and the catalog will keep track of its location. The catalog also stores any organization information you associate with a photo, such as keyword tags, ratings, notes, and more. As with most such software, ACDSee Photo Studio Professional prompts you to create a backup of the catalog file each month. If you’re upgrading from an earlier version, you may need to convert your photo collection to the latest catalog version.
You can also use ACDSee as a Photoshop plug-in, convert Lightroom catalogs for it, and integrate with OneDrive for cloud storage. Once you finish the installation, ACDSee jumps you to its web video course for beginners hosted by the company’s director of photography (and noted commercial photographer), Alec Watson.
What’s New in ACDSee Ultimate?
The company continues to aggressively improve the software. For ACDSee veterans, here’s a cheat sheet of the major new tools and features that arrived with the current version (in addition to new camera support):
Artificial Intelligence (AI) powered Face Edit. This lets you reshape facial features or do things like apply makeup.
Panorama Stitching. This capability has existed in Lightroom and other software for years, so ACDSee has finally caught up.
Select Subject and Select Sky. Photoshop-type features whose appearance in ACDSee give you another reason not to pay the monthly tribute to Adobe. But do they work as well? See our testing results below.
Shape Selection. This replaces and refines the previous Polygon Selection tool. It offers more control and tweaking options.
Advanced Search. Searched on metadata and use and/or statements. The update now retains search history, too.
Other Improvements. New develop presets, more lens correction profiles, improved OneDrive support, WEBP support, Media Mode UI improvements, raw file support for more cameras, and SendPix integration for photo sharing.
And to recap recent new features from the previous version, here are the highlights:
Media Mode. This mode lets you quickly sort, filter, and group your collection based on date, keywords, camera, edit status, and much more. It replaces the former and less clearly named Photos mode.
People Mode. ACDSee already had facial recognition capabilities, but this mode makes identifying, managing, and viewing people easier. AI improves the software’s ability to automatically find more pictures of the same person, too.
Color Wheel for Pixel Targeting. This tool works with the Edit Brush to let you make local changes to lighting and color based on the existing pixel color value. It’s especially useful for skin tones and skies.
Local Noise Reduction. Use an Edit Brush in Develop Mode to remove noise from (or add it to) specific parts of a photo.
Before that we got Color Wheels and Tone Wheels, text on a path, refine selection, enhanced batch rename and resize, GoPro raw support, an updated UI, improved crop and watermark tools, and easier migration from Lightroom.
Prior to that, we saw the introduction of a Focus Stack tool, text layers, custom LUT creation, PDF support, and support for Dropbox and OneDrive cloud syncing of your photos and edits.
Interface
ACDSee has a good many buttons, menus, modes, panels, and toolbars, all of which can be overwhelming. It uses the pleasing black (or very dark gray) background popular among pro photo and video applications. There’s no accommodation for 4K and other high-DPI displays like my BenQ QHD monitor, so menus are tiny on these screens. At least the mode buttons at the top right are big enough to be easily visible and clickable.

A Quick Start guide that appears on first run takes you through all the program’s modes, accessible from controls on the top right: Manage, Media, View, Develop, and Edit. Buttons next to these take you to more views: People, 365 (the online view), Dashboard, and Connect (the message center). A Workspace button at the top left lets you enable the default as well as your own custom preset workspaces. Panels can be dragged out of the main window, but pinning them back isn’t as straightforward as it could be. A lot of the program’s features are only available once you go to the Panes menu and turn them on, like Maps and Collections.
Like many photo programs, the left sidebar offers image sources, including hard drives, and ACDSee Mobile Sync, which sucks up photos and videos from your smartphone via the ACDSee Mobile Sync app. The company also offers a full mobile photo editing app for $6.99.
Buttons at top right let you quickly show and hide the left source panel, bottom filmstrip control, and right-side info panel, but other programs use the more intuitive collapse arrows for this. In adjustment sliders, double-clicking brings them back to the default, the way some apps work—and the way I prefer. There is, however, a reset button in each edit group. You can zoom with Ctrl-Mouse Wheel, click a 1:1 button at the bottom to see the full-size image, or use a slider next to that to set the zoom percentage. Unfortunately, there’s no before-and-after side-by-side view for comparing edits to the original, but there is a toggle button that shows the original. A Snapshots tool lets you save copies of edits, too.
Importing and Organizing Photos
An Import button atop the Manage mode lets you bring pictures in from devices, disks, scanners, or CD/DVD. On import, you can choose the disk folder destination and naming convention, but you can’t apply adjustment presets, as you can in CyberLink PhotoDirector and Phase One Capture One Pro. If you just want to add photos on your hard drive to ACDSee’s catalog, you can’t do so in the import dialog; rather, you right-click the folder in Folders view and then choose Catalog files. Lightroom Classic lets you add photos from the same Import dialog. During import, you can see thumbnails of current files and a countdown of the number of files processed and left. Import with ACDSee Photo Studio was significantly slower than for other tested programs; see the Performance section below.

(Credit: ACD Systems/PCMag)
The program supports raw camera file formats from all the major camera models, including some newer ones such as the Canon EOS R6, Leica M11, Nikon Z 6, and Sony a7 IV. The raw import quality was acceptable, with decent sharpness and colors. Capture One and Lightroom produce the best image (left) in terms of color accuracy and sharpness. Of course, all the programs have tools that let you adjust those things, but it’s good to compare what the program does by default, without requiring more work on your part.
Camera raw file conversion in four photo apps. Clockwise from top left: Capture One, CyberLink PhotoDirector, ACDSee Photo Studio Ultimate, and Adobe Lightroom Classic.
(Credit: ACD Systems/PCMag)
You can organize pictures by using Albums, People, Places, ratings (1–5), and colors. There’s also a checkmark at the bottom right that you can click to pick photos. And, what I find helpful, you can filter by lens and camera model used as well as EXIF data like F-stop and ISO settings. One option I miss is to view the last import batch or recently edited images. Also, Manage doesn’t have an all-photos view. The separate Media mode does show all photos, but it doesn’t have a search capability. It also lets you sort and group the displayed tiles by date, tags, filenames, camera, and image size. Manage mode lets you do a lot of this, too, so I’m not sure why the app needs a separate mode.

(Credit: ACD Systems/PCMag)
Applying keywords to your photos for organization has improved. You can now create hierarchical keyword groups or choose from a selection of topics, such as Landscape, Wedding, and Portrait, but it’s not as big a selection as some competitors offer, and there’s no AI object identification like that in Adobe Photoshop Elements’ Organizer.
You can also group photos into Collections and Smart Collections. To create a new collection, you right-click on the blank area in the left folder panel. It works, but it’s not very intuitive. The Collection pane wasn’t even enabled after installation; I had to turn it on from the Panes menu. Image baskets let you hold photos you want to work with in a temporary tray below the main display area. You can now create five image baskets, which appear as separate tabs.
Organize With Faces and Maps

People mode in ACDSee Photo Studio Ultimate.
(Credit: ACD Systems/PCMag)
The People mode button (it looks like two heads) at the top right makes working with face recognition easier. The program automatically processes all imported images with face detection (you can turn this behavior off in Settings if you prefer). Two tabs let you switch between Named and Unnamed faces. To get started, switch to Unnamed faces. After you’ve identified a few faces, name suggestion works with detected faces. Keep in mind that the technology finds art with faces and any random face in the background. It does a decent job of identifying those you name, though.

(Credit: ACD Systems/PCMag)
One fun organization feature is maps. ACDSee Photo Studio Professional can use GPS encoding in files that have it to show the images on a map. You can also drag photo thumbnails onto the map to create pins for their locations. There’s no mode button for this as there is for People, and it’s not even enabled by default. You have to go into the Panes menu and check its check box. The program highlights thumbnails shot in the location you select a pin on the map; I’d prefer it. Lightroom does a better job with maps, though, with thumbnail slideshows right on the map showing photos shot at the location.
Adjusting Photos
In Develop mode, you get all the standard light and color correction tools—Exposure, Contrast, Saturation—along with things like Vibrance and Clarity, which have become standards for prosumer software. The interface for adjusting this works well, with large bar sliders. Reset buttons helpfully appear for each section in which you make an adjustment, and B&W tools are just a click away, but there’s no overall reset option to start over. That means if you try a bunch of different presets, you have to undo them all separately to get back to the original. Develop mode does offer a slew of presets for targeted use like weddings, landscapes, and vintage looks. The program offers abundant batch tools, too, for most kinds of editing and organizing. Actions include Instagram-like filters as well as many other editing and workflow options.
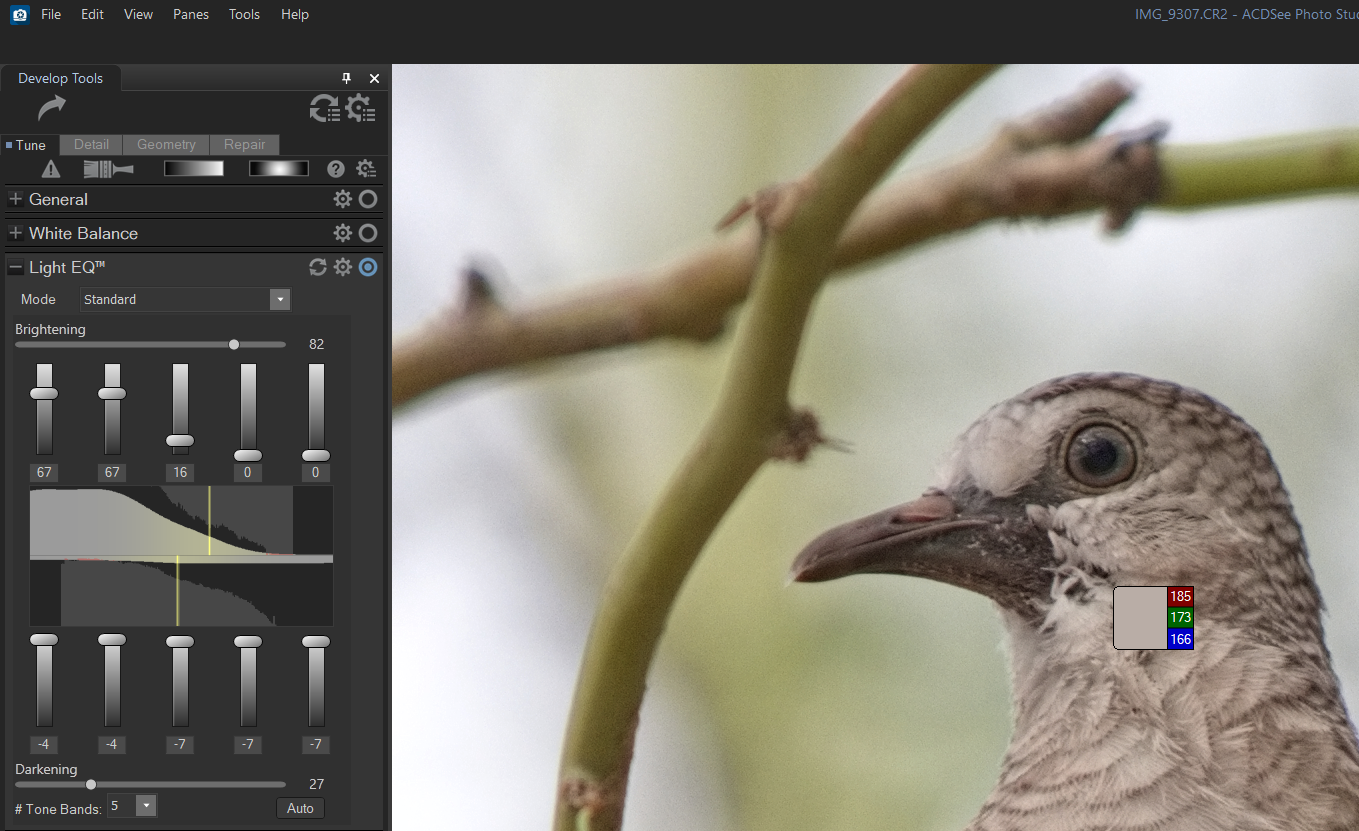
Light EQ in ACDSee Photo Studio Ultimate.
(Credit: ACD Systems/PCMag)
Switching to Standard mode for the Light EQ tools presents detailed sliders that let you adjust more-specific levels, another good tool I haven’t seen in other software. The Auto button only appears under the Light EQ controls when you open them, and you can click it to get the program’s best-guess settings. Even cooler, you can adjust with a wand tool over the image that adjusts brightness based on the area under the cursor. It’s sort of like the iPhone’s “tap on the screen to set exposure and focus” feature, minus focus.
ACDSee includes tools to correct pincushion and barrel distortion based on known characteristics of the equipment used. The program correctly identified my camera model, and applied the auto-fix, making a subtle improvement to a wide-angle shot, but there were still skewed objects at the image’s edges. You can increase the effect, but I missed Lightroom’s Upright option, which completely aligns vertical lines. ACDSee fares even worse when it comes to chromatic aberration correction. You have to try to move sliders just so to correct it, but the defringe tool worked more automatically and effectively.

(Credit: ACD Systems/PCMag)
ACDSee handles cropping fairly well and is now available in Develop mode. It defaults to an unconstrained aspect ratio, which I prefer. I also like how you can hide the area outside the crop, and how spinning the mouse wheel changes the photo’s angle. You can also straighten a photo with a guideline, but there’s no tool for auto-straightening based on the horizon like Lightroom’s. Note that the straightening tool is found in Develop mode’s Geometry section.
Brushes (up to eight of them) offer feathering and tolerance settings for most Develop adjustments, but there’s no subtract brush, only a Clear All Brushstrokes button. The Magic option does a nice job finding edges, even in complex areas like palm leaves. As mentioned, brush capabilities include vibrance, white balance, color overlay, color EQ (saturation, brightness, hue, and contrast), and tone curves. The last is a cool capability that I haven’t seen elsewhere. You can’t, however, use brushes with the Effects in Edit mode or with Skin smoothing. The Repair tool also disappointed me in that it didn’t let me see the source area; even after I’d chosen a source, my result had unwanted textures applied. The Blended Clone option is better, but still gave me the same problem, though to a lesser degree. The Repair tool in Edit mode was more successful, and in that mode (see next section) you can use a brush with Skin Smoothing.
Editing With Layers
ACDSee Photo Studio Professional’s Edit mode is where you find pixel-level functions such as watermarking, and text overlay. The mode sports a long list of tools down the left panel. There you find watermark, tilt-shift, grain, and Special Effect, which opens another selection of nine filter types, including artistic, distort, painting, and retro.
Some Develop tools are also found in Edit, but I’d prefer a design that keeps tools in their place, giving the Edit mode a friendlier look. Note, too, that you can go back to Develop mode after doing layer edits. Photoshop lets you use Adobe Camera Raw as a filter for this. You can open Adobe PSD files, but when I did this, layers weren’t preserved.
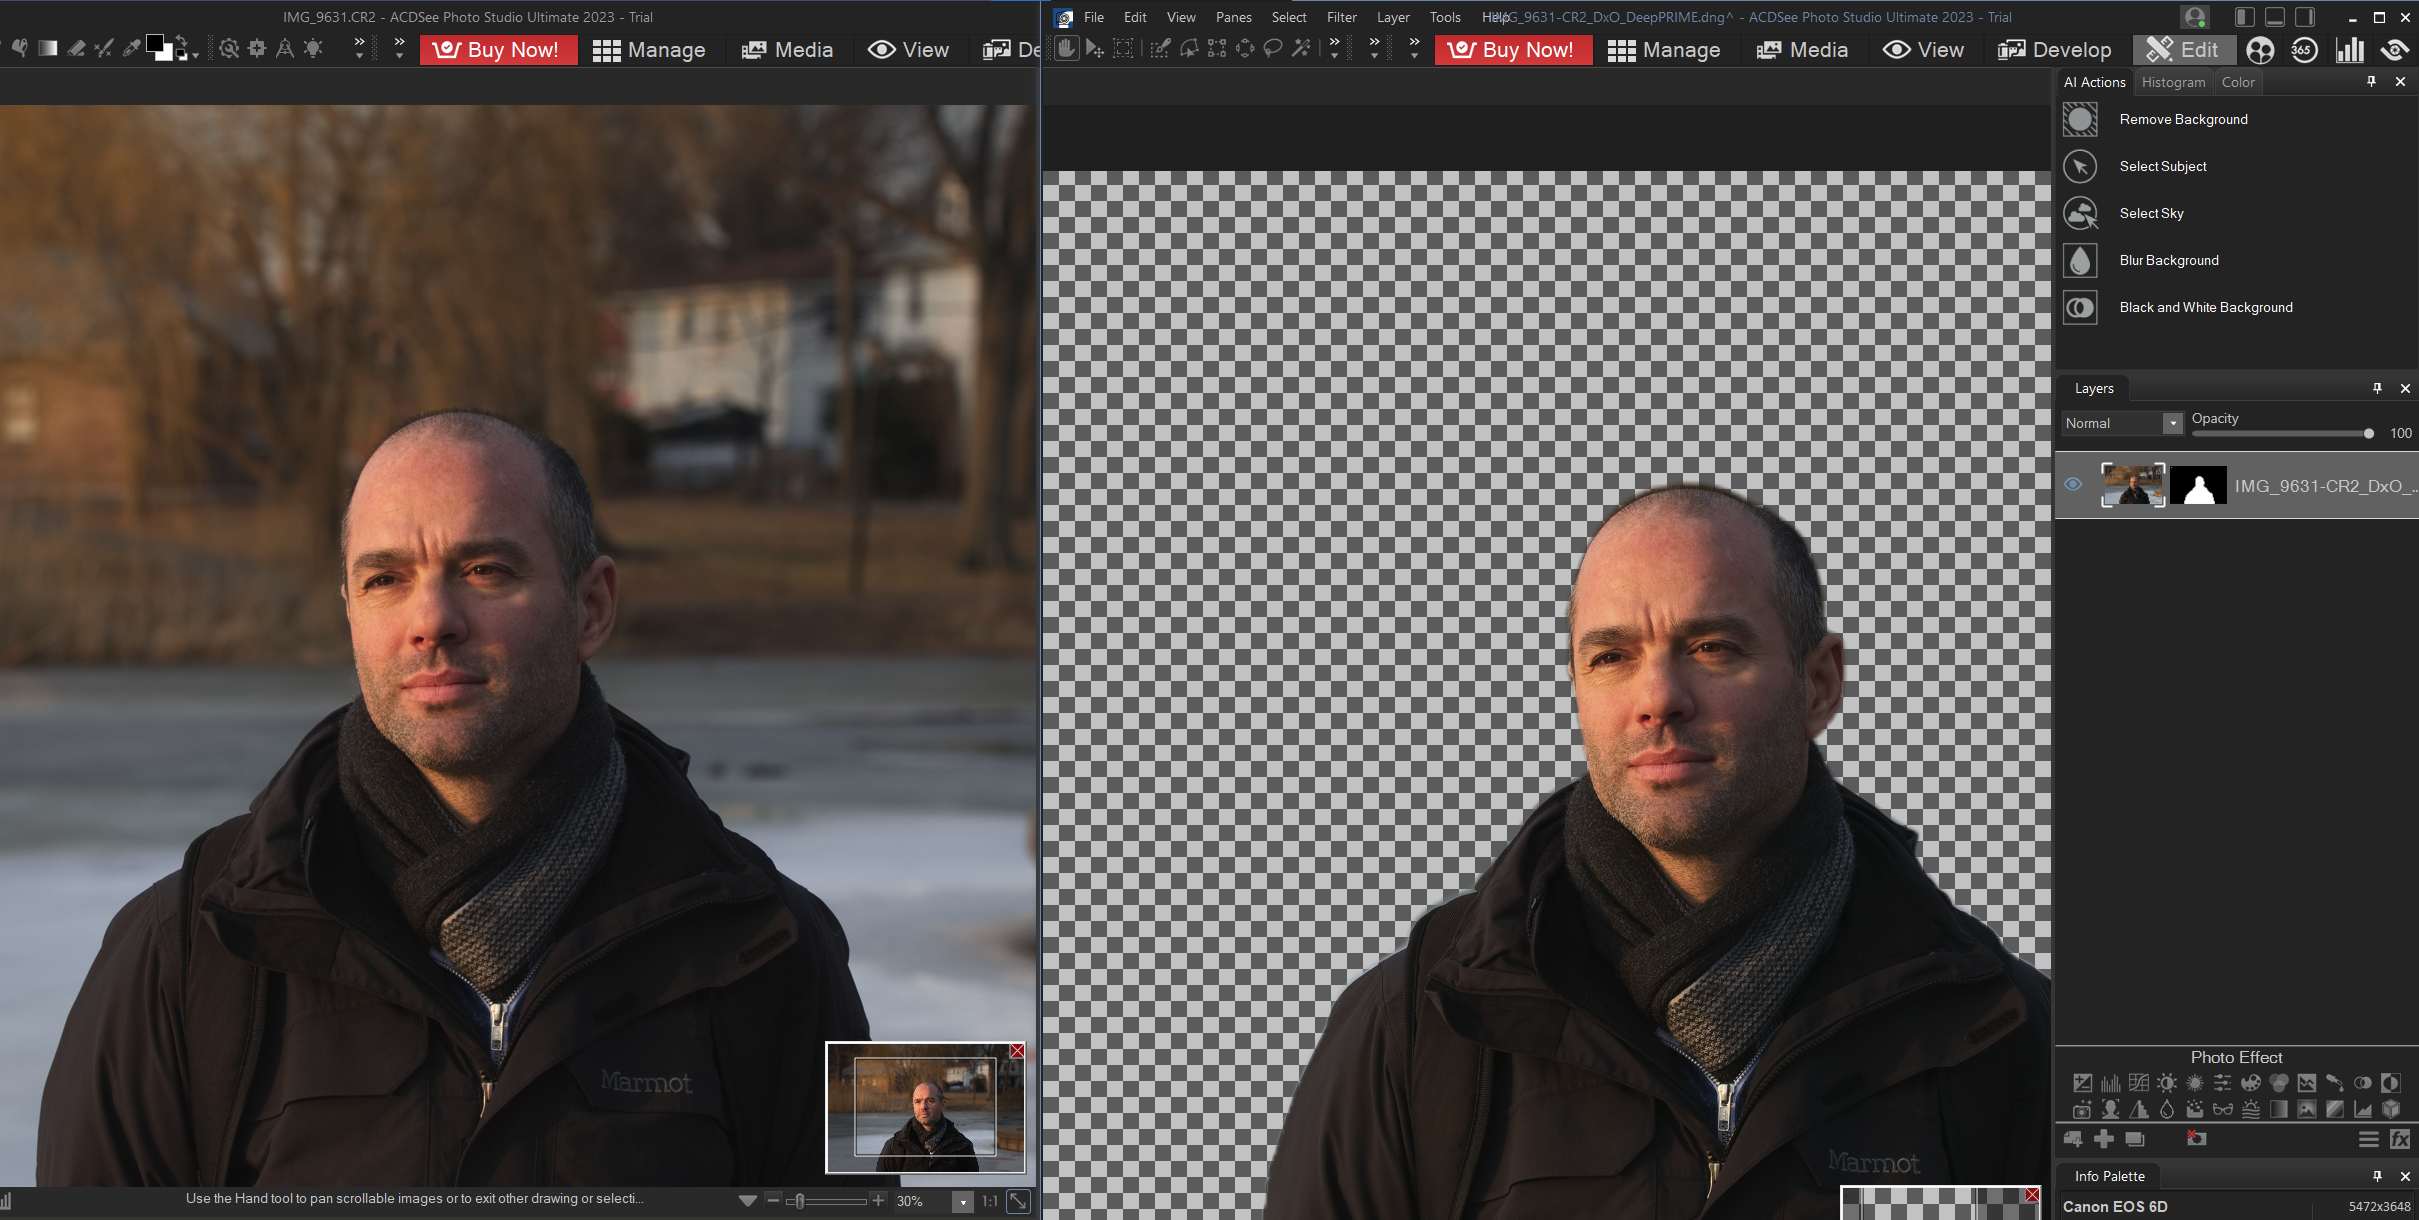
The hottest new features for Edit mode are straight out of Adobe’s playbook: Subject Select, Select Sky, and Remove Background. The latter worked well in my test photo:
(Credit: ACD Systems/PCMag)
Select Sky didn’t work as well as Adobe’s similar tools in Lightroom and Photoshop. Notice how it missed some sky between the palm fronds on the left; Lightroom correctly identified the sky there. What’s more, once you select the sky, there’s no one-click way to replace it with a more dazzling one, as you can in Lightroom, Luminar, and Photoshop.

(Credit: ACD Systems/PCMag)
Also new for 2023 is the AI-powered Face Edit tool. This lets you resize parts of the head, including Face Width, Jawline, Jaw Length, Chin Size, Forehead, Cheekbones, as well as many aspects of the Eyes, Nose, and Mouth. It also lets you apply digital makeup. It’s the very top choice in the left-panel selection of Edits when you’re in Edit mode. The tool identifies all the salient points of a face, and you can edit these points if you want.

(Credit: ACD Systems/PCMag)
You can have a lot of fun with all these face edits, and come up with some far-fetched looks. You can even change the direction of the person’s gaze.

(Credit: ACD Systems/PCMag)
The Smart Erase tool (only in Edit mode) is equivalent to Photoshop’s Content-Aware Fill tool and does a decent job of automatically removing unwanted objects from a photo. Note the removed gray tape on the right side of the floor in the nearby image. Lest you think that this kind of tool is gimmicky or just for hobbyists, you should know that Rhein II, the most expensive photo sold ($4.3 million) up till 2014, used digital manipulation to remove people and objects.

As with most similar tools, Smart Erase does a better job removing objects when they’re surrounded by a consistent texture.
(Credit: ACD Systems/PCMag)
The Dehaze tool worked well enough on my test winter landscape shot, but it tends to jack up the color saturation more than I’d like. I do like that it offers a brush for applying dehaze just to selected areas of the photo. Adobe’s similar tool also lets you add realistic haze; ACDSee’s slider can only remove haze. DxO PhotoLab does the best job at haze removal out of the box with its automatic corrections, and it doesn’t introduce a color cast, as Adobe and ACDSee do.

(Credit: ACD Systems/PCMag)
Skin Tune is a tool for portrait photographers. The three tools in this set—Smoothing, Glow, and Radius—make easy work of making people’s mugs look dreamier. One thing I’d wish for in this tool, however, is a Before-and-After view.

(Credit: ACD Systems/PCMag)
Noise, in the Detail group, differs from Noise Reduction in Develop mode. The Edit tool offers three options: Camera, Median, and Despeckle. By default, the first option is too aggressive for my taste, smoothing out the image excessively. Median leaves the sharpest but noisiest result, while Despeckle is something of a compromise. I’m happy to see that ACDSee offers those last two modes that don’t require trial-and-error moving of sliders back and forth, the way some apps do. You can also brush on noise reduction to selected areas of a shot. That said, the results aren’t on a par with those you get with DxO’s DeepPrime and Topaz DeNoise, which preserve detail while removing noise.

(Credit: ACD Systems/PCMag)
You can also target color ranges for selection. Using Noise Reduction illustrates how it works. In the photo below, I want to keep more detail on the barn swallow and smooth away the noise on the out-of-focus green background. Targeting the green pixel range in the color wheel enables me to do it. The same method of selection can be used for other types of edits simply by tapping the Pixel Targeting button.

You can brush on noise reduction to selected areas in a shot.
(Credit: ACD Systems/PCMag)
The Channel Selection tool (accessible from the Select menu), lets you specify RGB, CMYK, LAB, or HSL colors and use points on a histogram to make selections. I can only see this tool being useful for very specific cases, but it’s there for those who need it.

(Credit: ACD Systems/PCMag)
The Grain tool didn’t produce what looked like actual film grain to me, but I suppose you could tinker with the slider controls for Amount, Smoothing, and Size to get a convincing enough look. There are 22 artistic special effects, including Grunge, Orton, and Stained Glass. These are fun, old-school Photoshop-like effects to play with, but there aren’t AI filters that apply Van Gogh and other artists’ styles intelligently. In addition, you can record your edits as Actions, or use prefab Actions that apply grain, film styles, fade, and more. Further, the program supports plug-ins.
Text layers let you customize fonts, color, and opacity. It’s an easy-to-use feature, with WYSIWYG text entry and a convenient move icon.
Effects and LUTs

(Credit: ACD Systems/PCMag)
ACDSee throws in 10 LUTs for use with the LUT tool, and they’re fun to try, with names like Elegance, Film, and Tinsel. You can also import LUTs in CUBE and 3dl formats, and you can create your own using the program’s color and lighting adjustments in an adjustment layer (or layers). The updated Black & White conversion tool is indeed powerful, with brightness sliders for eight colors. I would like to see presets for the B&W conversion, however.
Photo Merge Tools
A new feature for the 2023 version are photo merging options: Panorama, HDR, and Focus Stack. I tried the panorama, and it did an excellent job stitching together shots of the Montreal skyline. You can choose to crop to a rectangle.

(Credit: ACD Systems/PCMag)
The HDR stitching result was a bit overly juiced-up for my taste, but I was able to tone it down with exposure and color adjustments. Lightroom’s similar tool produced a more realistic look, and CyberLink PhotoDirector lets you choose from several HDR styles ranging from natural to jarring.
ACDSee’s focus stacking lets you take several shots in increasing or decreasing focus distances and joins them to create one all-in-focus shot. You need to carefully shoot on a tripod for this, as the program needs to align and blend the images. The feature worked as advertised in my quick test, but still leaves me pining for the abandoned Lytro project.
Performance
In everyday photo manipulation, ACDSee feels responsive and not as sluggish as Zoner Photo Studio (though Zoner has very good import speeds, as we’ll see). Switching between modes, however, feels slower than it should.
For a quantifiable result, I tested import speed with 200 raw images (a total of 6GB) from a Canon 80D. My test computer was a Windows 10 PC with 16GB DDR4 RAM, a 3.4GHz Intel Core i7-6700 CPU, and an Nvidia GeForce GTX 1650 discrete graphics card. I imported from a Class 4 SDHC card to a fast SSD on the PC.
ACDSee took 314 seconds (that’s 5 minutes and 14 seconds) to import this batch, which was significantly slower than comparable apps I’ve reviewed recently. Zoner Photo Studio did the same import in about half the time, at 153 seconds (2 minutes and 33 seconds), while no other product took more than 175 seconds.
Sharing and Output
ACDSee Photo Studio Ultimate’s 365 mode is the starting point for sharing, but it’s nowhere near the slick experience you get with Adobe Lightroom (the non-Classic version) which easily syncs everything in a clear UI. ACDSee 365’s mode embeds a web browser into the application, where you sign into a cloud account.
Storage plans are not generous. You get 2GB free and pay $89 per year for 50GB or $69 for 10GB. To be fair, those plans do include application updates. Once you log in, you can upload photos via the Transfer sub-mode, including by drag-and-drop. As in Lightroom Classic’s Publish Services view, you see online photos on the top of a split gallery thumbnail view and local ones at the bottom. You can drag and drop images to the ACDSee’s online storage, called the SeeDrive.
By default, you upload JPGs to 365, but you can choose raw files with associated data. You can designate local folders to sync with the online storage, but syncing only happens when you click the Sync to Web button. There’s no link to your online gallery from the application, and the only sharing options are email, Twitter, and web widgets.
At www.365.acdsee.com, you can see all your synced photos, and the public can see them too if you allow it. The attractive, dark image pages show tags and allow comments and downloading. There are some appealing photos on the Popular page, but if you’re looking for a social photography experience, it’s hard to beat Flickr. Instagram, though very popular, is a different beast, more about social networking than photography, and doesn’t offer things like EXIF or even full-size viewing.
In any case, I’d rather see ACDSee put its effort into better tools for directly sending images to Flickr, Facebook, and SmugMug, rather than into creating its own web galleries. There are right-click options that do let you send photos to those services as well as to email, but they’re not as robust as Lightroom Classic’s equivalents.
When it comes to that old-school output option, printing, ACDSee Photo Studio Professional offers a full set of tools, with a good choice of layouts including custom layouts. It can show soft proofing with gamut warnings and supports the EXIF 2.2 printing standard. You can choose between having the program or the printer handle color management.
Is ACDSee Right for You?
ACDSee Photo Studio Ultimate is a powerful photo organizer and editor, and the company continues to add worthy editing tools to its sizable repertoire. Especially noteworthy is its Light EQ tool, which gives you a lot of control over adjusting a photo’s tone. Its array of panels, tools, buttons, menus, and tabs can get dizzying, however, and we’re not sure a subscription model makes sense for this product. And despite its advances, ACDSee still trails Adobe Lightroom Classic, our top pick for pro-level photo editing and workflow management in terms of interface design and image-correction tools. Adobe Photoshop also remains unbeaten as our Editors’ Choice winner for pixel-level photo editing.
3.0

(Opens in a new window)
(Opens in a new window)
View More
ACDSee’s pro-level software offers many powerful photo organizing and editing tools, combining functions of both Lightroom and Photoshop, but its interface can get overwhelming and importing is slow.
[ad_2]
Source link : https://www.pcmag.com/reviews/acdsee-ultimate