


[ad_1]
Photoshop Elements brings much of the visual magic pioneered by Adobe Photoshop to nonprofessionals. This consumer photo editing software continues to make splashy Photoshop effects possible for novices. Like Adobe’s pro-level Creative Cloud applications, new features in Elements add web functionality and take advantage of Adobe’s AI technology, called Sensei. Elements provides many of Photoshop’s tools and capabilities without requiring you to sign up for a subscription, as its bigger sibling does. With its wealth of tools and ease of use, Photoshop Elements remains a PCMag Editors’ Choice winner for enthusiast-level photo editing software.
How Much Does Photoshop Elements Cost?
You can purchase Photoshop Elements either as a package with its enthusiast-level video-editing companion, Premiere Elements, for $149.99; or you can buy it alone, for $99.99. If you’re updating from a previous version, you pay $79.99. A 30-day trial version is available. Unlike Adobe’s Photoshop and Lightroom, which start at $9.99 per month, no recurring subscription is required to keep using the Elements software.
Close competitor Corel Paintshop Pro costs a one-time price of $79.99 and also offers many features found in Photoshop. Another similar option, ACDSee Photo Studio, costs $149.99 one-time or as an $89-per-year subscription that includes four other apps for video editing and more. CyberLink PhotoDirector, which has features found in both Lightroom and Photoshop, costs the same one-time price as Photoshop Elements at $99.99, but is also available as a subscription for $54.99 per year, with lots of effects and stock content included.
How to Get Started with Adobe Photoshop Elements
You install Photoshop Express with a small helper app that downloads and sets up the software. The updated app now takes up 1.7GB on my PC, compared with 2.5GB previously, so it saves you some disk space, but you still need 6GB of available hard-disk space, according to Adobe’s documentation. You also need an Intel 6th Generation or newer processor or AMD equivalent with SSE4.1 support; 8GB RAM, and a monitor of at least 1,280-by-800 resolution. You can install Photoshop Elements on Windows 10 version 21H1 or later, and on Apple macOS version 11 or later.
Similar Products


Adobe Lightroom Classic
See It
(Opens in a new window)
Read Our Adobe Lightroom Classic Review

Adobe Photoshop
Check Price
(Opens in a new window)
Read Our Adobe Photoshop Review

Adobe Lightroom
Check Price
(Opens in a new window)
Read Our Adobe Lightroom Review

DxO PhotoLab
See It
(Opens in a new window)
Read Our DxO PhotoLab Review

Corel PaintShop Pro
See It
(Opens in a new window)
Read Our Corel PaintShop Pro Review

CyberLink PhotoDirector
See It
(Opens in a new window)
Read Our CyberLink PhotoDirector Review

Capture One Pro
See It
(Opens in a new window)
Read Our Capture One Pro Review

Skylum Luminar Neo
See It
(Opens in a new window)
Read Our Skylum Luminar Neo Review
Adobe Photoshop Express
See It
(Opens in a new window)
Read Our Adobe Photoshop Express Review

ACDSee Photo Studio Ultimate
See It
(Opens in a new window)
Read Our ACDSee Photo Studio Ultimate Review
What’s New in Photoshop Elements?
The program is already chockablock with photo tools and effects, but the 2023 update adds not only new creative tools, but—most excitingly—introduces a companion mobile app and a beta web version of the program.
Moving Elements. This new feature lets you animate a selected object in an image.
Search for Guided Edits. You can now search for the step-by-step sophisticated effects that have gotten so numerous.
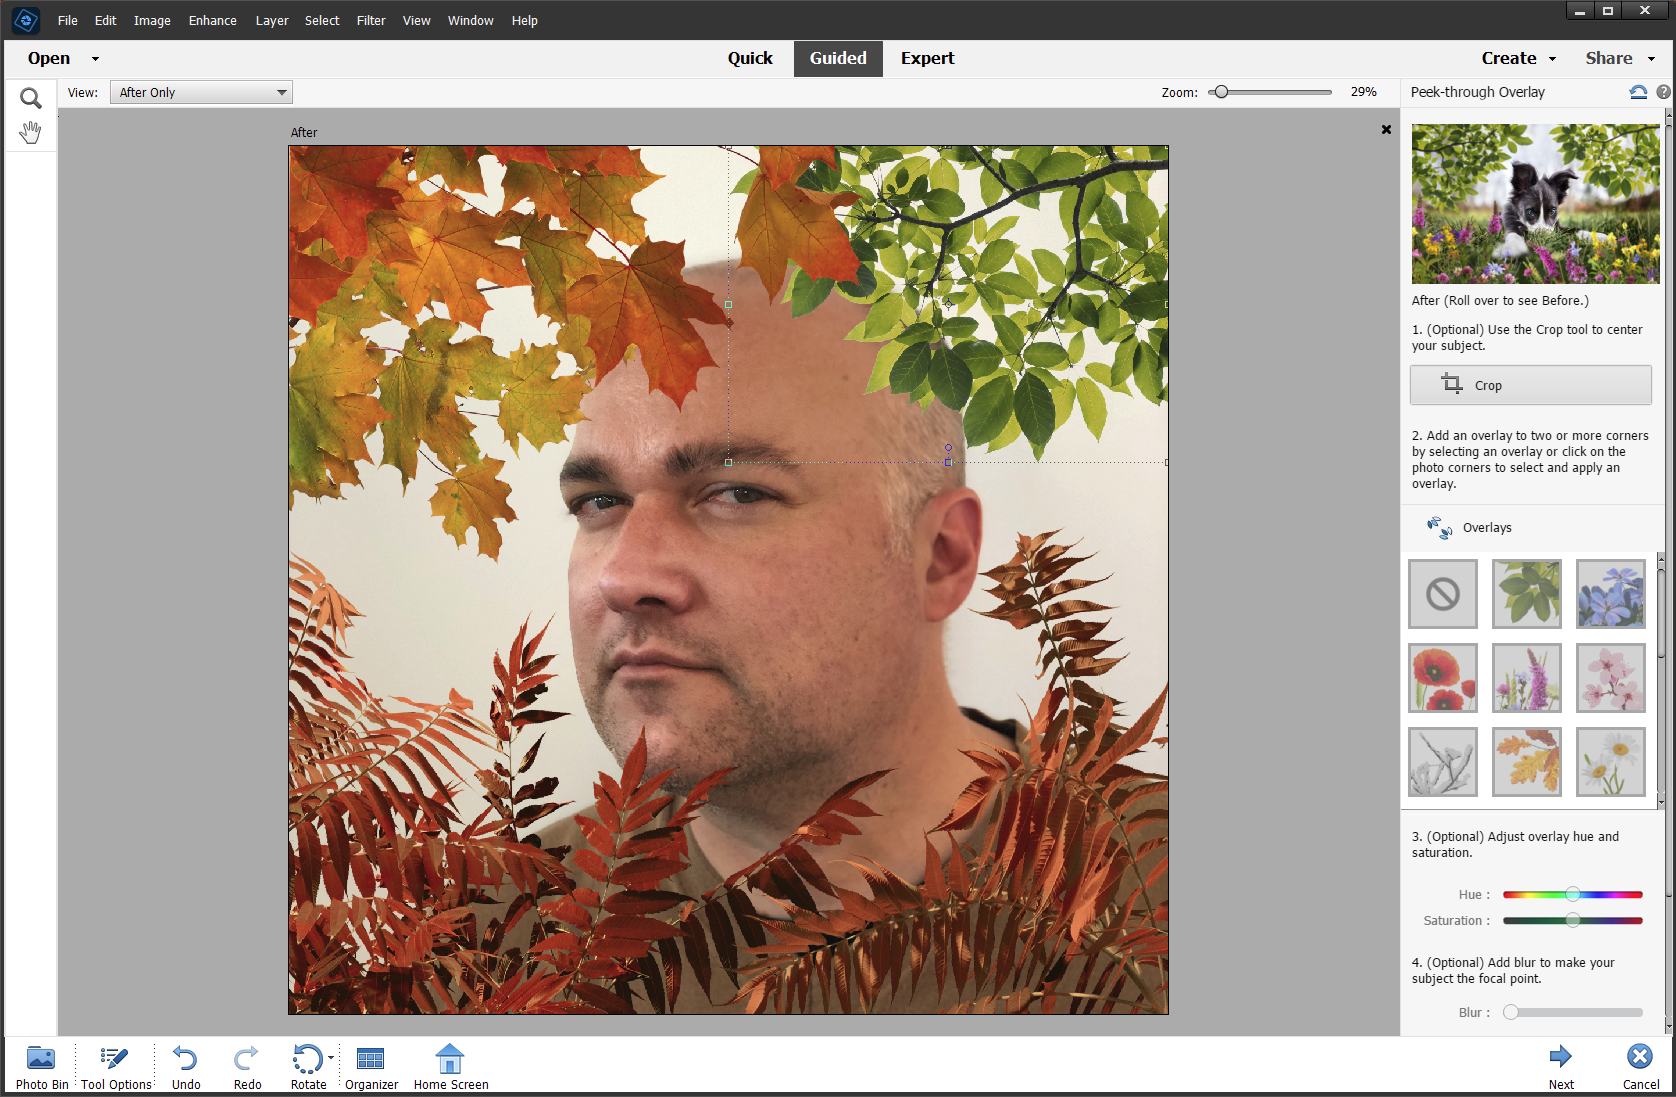
Peek-Through Overlays. Peek-through Overlays are new Guided Edits that make it look like a photo’s subject is peeking through vegetation, flowers, or other overlays and blur the background.
Smaller Program Size and Faster Startup. Adobe claims that installation is 30% faster and program startup is 50% faster, thanks to the program taking up 30% less disk space.
Web Version of Elements. A new website companion for Elements lets you see your media online and create slideshows and collages.
Mobile Version. The new Android app, in beta, lets you add media from your phone and share your creations via the cloud. One expects that we’ll also see an iOS version down the road.
New Content. Updated backgrounds, skies, and patterns are included in the new version and it also includes more modern collage and slideshow templates.
Apple M1 Support. Support for Apple M1 means users of new Macs should see a performance bump of up to 45%.
The 2022 version added AI-Powered Art Style Transfers, Photo Warp, which lets you wrap an image onto an object; Guided Edits for letting you create animals’ shaded faces and to extend landscapes using Content-Aware Fill; animated Slideshow Styles that combine videos and photos; and automatic program updating.
Before that, we got AI-powered Moving Photos, which turns static pictures into animated GIFs, and face tilting; social post creation with text overlays; perfect landscapes (complete with enhanced skies); and duotone images. Users of Adobe Creative Cloud online storage can now share work between Elements and Creative Cloud apps such as Adobe Lightroom and Photoshop proper.
Other updates in recent years have progressively added more powerful improvements and tools, often inherited from Photoshop itself. Notable among them are Subject Select, Automatic Colorization, Object Removal, one-click skin smoothing, pattern objects, and the astounding Open Closed Eyes capability. Adobe has gradually made improvements to the interface as well as underlying performance and image format support, such as adding support for the HEIC format used by recent Apple iPhones.
The Start Window and Organizer App

(Credit: Adobe)
The main photo editing program is joined by two utilities, the Start window and the Organizer, which you generally pass through before opening the actual editor. In the past, I’ve lamented the delay in getting to the editor, but I do see value in both. The Start window is not only your portal to both Photoshop Elements and Premiere Elements, but it also presents some extremely useful features. On it you see tips for how to use new editing tools, links to most recent files you worked on, and Auto Creations—slideshows and collages the program automatically generates from your content.

(Credit: PCMag/Adobe)
The Organizer application, as its name implies, is where you import, group, tag, and output your photos. You don’t have to use it, but it offers a lot of capabilities that would otherwise clutter the main editing application. Its powerful search, auto curation, and sharing tools can be useful additions to the standard organization tools. Competitors like Corel PaintShop Pro and ACDSee dispense with the extra application and do everything in one interface. Four main mode choices appear at the top of the Organizer’s window: Media, People, Places, and Events.

(Credit: PCMag/Adobe)
The Organizer search bar lets you filter content by people, place, keyword tags, media type, date, and folder. You can combine search criteria to narrow down the results, too. Smart Tags automatically identify what’s in the photo—an animal, a face, a landscape, a flower—following the artificial intelligence and machine learning trend we’ve seen in Flickr, Google Photos, and OneDrive. This cutting-edge AI technology saves you from having to explicitly apply tags to photos, though you can still do it yourself if you want more control.
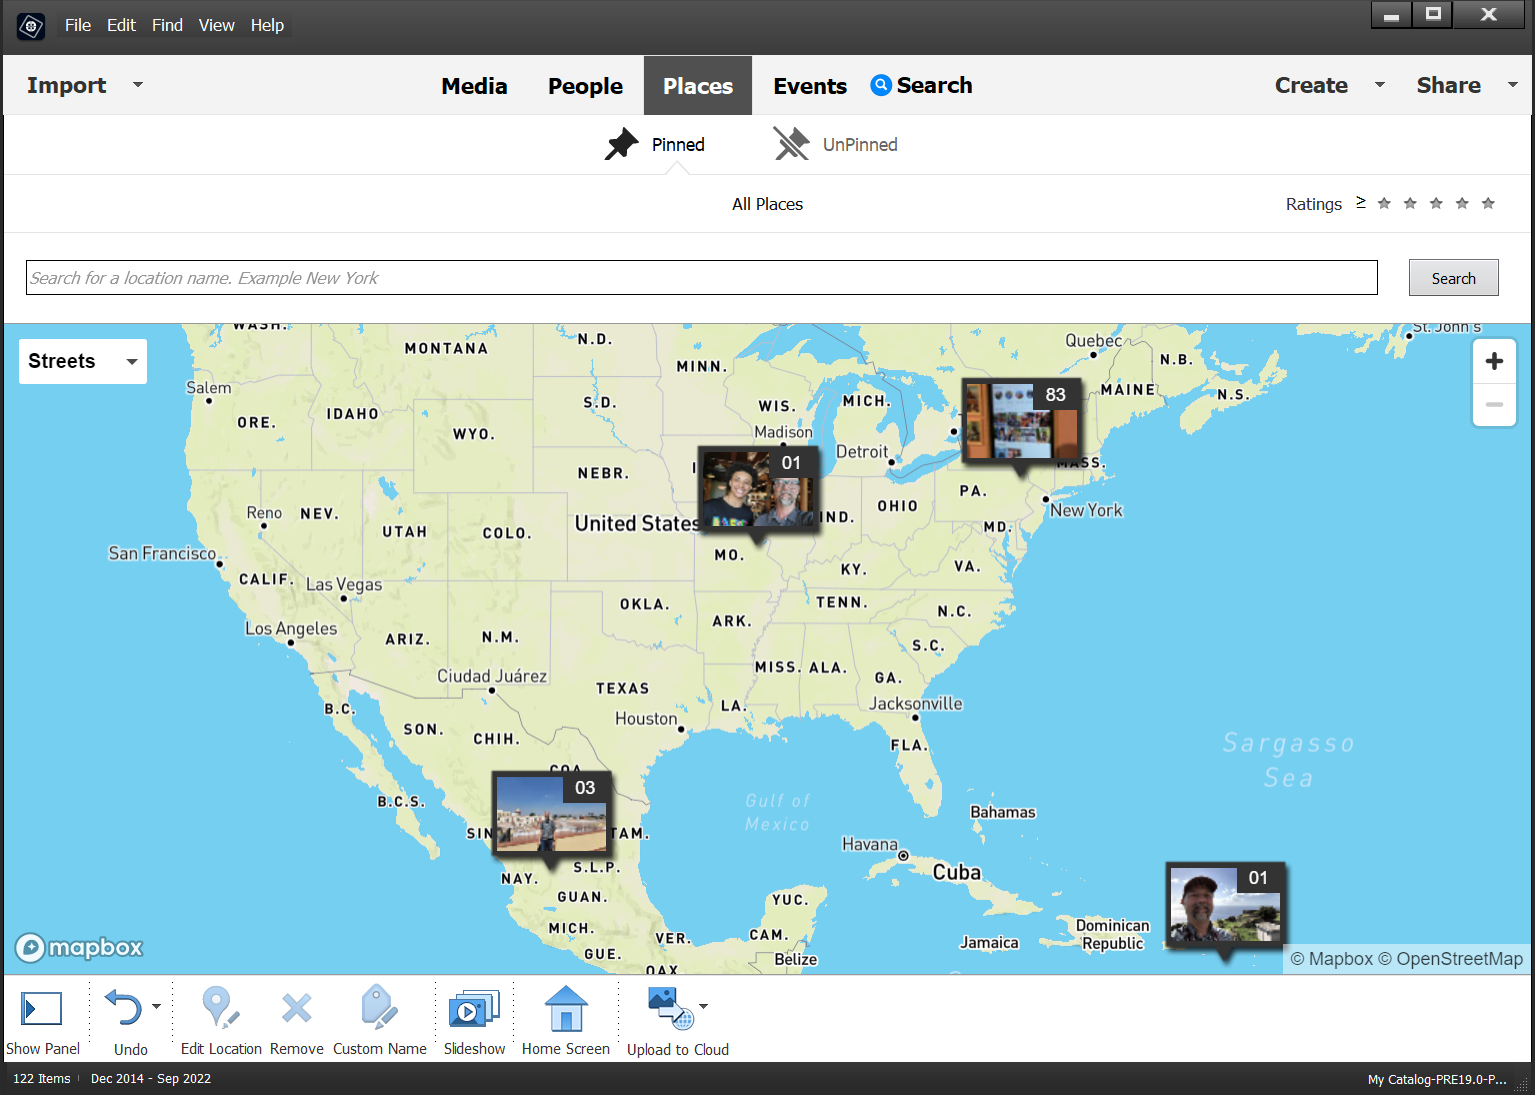
(Credit: PCMag/Adobe/Mapbox/OpenStreetMap)
Organizer’s Places mode showed my iPhone photos’ location based on their embedded GPS data, but the Places section on the Search page told me there were no Places tags to search by—you have to enter location tags manually for anything to show up here. It’s annoying when one part of a program has information that’s not accessible in another feature. Also, I prefer the way the built-in photography apps in Windows and macOS let you see a small map in the Info panel while viewing an individual photo.
To search based on faces, you must first supply names in the People module. The program detects all faces and tries to match them to any you’ve already identified, but it’s not 100 percent accurate and sometimes is fooled by profiles or weird angles. It’s easy to add photos to a face tag by confirming the program’s proposed images. Once you do this, though, you can search for all photos that have Jordan and Max in them, or for all photos with Jordan or Max, which is nifty.
Below the search bar is the Auto Curate check box. The first time I tried to check this, it said Auto Curation was in progress—understandable, since it analyzes your entire photo library. A few minutes later I could see the chosen images, with a slider to increase or decrease the number of photos shown. The fewer you choose, the higher the quality of the photos that appear. So, for example, you can see what the program thinks are your 50 best photos or your 100 best (10 is the minimum). The app looks for things like lighting, composition, focus, and even emotional impact. Most of my results understandably included humans, and the tool did turn up a bunch of good shots I’d forgotten about. You can even apply Auto Curate to a search, so you can find, for example, your best shots of mountains or cats.
New for the 2023 version is the Upload to Cloud button rightmost in the Organizer’s bottom toolbar. This offers three choices: In addition to uploading the selected media to the cloud, it also lets you Import Cloud Media and open the new Elements Web online browser-based interface (see the section on this below). Only JPG and PNG image formats are supported, which isn’t great if you shoot in raw or HEIF formats; the former offers more image editing potential and the latter saves on smartphone storage.
I have a couple of quibbles with the interface, however. You can’t double-click on a photo in Organizer’s search results to launch it in the editor, though that does zoom the image to fill the window. There are no smart albums, such as Last Import, like those you get in Apple Photos and Adobe Lightroom. The Editor interface provides no accommodation for screen sizes other than HD and 4K—I use a QHD (1440p) display, so the smaller size is too small and the larger too large. Further, there’s not much special support for touch screens as Photoshop and Lightroom offer, aside from zooming and scrolling with pinching and flicking.
Auto Creations
After I had Elements import about a couple of hundred photos and video clips, the home screen showed me more than a dozen Auto Creations it had produced from my content. From photos shot around the same area and time, it produced pleasant collages, which benefited from a bit of editing and photo swapping. The feature also produced several slideshows of varying interest from my test media, with effective transitions and backgrounds. The background music was usually well chosen to fit the image subjects, but it often stopped abruptly, rather than fading out. Some were so short as to be pointless. In any case, the project can provide starting points for your own creativity.
Elements still lacks one feature found in Apple Photos, Google Photos, and Windows Photos—automatic album creation. Those products group photos from locations and time periods and automatically suggest albums. Though these don’t always hit the mark, they can be a good way to get you started with albums.
Adjusting Photos
Photoshop Elements really comes into its own when you move from the Organizer to its full Editor app. The program has many of Photoshop proper’s high-end image manipulation capabilities but without the same degree of difficulty. Many of the tools, particularly content-aware ones that let you do things like remove areas or objects without disrupting the background, are unique to Adobe software.

(Credit: PCMag/Adobe)
Elements Effects feel like Instagram squared, with controls that the mobile app simply can’t match. The Smart Looks tool chooses an effect based on image analysis, with four variations. These matched the image types of my test shots well. And Quick mode’s FX options offer four variations on the standard Vintage, Cross Process, and Toy Camera options, among seven others. I like how this tool shows your actual image under the influence of the effect, rather than just a sample image, as some programs do.
When you choose the crop tool, you see four proposed crops in the bottom panel, based on faces found and other criteria. It works impressively, framing group photos and suggesting creative looks for landscapes. The crop tool, too, is suitable for many professional use cases, letting you specify standard aspect ratios and even a target size in pixels.

(Credit: PCMag/Adobe)
Expert mode offers near-Photoshop levels of control, complete with filters, layers, actions (the ability to run preset Actions like resizing and effects, not to create them), histograms, and tons of artistic and graphic effects. As with Photoshop, you get an array of tool buttons along the left, and edited files are saved in Photoshop PSD format. For web producers, there’s the Save for Web option, which optimizes (that is, reduces the file size of) images for online display.
Comic, Graphic Novel, and Pen & Ink are among some of the more noteworthy filters you can apply to your images. These don’t appear in the Filter Gallery, but must be chosen from the Filter menu directly, which may be an oversight. That said, they can produce some pretty amazing effects.
Expert Mode also has a generous selection of content, such as backgrounds, frames, and shapes to spruce up a photograph. The Text tool lets you wrap text around a shape, so it doesn’t overlap important parts of an image. Character-styling options are far less extensive than those in Photoshop, however.

(Credit: PCMag/Adobe)
Select Subject is simply a button that appears at the bottom panel when you’re using the selection brush; it’s also available from the Select menu. It worked admirably on all but photos with backgrounds that blended in with the subject using similar colors.
The Recompose tool is one of the program’s most impressive features, letting you change the aspect ratio of an image without stretching or squashing faces and the like. You can even remove selected objects and mark others for preservation. Recompose did a good job letting me move my big head closer to a friend without distorting a test picture, though I did have to crop the photo to remove a duplicate head.
You can also do standard Photoshop things, such as blur, sharpen, and add imagery. There’s a good selection of clip art, too. The spot-healing brush does an excellent job of removing blemishes. I also removed a sign in the background of a photo by brushing in the texture from a forest in the image with the healing brush.

(Credit: PCMag/Adobe)
When you open a raw file from a DSLR or high-end mirrorless camera, the program starts out in a separate Adobe Camera Raw window, where you have access to color, exposure, and detail controls. It does include Adobe’s raw Profiles—such as Color, Portrait, and Vivid—along with noise reduction, but Elements has no chromatic aberration correction. There are also lens distortion corrections, but they don’t use profiles to base automatic corrections on your equipment the way Lightroom and DxO PhotoLab do. The raw importer has red-eye reduction and cropping, which seems like an unnecessary duplication of what’s in the editor app.
Fixing Faces
Most portrait photographers are adept at smoothing skin, and Element’s Smooth Skin enhancement is designed to simplify the process. It identifies faces, overlays a circle—not an ellipse—and lets you smooth or blur the area; you can adjust the intensity of the smoothing. It’s a quick fix, but I think you’re better off applying Gaussian blur to a selection or using the Spot Healing brush.
The Adjust Facial Features tool is accessible from the Enhance menu. Open it, and a window pops up with all the faces circled. A right-side panel offers adjusters for Lips (with Smile and related sub-choices), Eyes, Nose, and Face. The last lets you change the forehead height, jawbone shape, and chin height. Just as with the similar tool in Photoshop, you can have a lot of fun with it. It does a great job of identifying the facial features and convincingly modifying them. It’s probably best to use these tools sparingly unless you want your friends to look like strangers.
A face feature lets you change the tilt and direction of multiple faces in a photo. It works well for subtle adjustments but can’t help you if the face in the original is in profile.
Open Closed Eyes is a cool tool you can find under the Enhance menu in either Quick or Expert mode. When you open a photo in Open Closed Eyes, you see circles around any faces in the image, with the closed-eye faces highlighted. Then you have to choose an eye source—the fixed open eyes needn’t come from the same person’s face as the one with closed eyes! Believe me, if you try it with the glamor model sample eye source photos Adobe provides, you’ll be in for some laughs.

(Credit: PCMag/Adobe)
When using the same person’s eyes, the results are decent; the closer the shot of the source eyes to the shot you want to open eyes on, the better. I still wish Adobe included some type of refinement tools for getting the lighting and detail closer to the original. If nothing else, Open Closed Eyes is a fun trick.
Moving Pictures
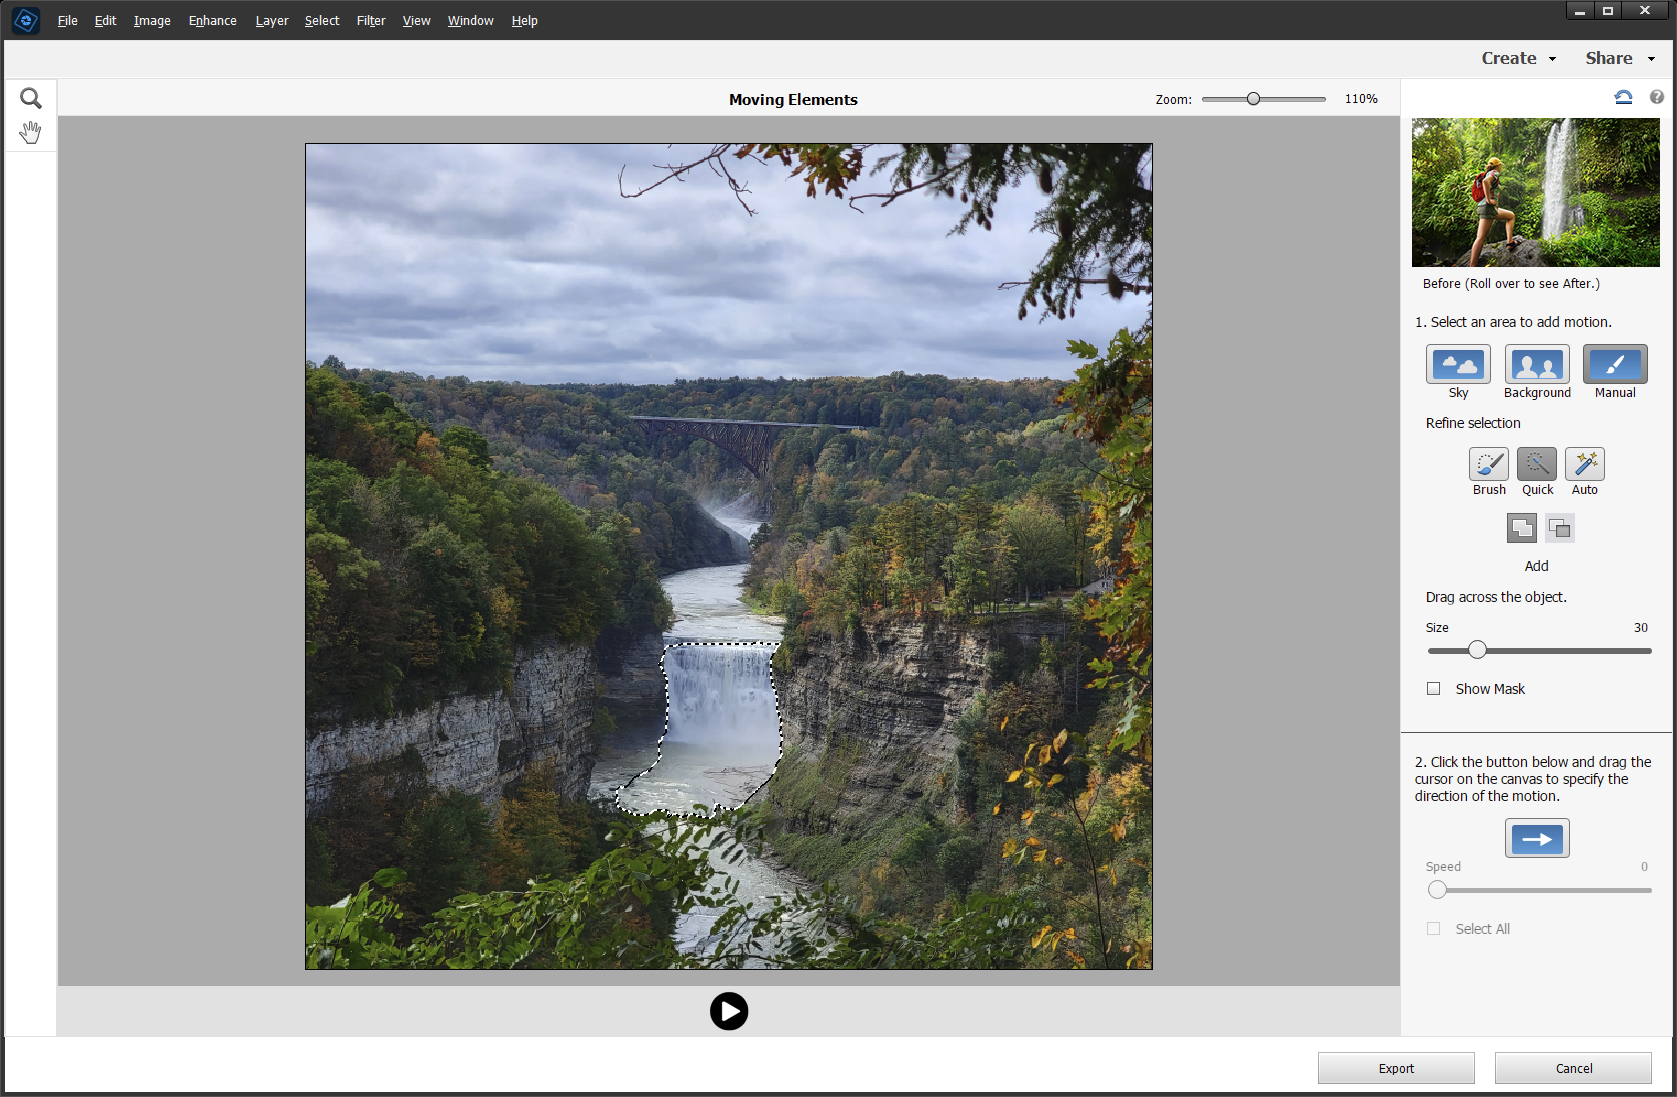
The 2023 version of Photoshop Elements adds Moving Elements to the earlier Moving Photos effect, and both are found at the bottom of the Enhance menu. Creating animated GIFs can be tricky without tools designed specifically for them. This feature creates a very specific type of animation that you can save in either GIF or MP4 format, in which the photo subject or the whole photo zooms, pans, rotates, or even flows.
(Credit: PCMag/Adobe)
You get to the new Moving Elements feature from the bottom section of the Enhance menu. You select an area that logically might be animated, such as a sky or river, optionally refine the selection. You then click the arrow button and drag on the selected object in the direction you want the motion to go. Finally, you tap the Play arrow below the image, and you’re ready to share your moving creation as a GIF animation or MP4 video file.
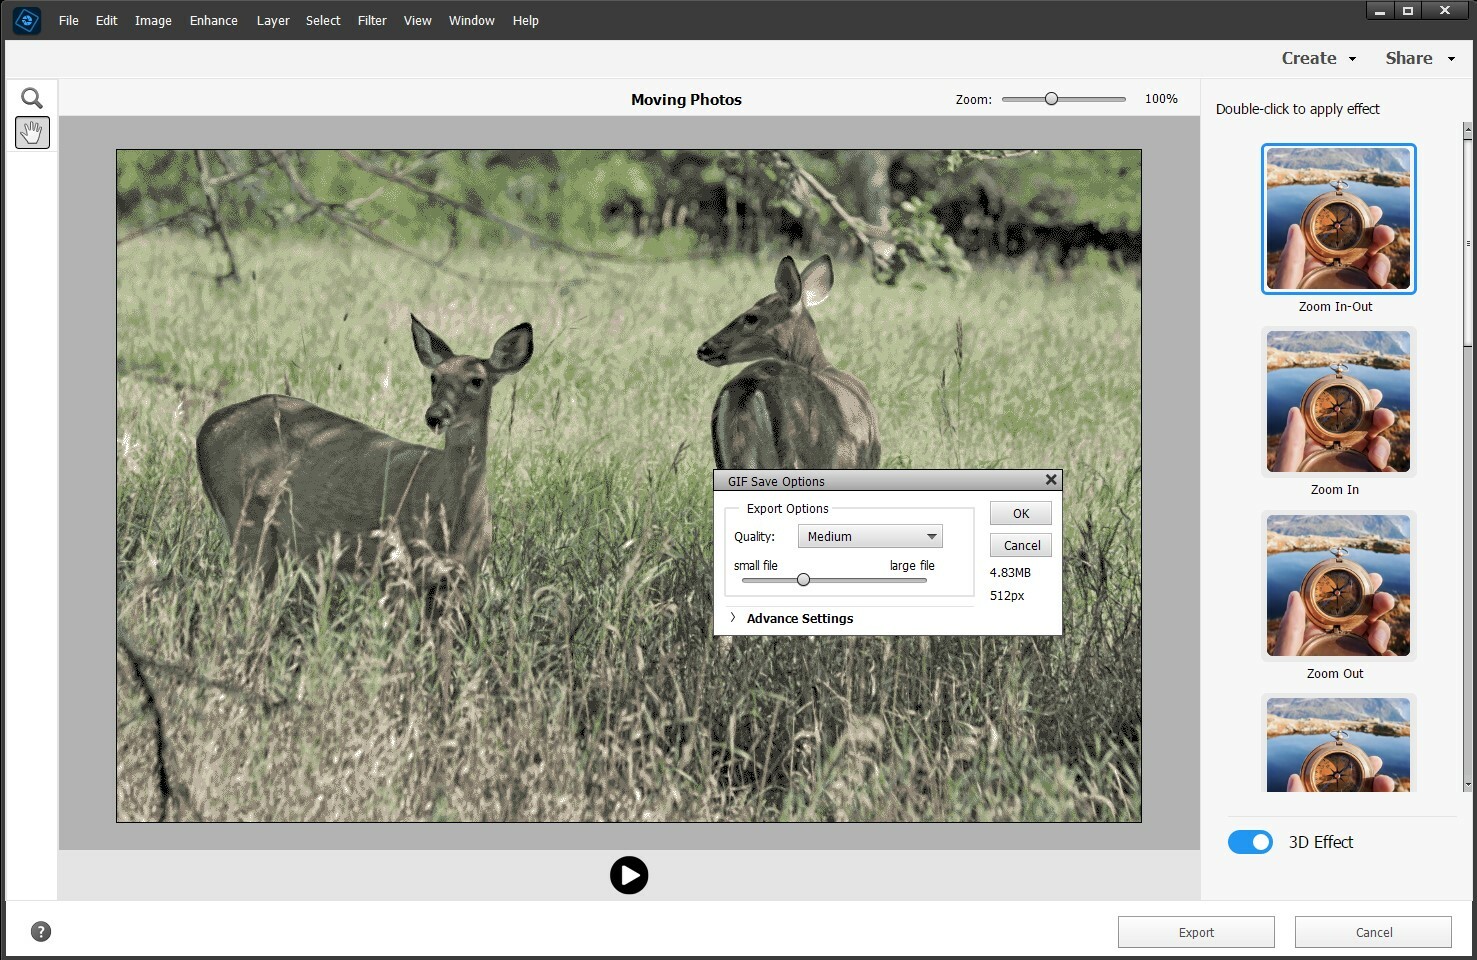
Back in the Moving Pictures tool there are 11 movement options, with thumbnails that preview what they do for you. You double-click one of them to apply them to your picture, which took about 20 seconds for some photos in my tests. You can play the effect with a standard play arrow button.
(Credit: PCMag/Adobe)
The 3D option is probably more impressive, as it selects the photo’s subject and moves only it. If you turn off the 3D Effect slider, the whole photo moves, rather than just the subject. If you choose a photo without a clear subject, the 3D can still be cool, making it look like the camera is moving in a circle.
(Credit: PCMag/Adobe)
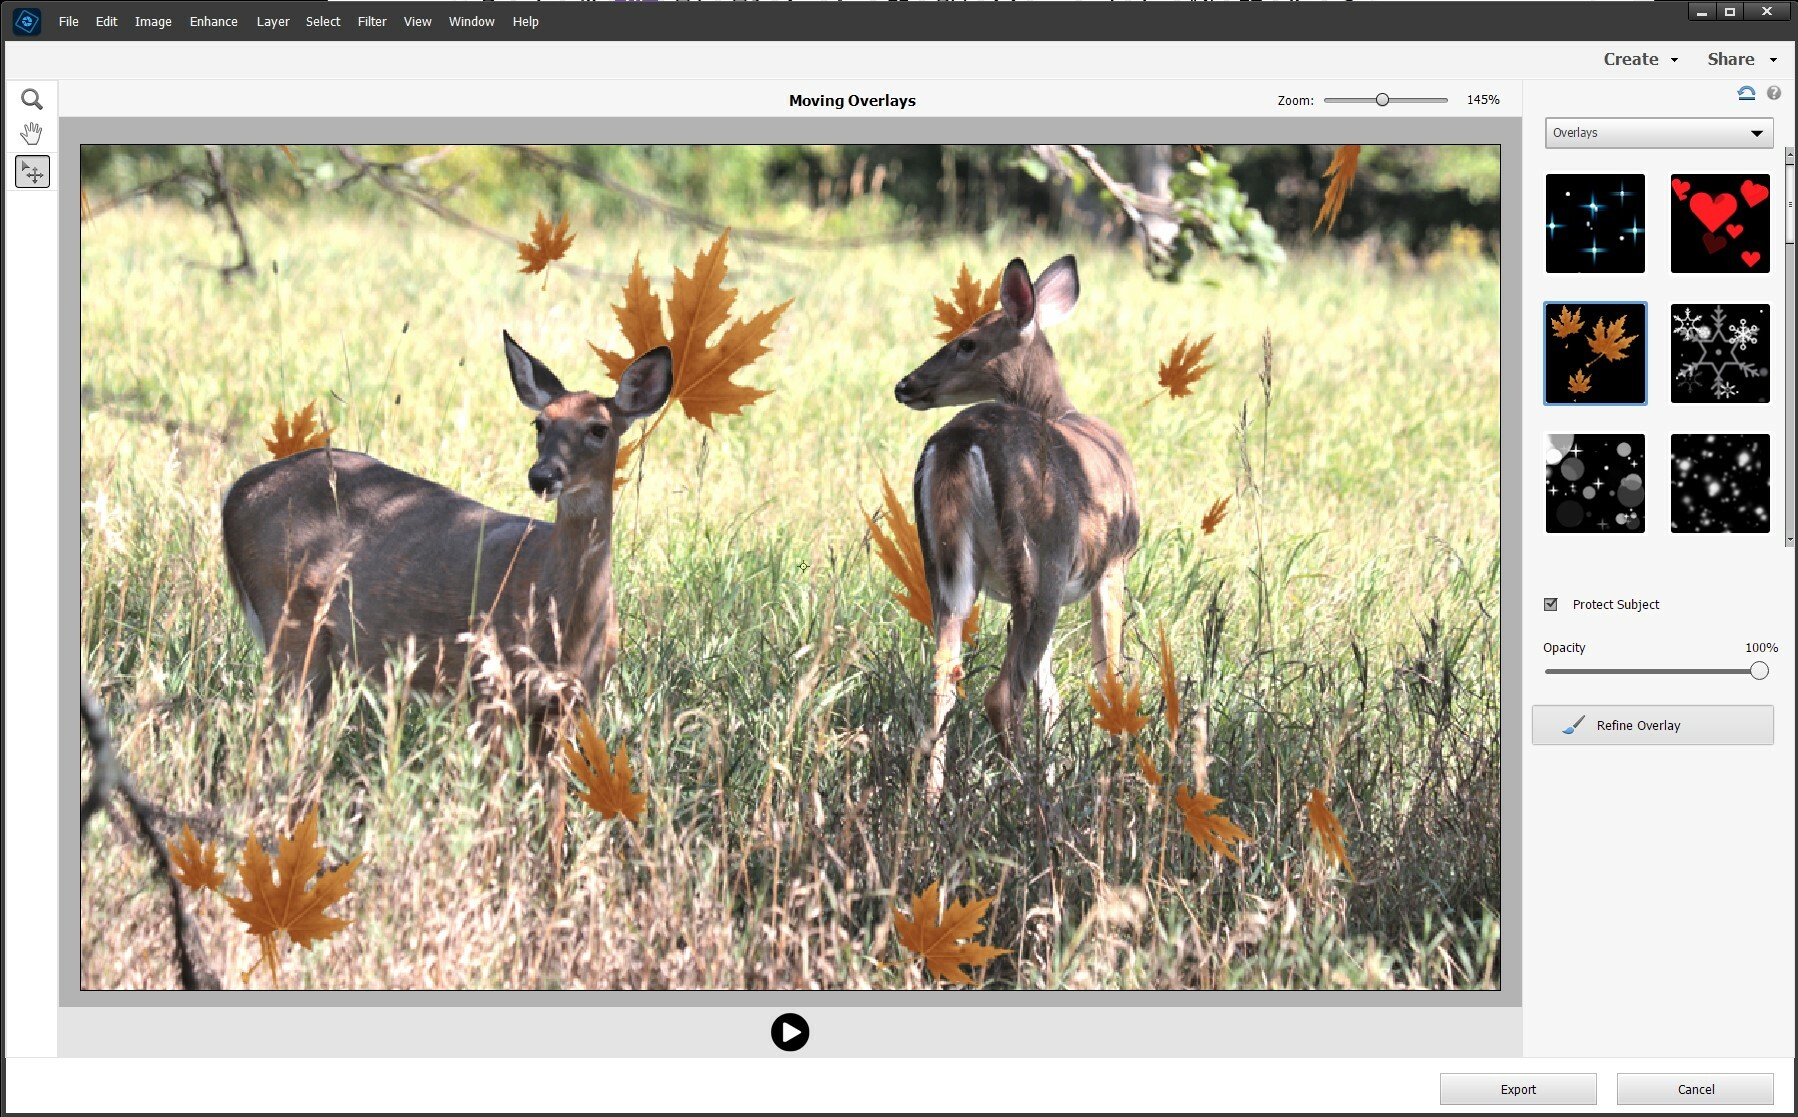
Moving Overlays—things like snowflakes, hearts, and stars—give your pictures-turned-videos some pizzazz. The menu choice is just above it for Moving Photos in the Enhance menu. It’s very simple to apply the effect, and you have a choice of 27 overlay object types. You can also overlay graphics (like a balloon, or flame) and frames. A helpful option is the Protect Subject check box, which automatically identifies a person or other photo subject and keeps it above the falling overlays. You can also set the opacity of the overlay with a slider.
With either tool, you can choose a GIF or MP4 and the export file size. That last option is very helpful, since one image I tried to share was over 25MB, which Facebook Messenger didn’t accept. That said, it would be nice to have more options when creating the animation, such as looping, refining the selection of what moves, or adjusting the distance of the motion.
Colorizing Photos

(Credit: PCMag/Adobe)
This tool makes impressive use of AI to colorize black-and-white pictures. After converting your image from monochrome to RGB and churning for a while, Auto mode presents you with four versions of your photo colorized. The top two choices skew toward warm tones, and the bottom two cool. It handles various skin colors with aplomb. I do wish you could adjust the intensity of the colorization within the tool, but you can always tweak colors with the separate Hue/Saturation tool.
Colorization is especially adept at identifying water bodies and vegetation for correct color rendering. The Manual mode is completely different. It lets you select areas of an image that you want to out and out change the colors. You can turn a blue shirt red, for example. It works better with solid colors than for patterns, though it handles varying lighting on the selected areas well.
AI Artistic Style Transfer Effects
(Credit: PCMag/Adobe)
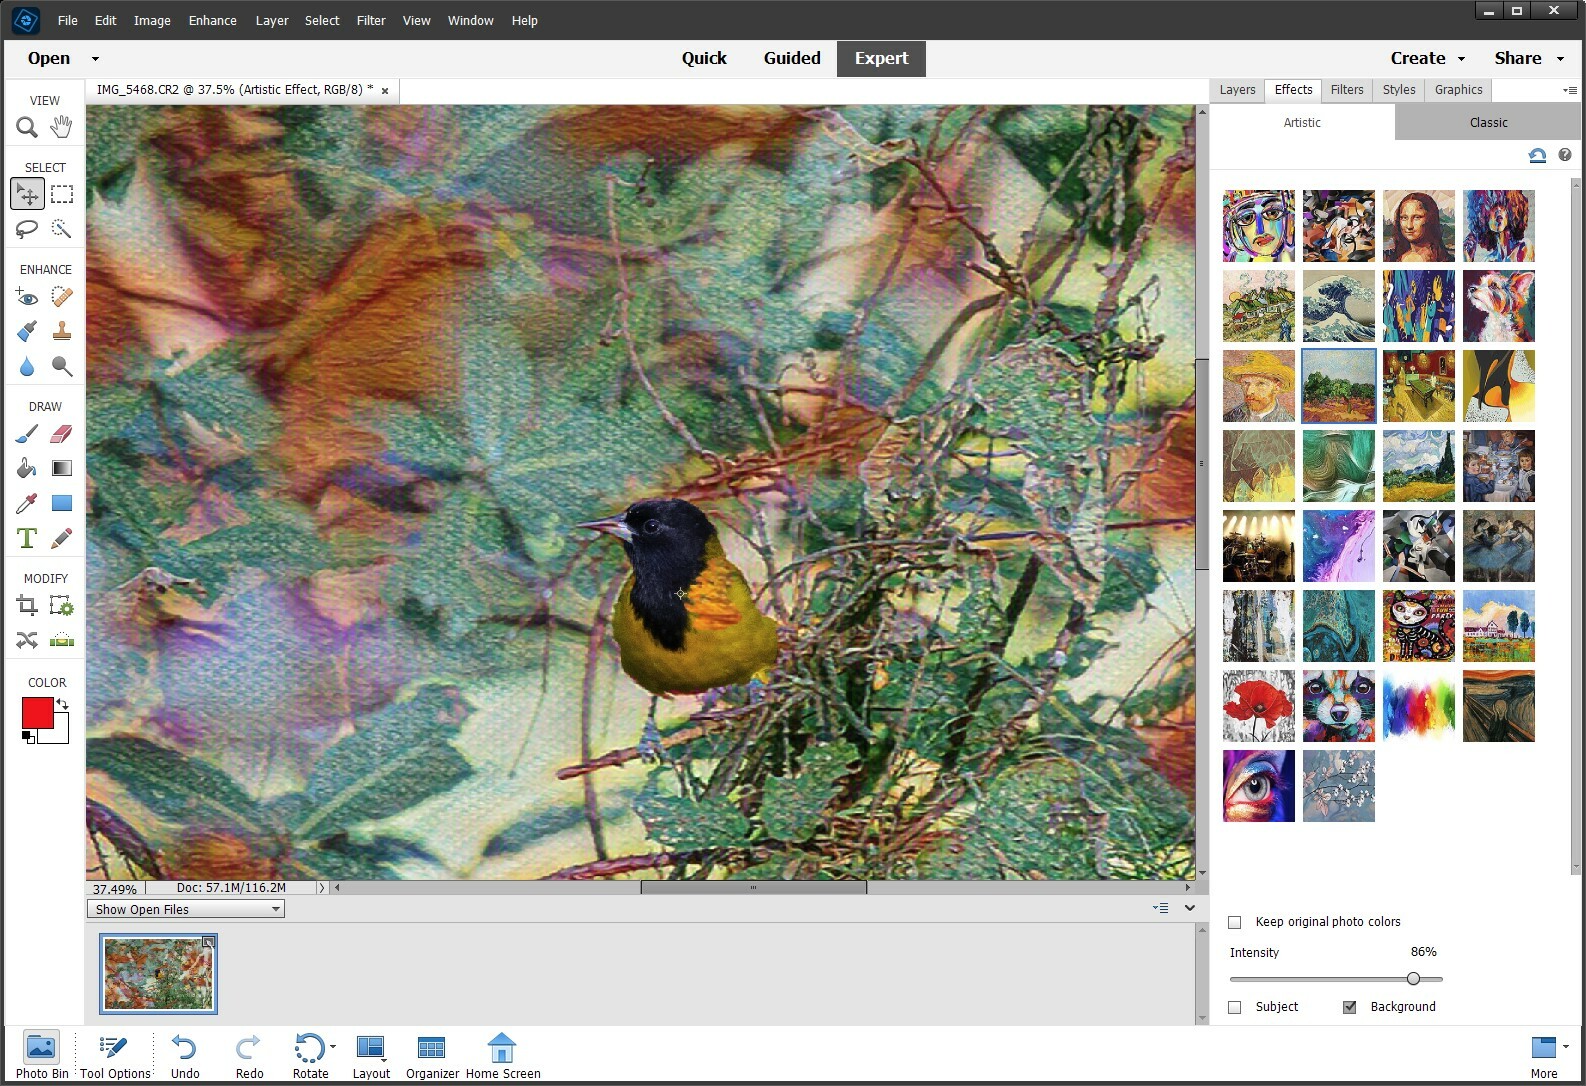
A tab on the Effects panel brings something to Photoshop Elements that has been around for a few years in other photo applications: artistic style transfers that use artificial intelligence to make your photo look like it was painted by Van Gogh or some other famous artist. Elements offers 26 of these style effects, but the program doesn’t name artists as some other programs do. It’s a good selection; PhotoDirector starts you out with eight but then continually adds new choices for subscribers or as extra purchases for non-subscribers.
I appreciate that this Elements tool lets you adjust the strength of the filter and check a box if you want to keep the original image’s colors, though doing so removes a lot of the charm of these filters. More checkboxes under the strength slider let you apply the effect only to the subject (automatically determined by Sensei AI) or only to the background. PhotoDirector also offers those options and adds the ability to brush the effect on and off, with brush option sliders for feathering, size, and strength.
Guided Edits
Guided Edits are one way that Elements helps novices create advanced, pro-level Photoshop Effects. They’re basically wizards that use tools within the app. If you knew what you were doing, you wouldn’t need the Guided Edits to create these effects, but we don’t all have MFAs.

(Credit: PCMag/Adobe)
A gallery of Guided Edits shows sample images of what they do, and swiping the cursor over them reveals the before and after. Different effect types are divided into sections like Basics, Color, and Fun. There are now more than 60 Guided Edits in all, so thankfully Adobe has added search capability to the feature in the 2023 update. You can also tap keyword buttons for Portrait, Landscape, Recent, Popular, and Updated. When going through a Guided Edit, you see a before-and-after split screen view, but I wish you could step backward or forward in the process. Below, I take you through a few of the newer and cooler Guided Edits. The only completely new one for the 2023 version is the first one here.
(Credit: PCMag/Adobe)
Peek-Through Overlay
Peek-Through Overlay is an amusing little edit that makes it look like your subject is coming through some vegetation. You get choices of spring or fall foliage, and you can resize and reposition the greenery to taste. It also lets you adjust the hue and saturation of the overlay and lets you blur the background easily.
Perfect Pet
The Perfect Pet Guided Edit is a response to all those pet photos where the animal’s face or part of the face is in shadow, as a natural result of the shape of animals’ mugs. The Guided Edit starts you out with cropping and straightening buttons. Then you get to remove dirt and spots with a spot-removal tool. More central to this edit are the Remove Collar & Leash and Fix Pet’s Eye buttons.

(Credit: PCMag/Adobe)
The first is an object removal which requires you to select an area with the collar, and the eye fixer removes excessive glare from those big shiny eyes. You need the Guided Edit’s Subject Select, Lighting, and Lighten brush to fix that dark side of the pet’s face.

(Credit: PCMag/Adobe)
The final tool set is under fx Effects. Here you get Auto Correct, Sharpen, Vignette, Blur, and Selective B&W. In my second example, I wish there were an Open Closed Eyes tool like Elements offers for humans. What’s more, you’re not going to get great results when trying to lighten dark areas of the face when you’re starting with a JPG image. Raw camera files get you better results, so you’re better off with a product designed for working with raw files like Lightroom for this type of operation.

(Credit: PCMag/Adobe)
Extend Background
Extend Background is useful if you need an image for social media, such as an Instagram Story, Facebook page background, or Pinterest post because it gives you preset canvas sizes for those use cases. You choose which directions you want to extend the background in, and then either Autofill or Extend. Autofill uses content-aware technology to identify and replicate the background, while Extend merely stretches the sides of the images, letting you protect a central subject from being stretched. I had an issue where I couldn’t protect both of my deer with the Extend option, and Autofill required some use of the Clone Stamp button within the Guided Edit to remove an extra deer.

(PCMag/Adobe)
Perfect Landscapes
Photoshop recently got the Sensei AI-powered one-click sky replacement tool, and it makes loads of sense for Elements to have it, too. It’s included in the Perfect Landscapes Guided Edit, which also suggests cropping, straightening, and dehazing. It added some brilliance to this shot of the Hudson Valley.

(Credit: PCMag/Adobe)
Object Removal
Object Removal is a Content-Aware capability that has appeared in many photo apps in the last few years. Now Elements gets a Guided Edit to simplify the process. You use one of the selection tools, and then you simply hit the Remove Object button. You can fine-tune your results with the Spot Healing Brush and Clone Stamp tool after the initial removal.
Advanced Tools
Many Photoshop effects involve selecting objects precisely, and either adding or removing them to or from an image. With the Auto Selection tool, you draw a rectangle or shape over the object you want to select, and the tool determines your object’s edges. The earlier Quick Selection tool has you scribble on the object you want to select. I still prefer Quick over Auto, since getting the right shape size and placement is trickier than simply scribbling over the object.
All the selection tools offer a Refine Edge option, which uses a circle with inner and outer selection circumferences. The brilliance of the tool is that it switches between adding and subtracting from your selection depending on whether you’re inside or outside the original selection. You can also hover the tool right over the edge to have Photoshop Elements refine the selection for you—that usually means adding those stray hairs to it. The tool worked impressively on a photo of my niece’s Shih Tzu puppy.
The Photomerge Group Shot tool lets you get the best expression on each person from a series of group shots. You can, for example, give one person’s face their eyes from another shot. Scene Cleaner lets you remove passers-by from a landscape or famous site. Exposure, also called high dynamic range (HDR), fixes images by using two or more shots to combine the best version of, say, the clouds in the sky from one picture, and a forest below from a second shot.
The Photomerge Panorama tool offers lots of control, creating a full panorama rather than one with twisted edges. It even fills in empty areas left by the photos and stitching—to impressive effect in my testing—but it can take a long time to do its work. You won’t find that filling option in other software.
Another photo-enhancing tool, Smart Brushes, lets you paint effects and adjustments onto specific areas of a photo, including B&W, color, lighting, special effects, and artistic treatments like drawing. These offer a really cool and easy way to make a sky bluer or darken areas of an image.

(Credit: PCMag/Adobe)
Warp tools, long a staple of Photoshop proper, let you reshape an image either manually or automatically to a choice of preset shapes such as oval, arcs, flags, and twists.
One trick missing is CyberLink PhotoDirector’s Multiple Exposure, which can automatically build impressive action images with multiple instances of your protagonist.
Finally, one tool that has come down from Photoshop is Shake Reduction. It automatically sharpens shots that you took while shaking the camera slightly. It gives you the same control as the Photoshop tool, letting you select the area you want to correct.
Photoshop Elements on the Web
With the 2023 version of Elements, Adobe launched a limited web interface for the app. It lets you add media either from the installed program or from the device you’re browsing on, whether that’s your computer or mobile device.

(Credit: Adobe)
You can then access those files from the installed program. The web app, accessible at elements.adobe.com serves both Photoshop Elements and Premiere Elements. In addition to the basic storing and viewing of uploaded media, it lets you create slideshows and photo collages. These creations can take some time, so there’s an option to have an email sent to you when one is completed. You can even start a new one while earlier ones are still cooking.

(Credit: PCMag/Adobe)
My test slideshow resulted in a video complete with interesting overlay transitions and background music. As with Windows’ free Photos app, you get a Remix button to try another look and sound for your creation. You can also simply choose another soundtrack or design, as well as add a title slide. The nifty styles include Geometric, WaterColor, Cherish, and Splash.
One downside of the web version of Elements is that it only comes with only 2GB of storage, which won’t hold your entire photo collection if you’re anything like me. My Creative Cloud account storage of 100GB applied to the Elements web storage, and I’ve used up 72 percent of that.
When it comes to sharing creations or single images (not albums or multiple photos), you have three options: Facebook, email, and link. Anyone with the link can view, so there’s no need for the recipient to have an Adobe account.
If you’re interested in ditching installed software to work with your images, see our roundup of fully functional online photo editors.
Photoshop Elements for Android
At this point, the beta Android companion app for Elements is very basic, but Adobe states that it will get new features over time. At the moment, it’s simply a way to browse and share cloud-stored images.

(Credit: Adobe)
I expect an iOS version coming down the pike, but for now there’s just an Android version. I also wish there were more linkage between the desktop and mobile apps; a QR code to get you to the store installer or something on the desktop app that clearly showed how to get photos from the device.
Sharing and Output
Elements offers the most output options of any consumer photo editor—whether you’re into creating slideshows, sending picture emails, printing via Shutterfly, burning discs, or uploading to web galleries. You can directly upload to online photo sites, including Flickr and Twitter. I would like to see more social outlets here, such as Instagram, Pinterest, and Flipboard. One minor disappointment is that Elements’ own keyword tags don’t carry over into Flickr, though you can add tags when you do the uploading. Others include the lack of direct sharing to Facebook Messenger, Skype, or WhatsApp. If Adobe had produced a UWP app, all this sharing could be built-in via Windows’ standard Share button.
Elements’ photo slideshows are actually videos. You can start creating one from either the Organizer or by selecting images in the editor and choosing the Create drop-down. You get six templates, including WaterColor, Woods, Pan and Zoom, and Classic. You can change the background music and add or remove images to taste, but the slideshow is generated automatically and starts playing right away, so your layout choices are limited. The tools in Apple Photos and Microsoft Photos offer more customization at this point, with more canned music choices and control over slide duration.
Quote Graphic offers templates that look sort of light greeting cards that are for use on social media. You can choose a shape that works for stories or posts on Facebook and Instagram primarily. Shapes and graphics can adorn your image as well as text. You can even choose an animation style like those in the Moving Photos discussed above.

(Credit: PCMag/Adobe)
Adobe lets you order photo prints from within the Photoshop Elements application. From the Create menu, choose Photo Prints, FujiFilm Prints and Gifts, and accept the Fuji terms of use. You then see a window that’s basically the FujiFilm website, where you can choose what sort of prints you want and on what surfaces. 4-by-6-inch prints cost a reasonable 19 cents each. It uses a clear and simple interface, but dedicated options like Editors’ Choice winner Mpix have more printing options, and sending pictures to CVS or Walmart gets you the option of same-day pickup.
A final quick word about help: I’m not a big fan of Adobe’s Web-only help system. I’d love to be able to search within the application for help on tools and techniques. Even a user-guide-type offline help document would be an improvement.
Adobe Photoshop Elements for macOS
As with its Elements stablemate, Premiere Elements, Photoshop Elements for macOS matches its Windows 10 counterpart feature-for-feature. The software requires macOS 10.14 or later, but it doesn’t yet support Apple Silicon M1-based Macs. That’s on Adobe’s roadmap for the software, however. An Adobe M1 web page(Opens in a new window) details the company’s progress in moving software to the new hardware platform. Unlike Premiere Elements, Photoshop Elements is available on the Mac App Store, which simplifies installation, updating, and moving the app to another computer.
All the Elements You Need for Your Photos
For amateurs who want to get creative with their photos, Adobe Photoshop Elements is the best game in town. Professionals can do everything in Elements and more with the full Photoshop application, but that comes with a high learning curve and a recurring price tag. Elements makes a lot of the coolest Photoshop effects accessible to nonprofessionals, offering a generous subset of the pro editor’s features in a simpler package.
Elements includes an impressive array of photo effects, organizational tools, and sharing and output options. With best-in-class tools for getting creative with your digital images, Adobe Photoshop Elements is our Editors’ Choice winner for enthusiast-level photo editing software. Those who are only interested in photography without the extra creativity tools should look to our photo workflow software Editors’ Choice winner Adobe Lightroom, and pros will certainly want Adobe Photoshop, our Editors’ Choice for professional image editing software.
4.0

(Opens in a new window)
(Opens in a new window)
View More
View More
Adobe Photoshop Elements is an excellent photo editing tool for hobbyists who don’t want to pay for a subscription or learn complex Photoshop techniques.
[ad_2]
Source link : https://www.pcmag.com/reviews/adobe-photoshop-elements

