[ad_1]
CyberLink’s PhotoDirector combines the photo workflow features of Adobe Lightroom with functions found in Photoshop and adds hand-holding help features like those in Photoshop Elements, making it an all-in-one photo editing application for photo enthusiasts. We highly recommend PhotoDirector, though our Editors’ Choice photo applications remain Adobe Lightroom, Photoshop, and Elements.
PhotoDirector does, however, give Adobe a run for its money in terms of photo workflow and image editing. You get Photoshop-like tools such as adjustment layers, masks, text kerning, and guided edits. You even get some impressive AI-powered image abilities like style transfer, content-aware removal, sky replacement, people masking, as well as with GIF animation. But PhotoDirector lacks some powerful features Lightroom and Photoshop have, such as Subject Select and geotagged maps. Still, it goes beyond Lightroom with drawing tools, face-beautification tools, blur, and cartoon effects. And unlike Photoshop, it has nondestructive workflow and collection organization features. Though all the additions could be considered feature-creep, the program remains impressive in both its usability and breadth of capabilities.
How Much Does PhotoDirector Cost?
The non-subscription version of the app is called PhotoDirector 13 Ultra, and it has a list price of $99.99. You can bundle PhotoDirector together with our Editors’ Choice-winning consumer video editor, PowerDirector, for $169.99.
The subscription options are a little different. A $54.99-per-year (often discounted) or $14.99-per-month subscription called PhotoDirector 365 gets you the photo program along with frequent updates, content packs, and 50GB online storage. Another subscription option is to get the full Director Suite 365. That’s a $29.99-per-month ($129.99 per year) plan that includes all of CyberLink’s media software along with plug-ins, content packs, and 100GB of cloud storage.
Similar Products
By comparison, Photoshop Elements costs a one-time fee of $99.99. For Adobe Lightroom, you pay $9.99 per month as long as you want to keep using it. ACDSee Photo Studio also costs $99.99 one-shot, and Corel PaintShop Pro lists for a one-time price of $79.99. The more professional-targeted DxO PhotoLab and Capture One Pro cost $219 and $299, respectively.

(Credit: CyberLink/Shutterstock/TandemBranding)
A fully functioning 30-day free trial of PhotoDirector is yours for the price of your email address. After that time period, it converts into a limited version of the program that lacks premium effects. It requires more than 1GB on disk, so make sure you have some space available. Note that the trial is not upgradable to the licensed version, so you must reinstall it if you decide to buy.
System Requirements and Getting Started
PhotoDirector is available for Windows 10, Windows 11, and macOS (10.14 and later). Both Mac and Windows versions require a 64-bit processor and at least 4GB of RAM.
PhotoDirector is a 64-bit application, meaning you can take advantage of more than 4GB of RAM—something you’ll want when you have a lot of high-res photos open and are doing heavy image manipulation. It also means it won’t run on an older, low-power 32-bit system.
When you first fire up PhotoDirector, you see a splash screen inviting you to open the application in Full or Express mode, along with tiles highlighting new features and tutorials. On first opening the actual program, you’re offered cloud syncing for your photos, something Lightroom also offers. The one-time purchase fee gets you 25GB for a year for storage.
After this, a third and final box appears, offering optional plug-ins such as LUTs (lookup table filters), frames, clipart, and music for slideshow backgrounds. Going the subscription route when you purchase the software gets you all these goodies, too.
What’s New in PhotoDirector?
CyberLink is continually updating this software, and subscribers constantly receive new effects, fonts, templates, and editing tools. You can see every one of them on the company’s handy What’s New in PhotoDirector(Opens in a new window) page. Since my last review, here are highlights among the many updates:
-
AI Denoise—remove sensor noise
-
Content-Aware object removal
-
Interface customization—move tools around to taste
-
Focus and bokeh with depth map
-
Automatic lens correction for Android and iPhone shots
-
Color gradient presets
-
AI cartoon and anime stylizing—great for users with kids
-
New fonts, stickers, and background music tracks
Previous updates added object segmentation for silhouettes and masking (improved in the latest release), a bokeh effect, AI-powered color enhancement, Getty iStock content, new layer effects and management, a photo-beat music synchronizing effect for animated photos, and Light Hits effects. Photo animation tools, a particle dispersion effect, Canon CR3 support, and many audio and image effects and content packs made it into the program before that. You get LUTs, background music for slideshows, frames, sky replacements, glitch effects, and fonts.
One of the biggest recent updates, Shutterstock and Getty images for subscribers, should be a big draw for anyone who needs stock content. Earlier updates added Photoshop-like layer options, Rotate Cloned Objects, AI Deblur, Color Replacement, text effects, clip art, and improved LUT support.

(Credit: PCMag)
The PhotoDirector Interface
The latest PhotoDirector version doesn’t include any drastic changes to the program’s interface, which was clear, functional, and attractive already. PhotoDirector bypasses Photoshop Elements’ separate Organizer app, too: You can import, organize, edit, and export photos inside the main PhotoDirector application.
The program starts up quickly and most editing operations are snappy, but I occasionally ran into the main menu pausing on my PC before appearing. On first run, you see a helpful Quick Start tutorial window to familiarize you with the program’s features, with links to fuller online tutorials.
As is common among pro- and near-pro-level photo workflow apps, PhotoDirector uses modes. That means there are global tabs or buttons that switch the interface among different functions, usually organizing, editing, and sharing. PhotoDirector has six modes: Library, Adjustment, Guided, Edit, Create, and Print. Like Lightroom, PhotoDirector lets you choose which of these buttons appears, though you get to the option by right-clicking on the title bar, rather than in Preferences.
Switching modes is as simple as it is in Lightroom Classic. Just tap the button up top. Within each of PhotoDirector’s modes, a left-side panel offers mode-appropriate options. In the Library and Adjustment modes, the panel is further broken down into two tabs, Project and Metadata for the first, and Manual and Presets for the second.
The main viewing area is flexible, with a few options of its own. In Library mode, a large view of the photo sits above a filmstrip-style look at other pictures in the folder. Alternatively, buttons at the top let you see just the photo, a gallery browser of thumbnails or filenames, or a full-screen view of just the current photo. In addition to viewing one large image, you can also compare two or several in Library mode.

(Credit: PCMag)
The Grid view can be filtered by photos you’ve flagged or color-labeled, or those you’ve edited. I’m happy to see that you can filter the view by camera model and lens, as you can in Lightroom Classic. Hover the mouse over a thumbnail in gallery view, and you see star rating and flagging buttons for easy rating and selecting. When you’re viewing one large image, the same choices appear along the bottom with color labeling added. You also have the option to add controls for rotation and back and forward arrows.
In Adjustment mode, you can see a split view showing an image before and after your edits. Flipping through images was snappy and delay-free in testing, as was overall program response. Like Lightroom, PhotoDirector lets you zoom only to preset sizes—25 percent, 33 percent, and 50 percent, and so on—rather than offering a full-range slider like the one on ACDSee Pro. But a single click switches between zoomed and unzoomed, which is convenient.
I like the way adjustments are grouped into Regional and Local groups, and the adjustment panel is topped with Manual and Presets tabs. I also particularly like that double-clicking on a slider returns it to the default position and that you can adjust them with the mouse wheel—Lightroom is inconsistent about the latter. And I really appreciate that (Lightroom-like) arrows let you collapse the side panels.
Undo is well implemented, and an excellent adjustment history panel shows not only all previous tweaks but also a thumbnail at the top displaying a mini view of those tweaks’ effects. Clicking on any history entry applies that point to the full image view. In all, PhotoDirector gets high marks for its interface. You can’t detach the program’s panels to float anywhere on screen, as you can in ACDSee Pro, but I suspect that’s not something everyone wants to do.
Importing Photos
The photo import dialog groups zoomable thumbnails of images on the card by date. As with Lightroom, you can select photos for import from these thumbnails. You can apply Auto-tone, Auto-Denoise, and even effect presets, such as B&W Cool, Faux HDR, or Fantasy Pink during import. You can also apply keyword tags, renaming, and a copyright notice.
The program can import raw camera files, of course, in formats such as Canon’s CR2 and Nikon’s NEF. Raw conversion detail and color are good, though Lightroom brought out more detail and truer colors in initial raw import on test images. In the past, Capture One has led the pack in raw import quality, but I have yet to test it in this round of updates. PhotoDirector is somewhat behind Lightroom in support for new camera bodies. For example, it can’t yet work with raw image from the Sony a7 IV but or Canon EOS R3, but it does now support Canon’s newish CR3 file format, and I was impressed that it let me import RAF raw shots from a Fujifilm X-T4 and a Nikon Z fc.

On the left is PhotoDirector’s initial import of a Canon raw file, and on the right is the market leader, Lightroom.
(Credit: PCMag)
Import Performance
One shortcoming in PhotoDirector—at least in my experience, with my test PC—is that occasionally it would be slow to load a menu or an image. Import, however, is plenty fast. The app imports swiftly, compared with the competition. I tested import speed with 200 raw images (a total of 5GB) from a Canon 80D. My test computer was a 64-bit Windows 10 PC with 16GB RAM, a 3.4GHz quad-core Intel Core i7-6700 CPU, and an Nvidia GeForce GTX 745 discrete graphics card. I import from a Class 4 SD card to a fast SSD on the PC. The application took 2:45 (minutes:seconds) for the import compared with 3:02 for Adobe Lightroom and 2:50 for On1 PhotoRaw.
Another type of importing, tethered shooting, is finally supported by PhotoDirector. The feature only works with some Canon and Nikon DSLRs for now, but you get a shutter button, along with the ability to change shooting settings like f-stop, shutter speed, and ISO.
The program offers all the expected organizational tools with easily accessible ratings, color coding, and flagging tools in the Library interface. And, as I’ll show in the next section, it even offers face tagging, a powerful organization tool that’s been available in Photoshop Elements for several years. Geotagging and maps, however, are still absent.
Shutterstock Included—and Getty Images, Too

(Credit: CyberLink/Shutterstock)
If you don’t have a suitable photo of your own, a PhotoDirector subscription lets you use stock photography from two of the biggest names in the game. A Shock Photos button at the bottom of the left sidebar opens a window full of evocative photos. You can search for topics, select multiple thumbnails, and then hit Import. A test sample was 16 megapixels, and it was simply in my Library to edit and export at will. Subscribers also now get iStock by Getty images. You don’t get the full catalog of either stock service, but at more than 4 million images combined, you’ll probably find something that works for you.
Basic Photo Adjustments and Edits
PhotoDirector offers all the basic adjustments you’d expect, including exposure, contrast, white balance, and sharpness. And the ubiquitous fixers—red eye and blemish removers—are added to the local adjustment brushes. Cropping and rotating follow the brilliant approach of Lightroom and Photoshop, showing you the result rather than an outline of your intended crop.
PhotoDirector also has pro image-editing tools, such as curves and levels. The latter lets you manipulate highs, lows, and midtones with controls on a three-color histogram, with optional quarter-tone controls, too. The tone curves tool gives only three control points if you have the Tonal region box checked, but if you uncheck this, you can add lots of control points. Another very nifty tool here is one that lets you adjust the tone by dragging on the place in your image you want to change.
When it comes to pumping up or cutting down on overly dark or bright areas, PhotoDirector adds a couple of levels in between the standard brights, midtones, and darks. You get five sliders—Brightest, Bright, Midtone, Dark, and Darkest. This setup lets you use the histogram’s Show Over/Underexposed Areas tool and then correct these areas with a more appropriate slider. PhotoDirector’s Auto-tone magic wand button, like similar tools in every photo app, worked beautifully for some photos, but not so well for others.
Another image-correction tool that worked well in testing was Dehaze. I found that this did a better job than Lightroom, which tends to add a color cast, usually blue. PhotoDirector’s Dehaze was nearly as good as DxO PhotoLab’s best-in-class ClearView tool.

On the right, the Auto Keystone tool has straightened out the building’s vertical lines.
(Credit: PCMag)
The program’s geometry adjustment tools let you fix the barrel and pincushion distortion of telephoto and wide lenses. The Keystone correction tool’s vertical and horizontal controls let me straighten distorted lines at the sides of photos of buildings. The Auto Keystone option does a good job straightening out buildings shot from below, and it cropped the unusable sides of the photo. A fisheye shot stumped it, however, with its added distortion. There is a Fisheye Distortion adjustment, but it wasn’t strong enough to convincingly correct my 8mm shots.
CyberLink has a couple of nifty color adjustment tools: the AI-powered Auto Color Enhancement option and Three-Way Split Toning. The former opens a dialog box with a slider for the strength of the correction and then applies it when you close the dialog. An unfortunate side effect is that you can’t use the Before-and-After split screen to see the effect unless you make a copy of the image.
For the ultimate color control, three-way split-tone color adjustment lets you change the hue, saturation, and lightness for highlights, midtones, and shadows. You move the cross cursor around the color wheel for the three tone levels to adjust their color settings independently. It’s very similar to the Color Grading panel that Adobe introduced in a 2020 Lightroom update. These tools should be used sparingly unless you’re going for a heavily tinted effect.

(Credit: PCMag)
Guided Mode

The left side is the original (with adjusted exposure), and the right side shows the effect of applying Deblur.
(Credit: PCMag)
This mode creates a copy of your image for creating, so that the original remains unscathed. In it, you find the People Beautifier, Photos Effects, Improve or Remove, Extract or Compose, Photo Merge, Frames and Watermarks, and 360° Photo Editor. It’s a good collection of tools. Featured in the mode are Sky Replacement, Glitch, Dispersion, Sparkle, and Light Rays. The Guided Deblur didn’t turn a blurry photo into a perfectly focused one, but it did improve it. A slightly blurry photo was even better improved.
(Credit: PCMag)
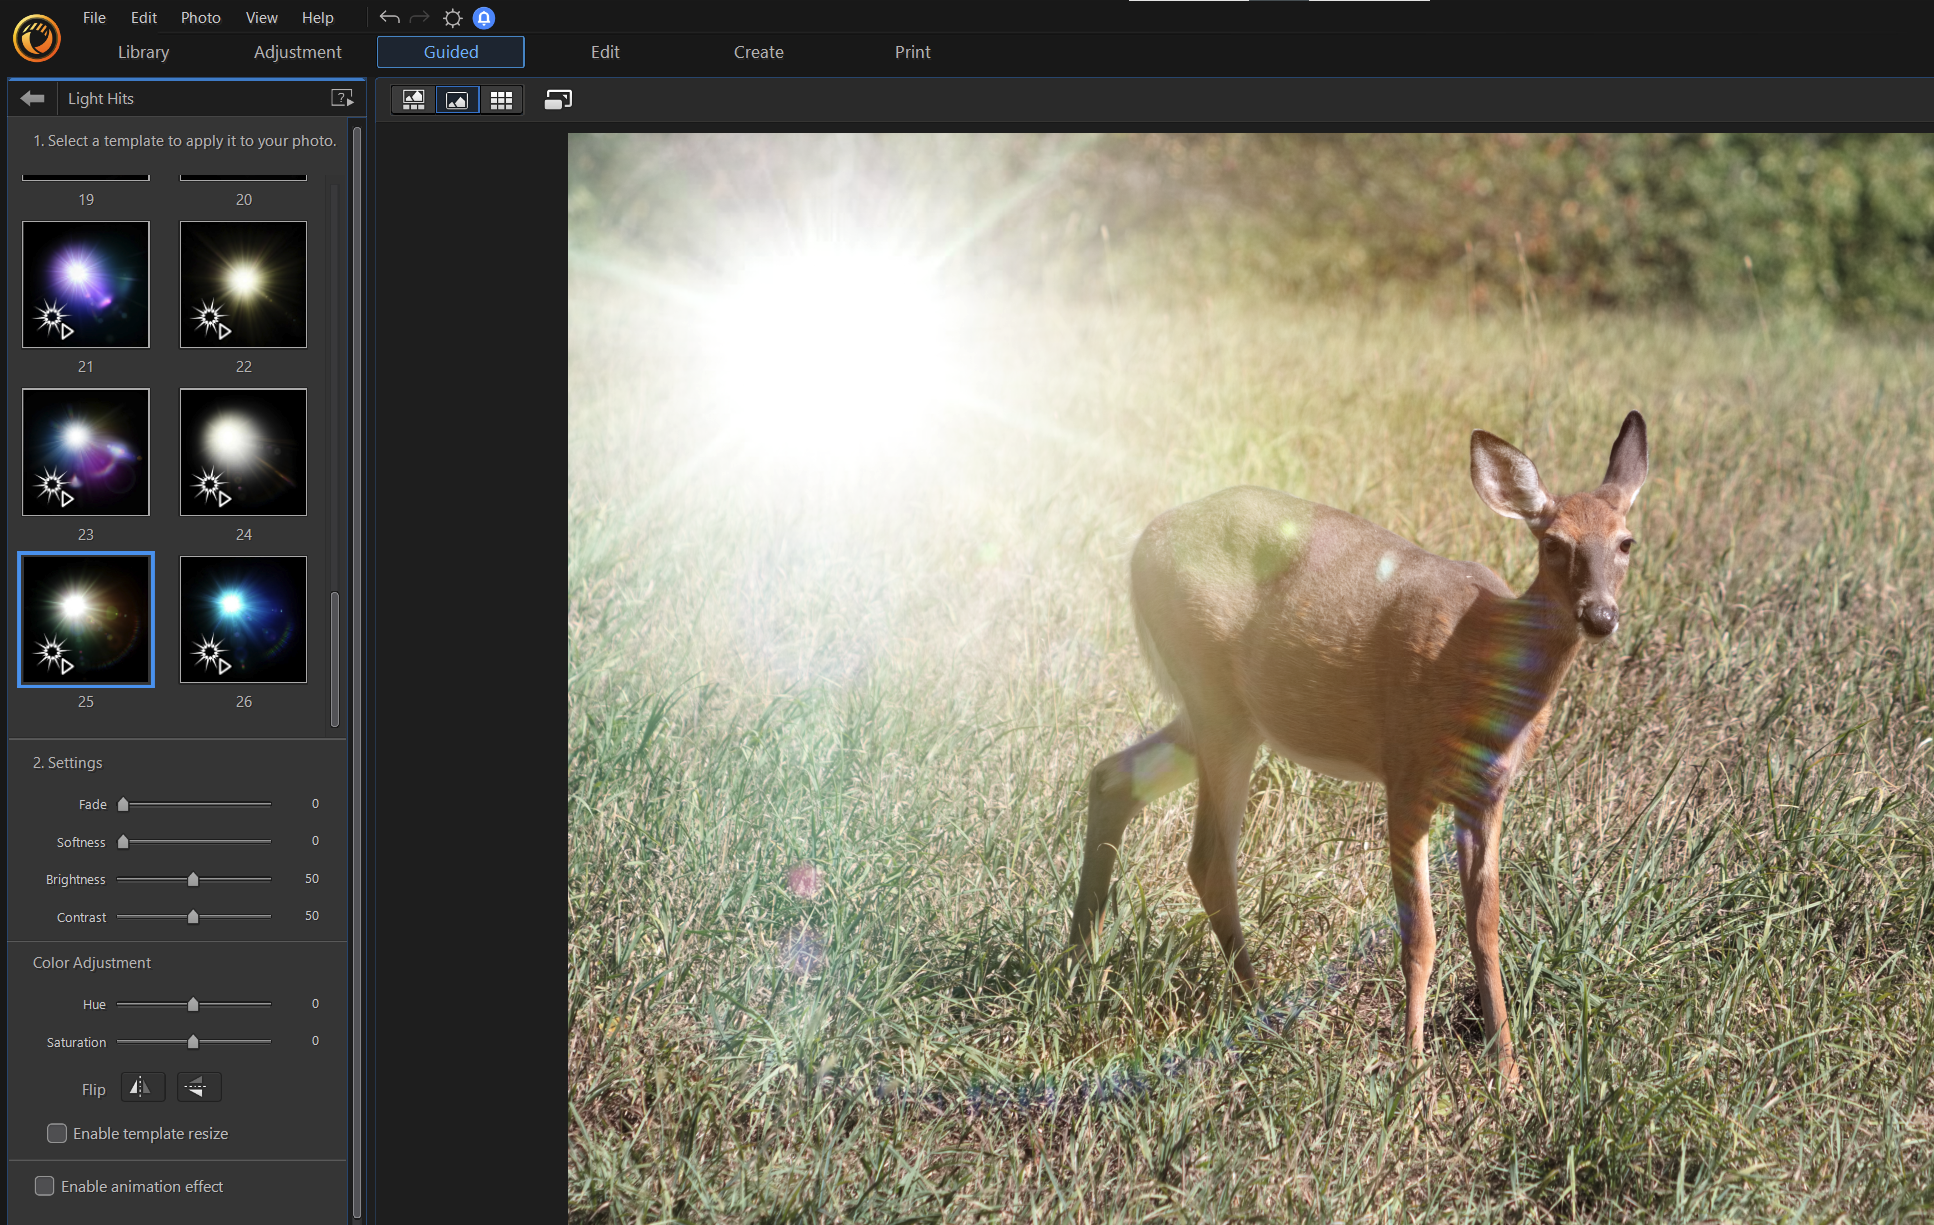
The Light Hits effect add animated glowing overlays (a sort of bokeh or sunstar) to give the shot extra interest. You choose a shape template for the light object overlay, and you can then adjust the Fade, Softness, Brightness, and colors of the effect. You can also turn off the animation if you want a still shot, and adjust the speed of the animation if you do want it. You can position the effect by moving it around with the cursor, but I wish you could also change the size of the light orb. Flip the overlay vertically or horizontally to taste. It’s an impressive charge-up to give a mediocre shot an impactful boost.
AI Style Transfer
If you’ve seen the Prisma mobile app, you know how fun it can be to turn prosaic cameraphone shots into artsy, painted-looking images. PhotoDirector’s AI Style Transfer, available in Edit mode, does the same thing for your DSLR photos. You only get 10 styles included with the program unless you subscribe to Director Suite 365. Otherwise, AI Style Packs cost $149 each, but they are very cool, especially the Chinese Painting pack. The effects took about 20 seconds to apply on my photos.

(Credit: PCMag)
You can adjust the strength of these effects and erase it for select areas of the image with a brush. Better yet, the Person Selection tool lets you easily apply the art effect to everything but a person. It worked instantly and flawlessly in my testing, producing a striking image.
Another option is Apply original color. It creates a color palette for the painting effect using your image, rather than using the palette included with the effect. I found that using the template color scheme produced a more drastic, artsy result. I would like more controls, and remixing capabilities. For example, the canvas creases in the example above weren’t adjustable, and applying the effect a second time produced the exact same effect, meaning it doesn’t recalculate the effect. A Reapply tool would be nice here.
Anime Cartoon Styles

(Credit: PCMag)
Here’s one the youngsters, as well as any fan of graphic novels, will enjoy. From Guided Edits > Photo Effects > Style. Here, you find Cartoon, Anime, and impressive 3D Cartoon choice. Above is the Anime style. It’s a one-click effect, so it’s easy as pie to use.
Sky Replacement

(Credit: PCMag)
In Guided mode, the Sky Replacement option lets you instantly apply a more dramatic sky than the drab one in your photo. It found the obelisk in my test shot of the Vatican easily. A dozen preloaded skies are available within the app, and you can download more. Some even feature moving clouds for use in GIFs or video files. You can adjust the feather and horizon for the effect and change the color cast of the land or the exposure of the sky.
Photo Animation

(Credit: PCMag)
Adobe Photoshop Elements recently introduced a photo animation tool that uses AI to determine a photo’s subject to animate the background. PhotoDirector’s photo animation tool (on the Guided tab) offers a lot more control, though it’s less automatic. To get started, simply draw an arrow on an object in your photo in the direction you want it to move. You can control the speed, as well as pinning areas that you don’t want to move.
You can add background music that pulses to the beat of the animation, although that requires exporting it as a video file. This effect is especially successful with sports images, and I can see good use cases for it in social posts. You can save your result not only as an animated GIF, but also as MPEG-4 or WMV.

(Credit: PCMag)
Another cool animation is called the Dispersion effect, on the Create tab. It lets you select an object in your photo that will peel off and away into particles. You simply mark the area you want to disperse, choose a shape for the particles (circle, square, and so on), a size, and direction. You can use this for either still or animated images.
The third animation type is Motion Stills, also on the Create tab. I had a little trouble figuring out what effect this was supposed to produce, until I watched an explanatory video. The trick is that your source media needs to be all shot from the same viewpoint. Alternatively, you can start with a video (for more ways to do this, see Video-to-Photo, below). If you move the camera at all either during video or still shooting, the result is unconvincing.
The Glitch Effect
(Credit: Flickr/rosiejuliet)
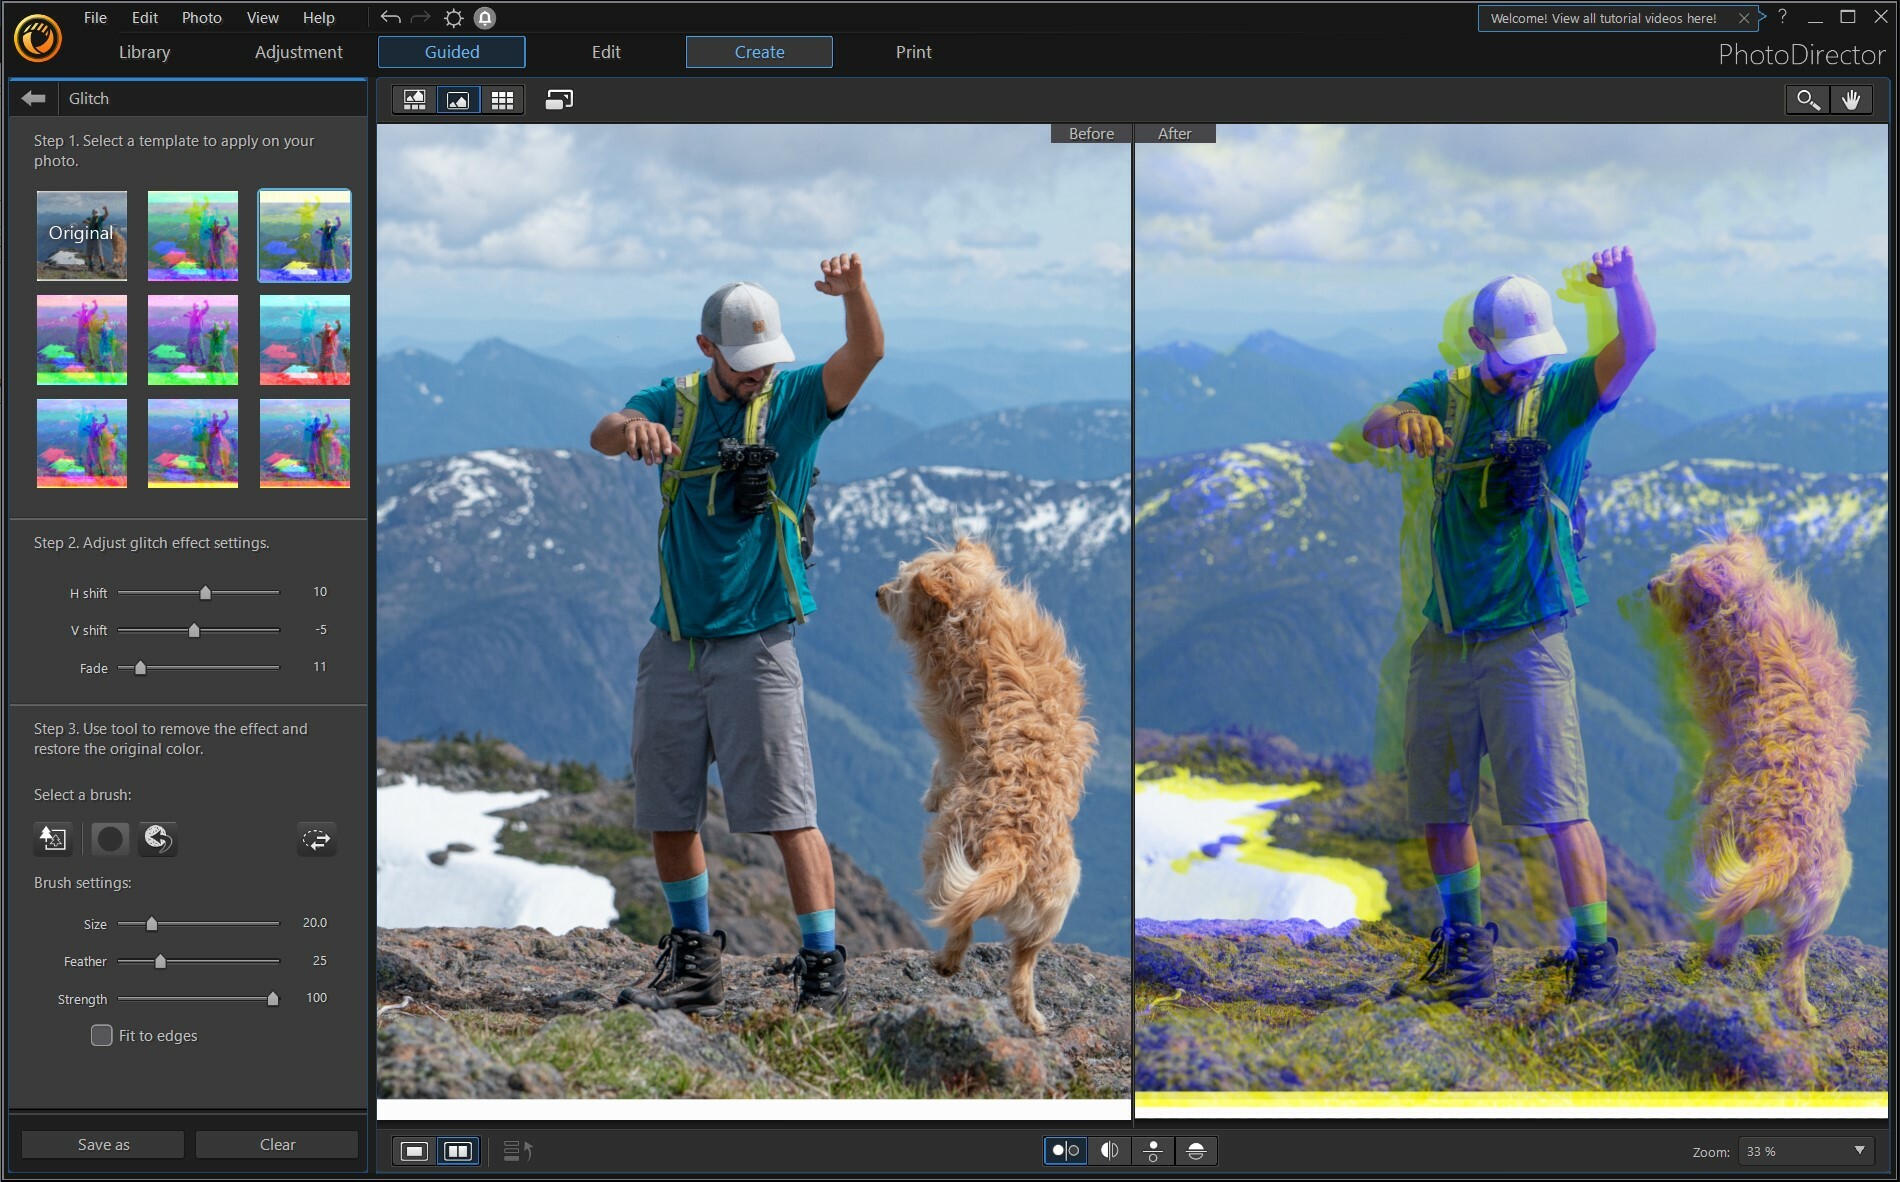
In the Guided mode, the Glitch Effect makes your photo look like an artistic misprint. Though that may sound unappealing, it’s actually a cool look, as you can see above. Controls let you shift the effect vertically and horizontally and change the fade (or transparency). As with other Guided effects, you can automatically exclude the treatment from a person in your photo, or only apply it to the person.

Left: the Sparkle effect; Right: Light Rays.
(Credit: CyberLink)
Two more Guided effects that are noteworthy are Sparkle and Light Rays. The latter can add real drama to an otherwise flat image.
Multiple Exposure Effect

(Credit: PCMag)
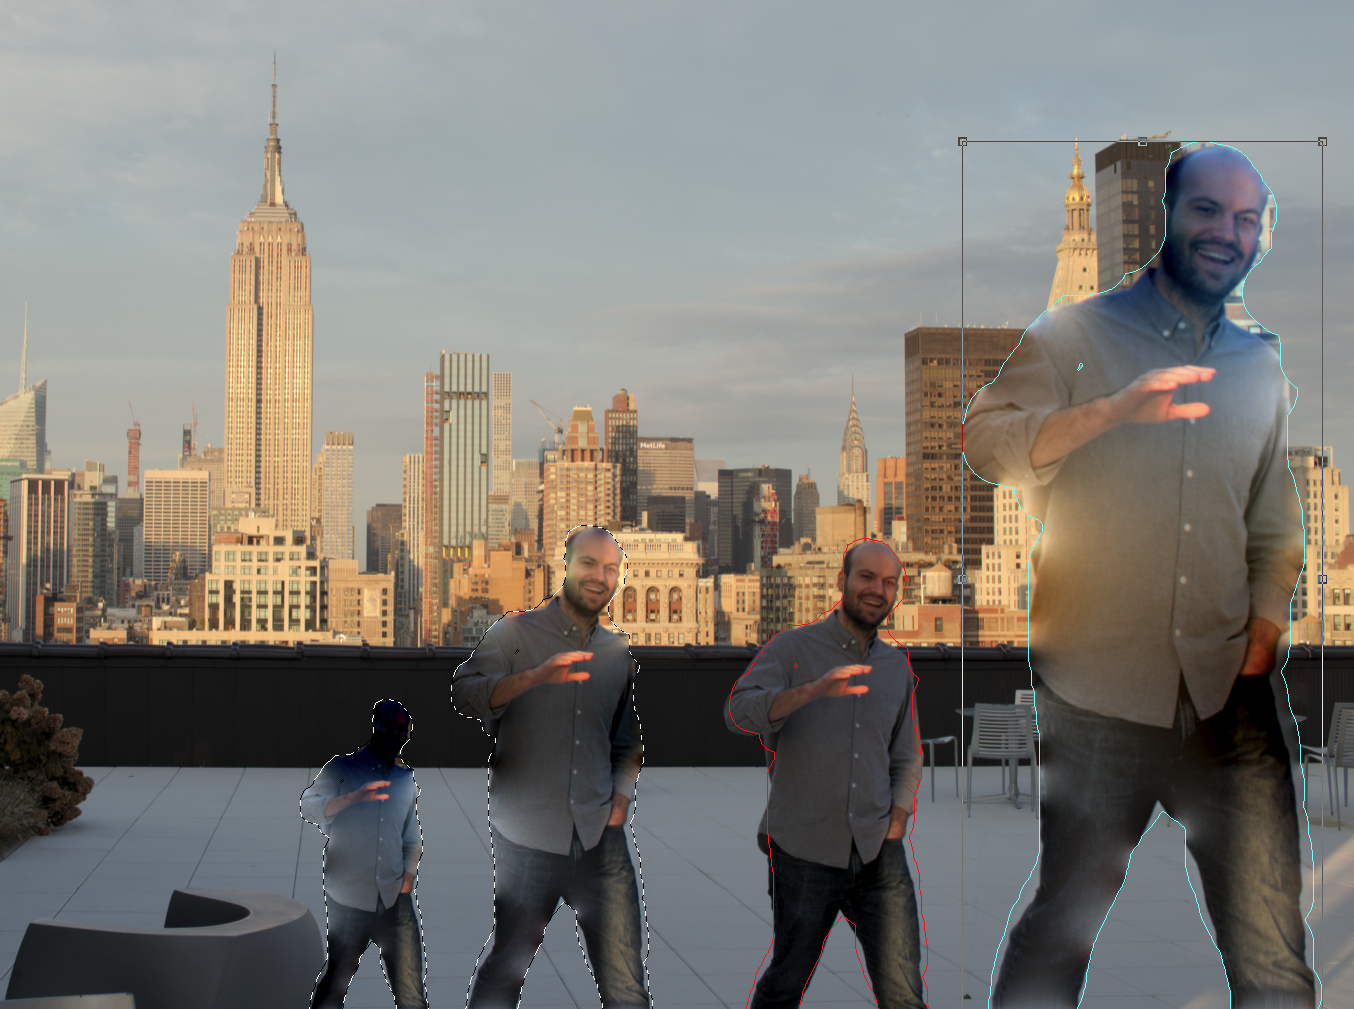
Multiple Exposure Effect is one of PhotoDirector’s coolest features. Take a group of up to 10 action shots while keeping the camera still, and PhotoDirector can automatically produce a multiple exposure like the one below. Doing the same thing in Photoshop would involve selecting the person in all six images and creating masks and layers. PhotoDirector even lets you apply a fade-in or fade-out effect to the sequence. It also lets you reduce the number of exposures from a drop-down, rather than making you recreate the merge.
Layers in Edit Mode
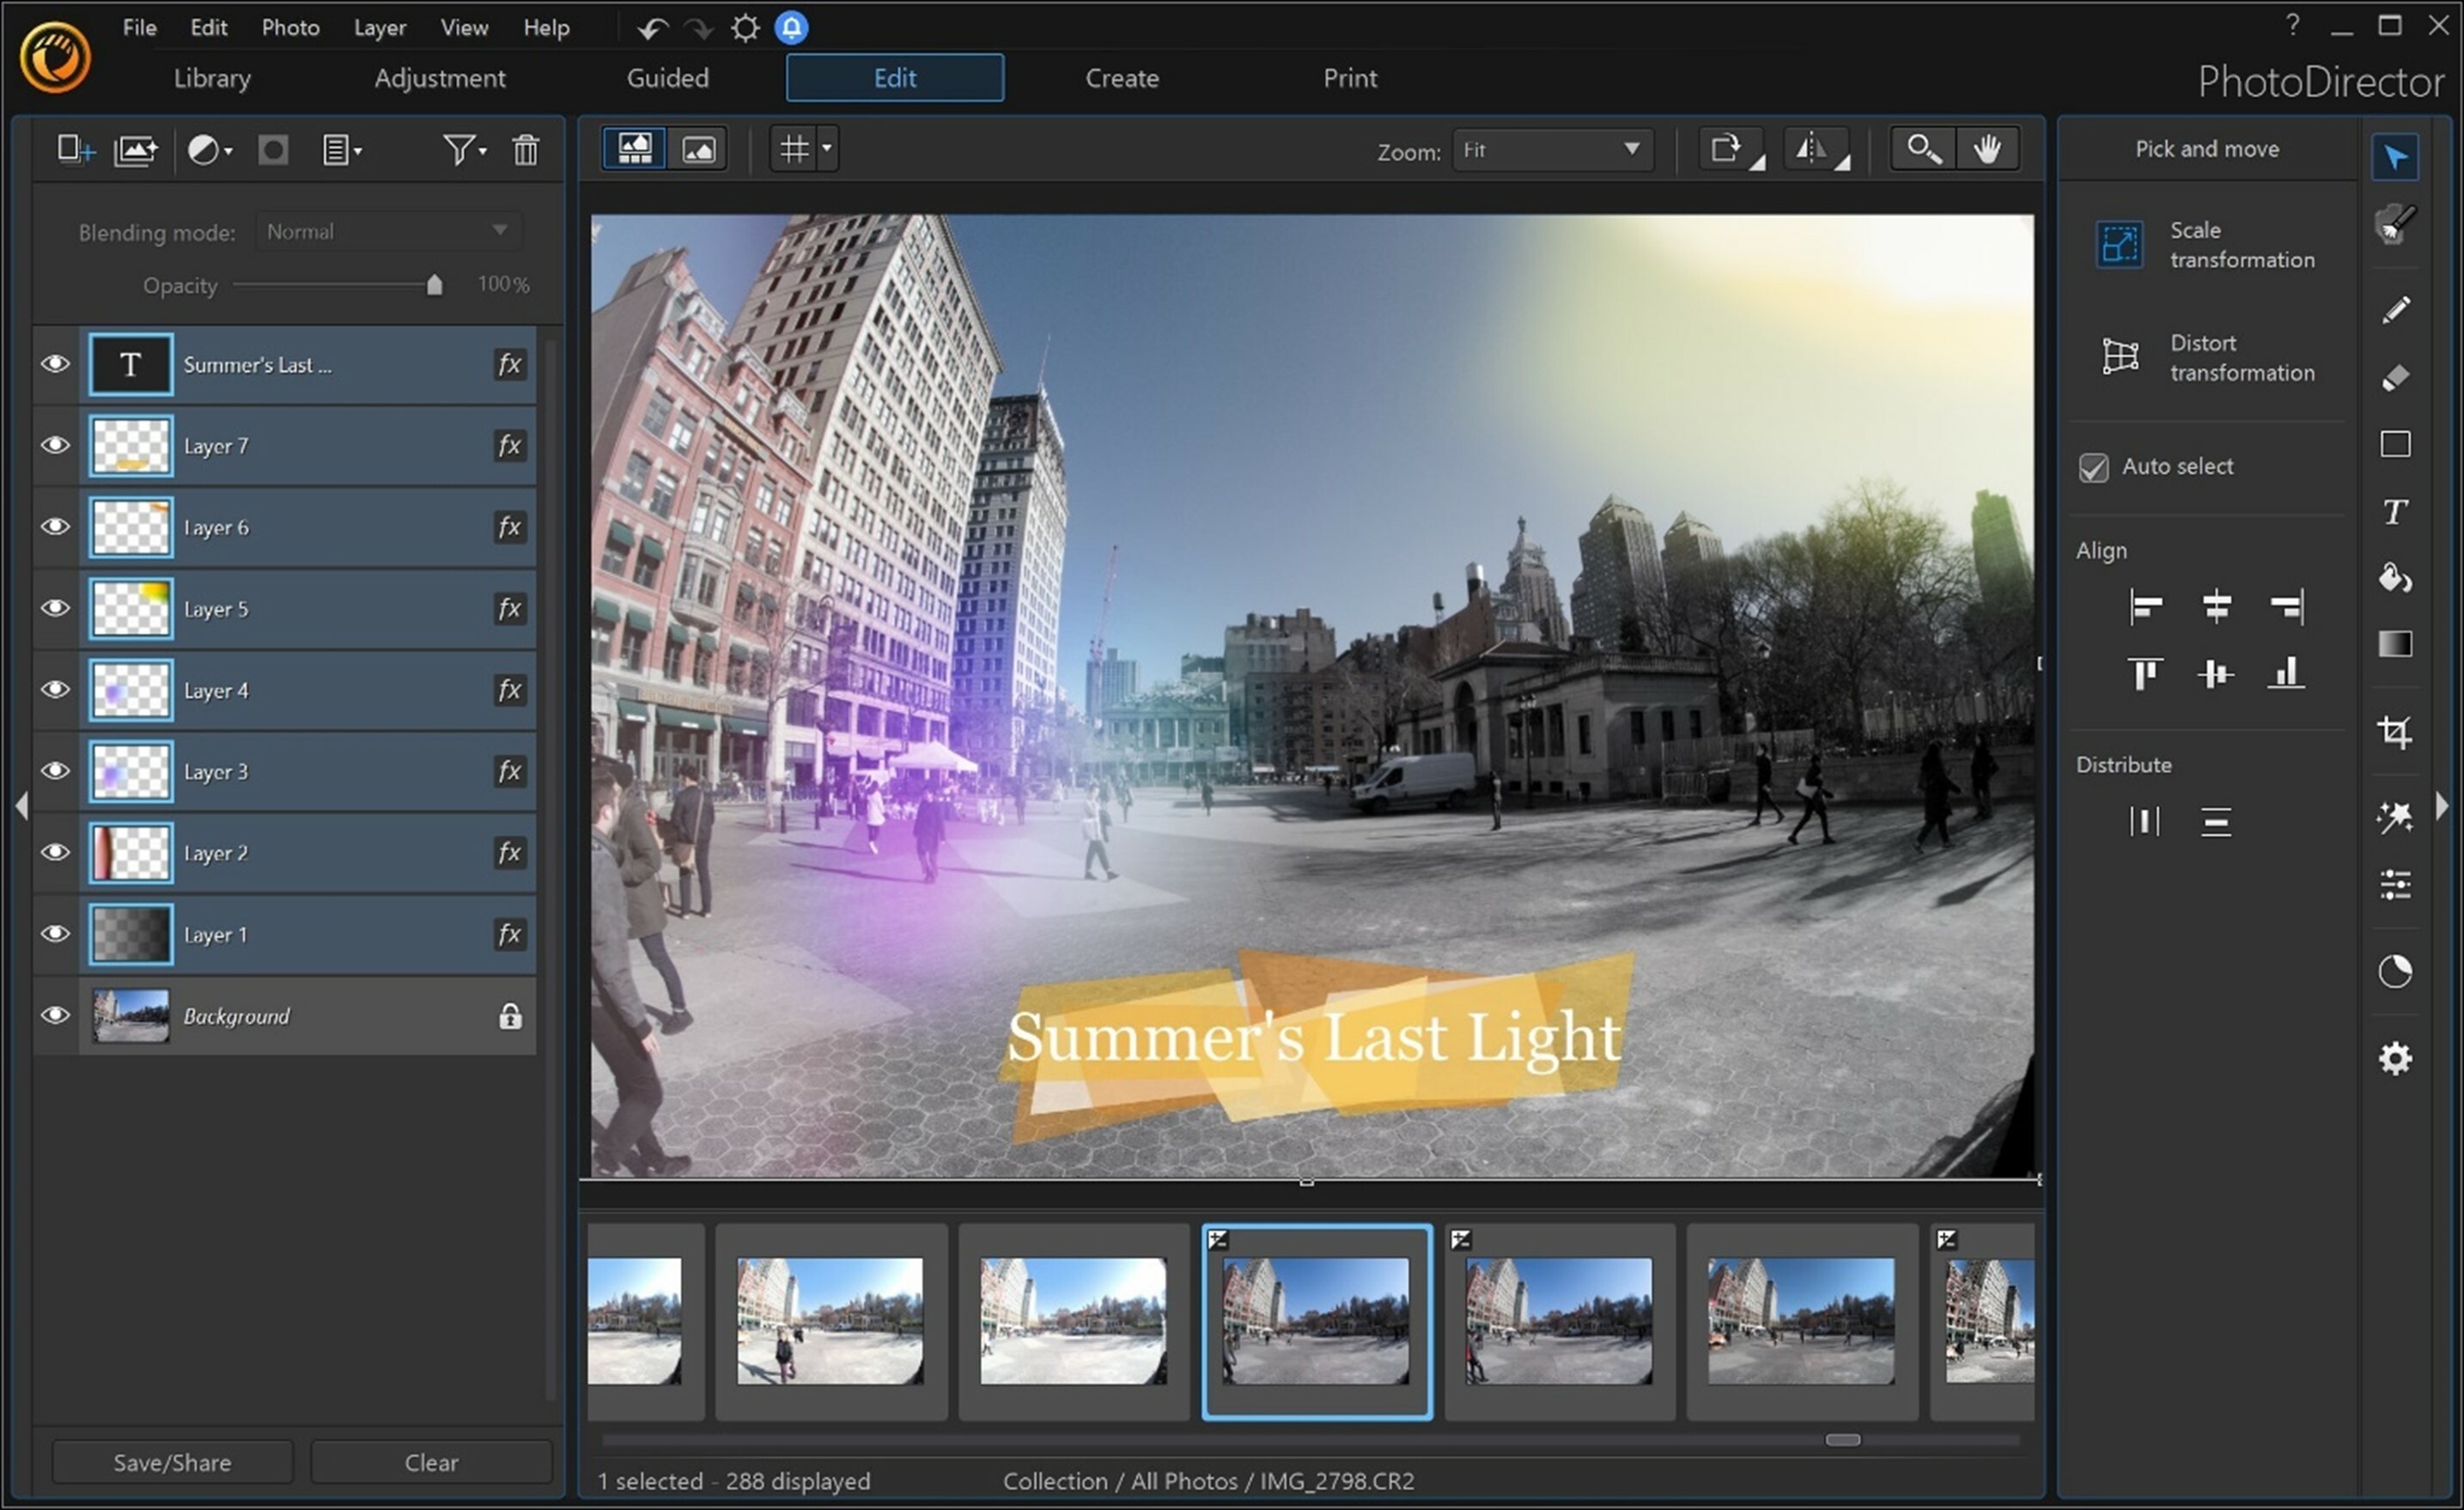
Showing its ambitions to be more than just a photo workflow application competing with Lightroom, PhotoDirector includes layer editing—Photoshop’s forte. I was initially leery about this kind of tool cluttering a program that’s designed for efficient photo workflow. There’s a reason Lightroom doesn’t require photographers to mess with layer editing. PhotoDirector’s tool doesn’t clutter things up, though, unless you consider a mode button atop the interface to be clutter. If you don’t want to spring for Photoshop itself, here are your layers.
The button you tap to get to the capability used to be labeled Layers, but now it’s called Edit. When you enter the mode, a Photoshop-lite appearance takes hold, except the layer controls are on the left and the tools (Text, drawing brushes, gradient, fill, shape, blur) are on the right.
As mentioned above, the text controls are fine-detailed, letting you adjust not just font and size, but also kerning, shadow, and border effects. Emboss and bevel options bring the program that much closer to Photoshopping capabilities. Work with layers is saved in PhotoDirector Layer File format (.PHI), not in the more standard PSD.
A dialog tells you it’s best to complete all overall photo adjustments (lighting, white balance, and the like) prior to working with layers.
(Credit: PCMag)
You can create empty layers, apply prefab project layers, edit with layer masks, group layers, add adjustment layers, and create clipping masks. These techniques will be familiar to Photoshop users, who now have fewer reasons to pay that subscription.
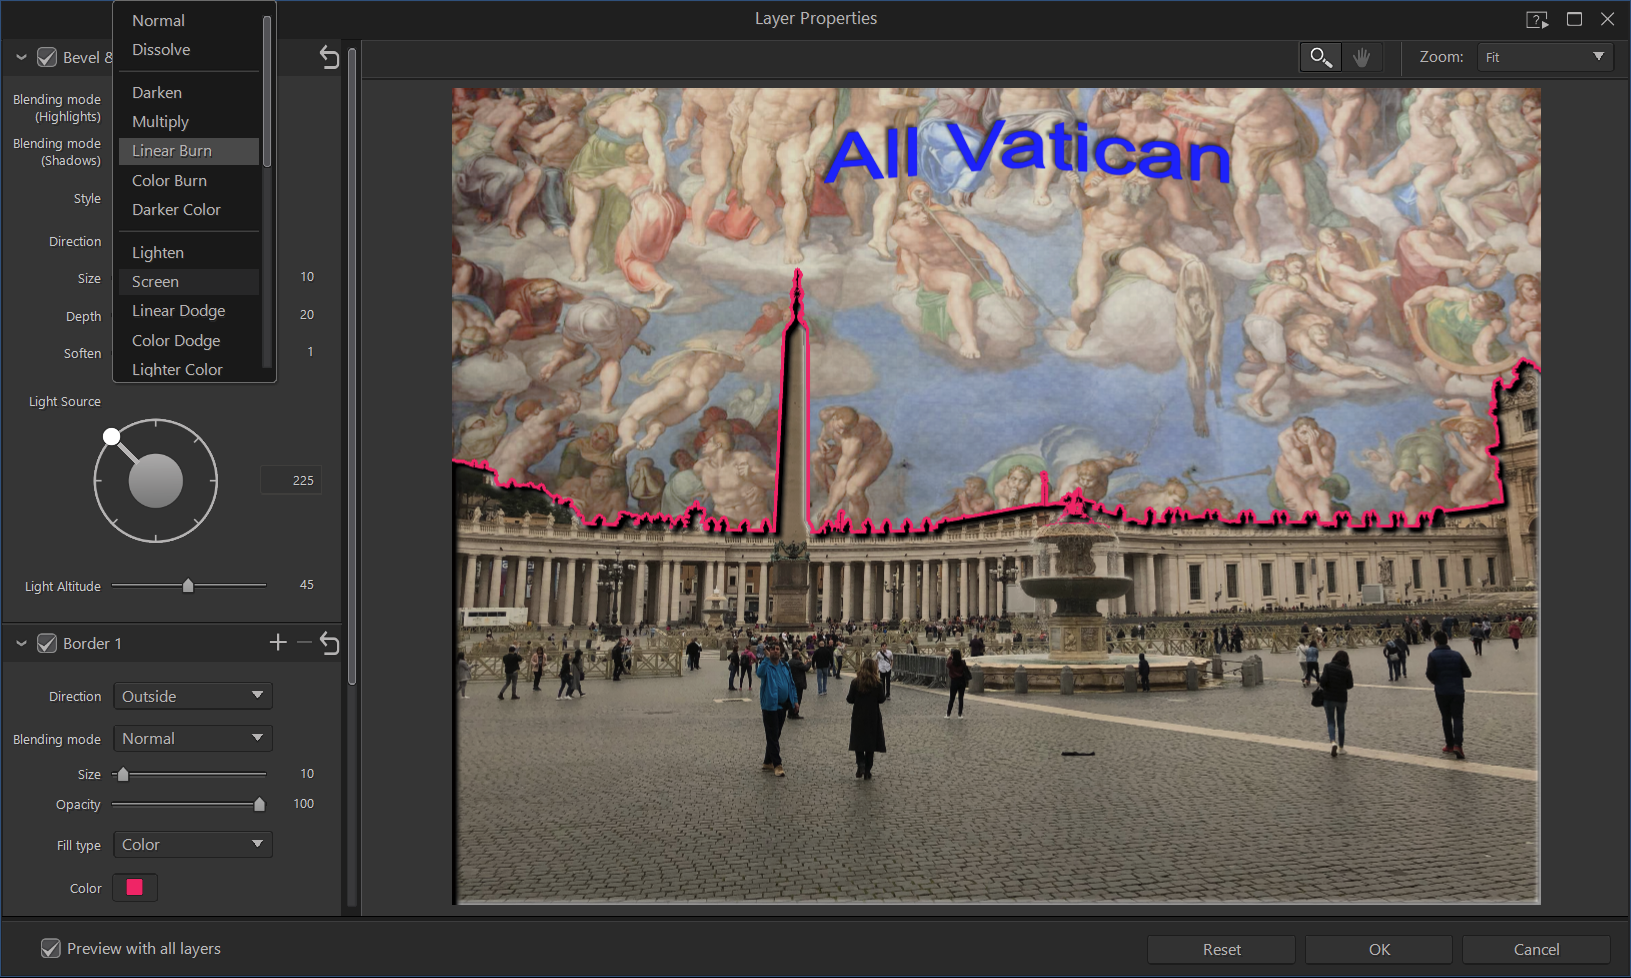
PhotoDirector now offers all 27 blending modes, the same number as Photoshop, which offers a lot of creative options. I like how you can solo and edit a layer by double-clicking on its thumbnail image, but Photoshop’s right-click options are a bit more helpful.
(Credit: PCMag)
You can have multiple borders and border gradients on layers, set the blending mode for each layer property, and copy and paste layer properties. These are particularly useful when you’re working with text overlays, but you can add the effects to any layer with transparency. The copy-and-paste capability means you don’t have to reinvent the wheel if you want consistency in multiple layer objects.

(Credit: PCMag)
As in Photoshop, PhotoDirector’s layer-boasting Edit mode gives you ways to select and mask parts of an image. Auto Object Selection is an option under the Select Area tool, it can automatically identify people and animals in a picture, similar to Adobe’s Subject Select tool. For well-set-off subjects, it did an excellent job identifying subject, and you can adjust the size and feather for the tool. Also excellent is PhotoDirector’s Smart Brush selection tool, which also auto-selects objects as you brush on the screen.
Express Mode
If you’re not intent on tinkering extensively to perfect your image to get an exact effect, you can simply open a photo in Express Mode. It limits the interface to presets, express layer templates, and AI Style Transfer options. I don’t think it’s a particularly helpful option. I’d prefer at least the addition of the basic image correction tools for exposure, cropping, and color corrections.
Video-to-Photo
The Video-to-Photo set of tools offers more than its name suggests. You can use it to create a panorama from a video clip, a group photo from a video with everyone making an acceptable expression, or a multiple-exposure image. You start from the Video-to-Photo button right above the Import button. The feature does let you make still photos from video, but in my testing, it couldn’t sharpen a moving subject. The same problem made multiple-exposure shots from video a lot less appealing than those created from stills.
Likewise, the Panorama feature worked in testing but was less automatic than I’d like. It works best if you manually select frames from a video you play through, and in my first attempt, I hadn’t overlapped the frames enough to get a full panorama. There’s an Auto option, but that also took a few tries to get a full panoramic result. The tool lets you auto-fill areas of the photo that result from combining perspectives—a nice content-aware feature.
Content-Aware Tools

(Credit: PCMag)
CyberLink offers Content-Aware Clone, Remove, and Move tools. The Remove tool has been updated with AI smarts and works suprisingly well, as you can see from the photo above. What’s impressive is that the background isn’t a consistent texture, but the app still managed to create a convincing backdrop out of the areas around the subject who was removed. One thing I do miss from Adobe’s software is automatic subject selection; with PhotoDirector, you have to draw over the object you want to remove. That said, it’s fairly forgiving if you don’t select exactly.
I had a bit less success with the Content-Aware Clone feature, which produced some unwanted transparency in the object I was cloning. But note the fun trick of resizing or even rotating the cloned objects.
(Credit: PCMag)
People Beautifier
The People Beautifier tool has three subsets: face tools, skin tools, and body tools. The first includes Face Shaper, Shine Remover, Eye Bag Remover, Wrinkle Remover, Tooth Brush, and even Eye Blinger, which brightens the whites of the eyes. Note that anything you do here can be undone, since a working copy is created. On my test image, the Face Shaper basically tucked in jowls.

Face Tools let you enhance a subject’s countenance in several ways.
(Credit: CyberLink)
These tools let you draw on top of your images and superimpose text, as well as add shapes, fills, and gradients. You select areas with a lasso and a smart lasso, but PhotoDirector’s selection tools are not as smart as Adobe’s. This program offers a lot of the layer-blending modes found in Photoshop, including Darken, Multiply, Difference, and Exclusion—14 in all. You can drag layer entries to change their order. Adjust any layer separately with the standard lighting, color, and detail tools.
Blur Tools and Noise Reduction
The Blur Tools section in Editing mode makes it easy to add not only blur but also bokeh, zoom focus, and tilt-shift effects. It’s as fun, powerful, and interesting as the Motion Blur tool in Photoshop Elements.

(Credit: PCMag)
But a more fun way to add bokeh, or narrow focus depth with lens light distortions is through Guided Mode > Light Effects > Bokeh (example above). This lets you choose an aperture shape and focus shape, along with a gaggle of other settings, and even lets you create an animation of the effect. This tool can detect the subject automatically, saving you the trouble of drawing around it or sizing a circle to it.
Another new tool, Focus, also found among the Guided options, lets you choose whether to blur near or far objects.

(Credit: PCMag)
CyberLink has update the Denoise tool with AI machine-learning smarts. This is separate from the Noise Reduction tool in the Adjustment menu, and is found in the Guided mode. It takes longer to work its magic than the standard—45 seconds for a 24-megapixel shot. But its results are notably superior to those of the standard tool, which produces results that look a tad blurred.

(Credit: PCMag)
You can, however, do better with a couple of standalone denoising applications: Below, you can see the results from Topaz Denoise, DxO PureRAW, and CyberLink PhotoDirector, from left to right. The first two preserve more detail than the CyberLink tool. All started with the noisy image at left above, so all are improvements on the original. Note that when I tried reducing noise in Adobe Lightroom, I couldn’t get results as good as any of these.

(Credit: PCMag)
Bracket HDR
I’ve long been impressed with PhotoDirector’s single-shot HDR (high dynamic range) effect, but this true HDR tool, Bracket HDR, is no less remarkable. It’s accessible in Edit mode, and you can drag up to five photos shot at different exposures of the same subject from the tray to the main editing area. A merge button combines all the images, which took about 15 seconds on my five-shot test.
The merge lined up the images well, and a checkbox let me remove “ghosting”—in the case of my shot, traffic that differed from shot to shot. The result is pleasing, and you can tinker with it even further by adjusting Glow, Edge, Detail, and Tone, or by choosing a preset look. These include Colorful, Detail, Light, Natural, and Surrealistic. It’s fun to see the dazzling artistic effects all these choices enable.
Lens Profile Correction
This kind of tool has been a feather in the cap of programs including Adobe Lightroom and DxO PhotoLab for a while. The idea is to fix issues introduced by the lens the photo was shot with, such as warped perspectives and darkness around the edges (known as vignetting). The technique, as with most photo adjustments, works best with raw camera files.

(Credit: PCMag)
For lens-profile-based correction to be useful, it needs to support a lot of lenses. CyberLink’s library of profiles is limited compared with Lightroom’s but you can manually adjust the distortion, and CyberLink users can create their own profiles and make them downloadable from DirectorZone.com. PhotoDirector still didn’t have my Sigma 150-600mm zoom lens in its database when I tested it, but it does have one for my Canon EF 70-300mm f/4-5.6 IS USM.
Tapping a globe icon in the Lens Correction option group takes you to CyberLink’s profile download page, where you can see all profiled lenses. DxO makes the process more efficient by automatically popping up a dialog that asks you to download the appropriate profiles whenever you load a photo. For supported lenses, the program automatically chooses the correct model, and those I tested did improve barrel distortion and vignetting.
I am disappointed to see that chromatic aberration (CA) wasn’t improved when applying profiles. PhotoDirector offers sliders for CA correction that did let me remove some color fringing, and the program’s Defringe tool, though manual, does a great job of removing color strokes from object edges. For excellent automatic results, try DxO PhotoLab. Lightroom and DxO PhotoLab are still way ahead of PhotoDirector when it comes to lens profile corrections, for both geometric distortion and CA (chromatic aberration).
Face Tagging
To get started with face tagging, select some photos in Library mode, and hit the Tag Faces button above the thumbnail grid. This starts an Analyzing dialog, which goes through each photo one at a time. Processing 129 photos took just under 3 minutes. As with all face-recognition software, there were a few false positives. A bush was identified as a face, for example. But I’m impressed that it picked up profiles as well as full faces.
The interface for assigning names to faces is, as with much of PhotoDirecter, clear and simple. Once you assign one name, it becomes a button for one-click assignment to other photos with faces. After that, you can click Faces on the Library’s left panel Project tab and then select a name to display photos only of that individual. There’s an option to find more faces of a given person in selected photos, but the program doesn’t do as good a job of suggesting names that belong to a face as competitors do.
Sharing and Output
PhotoDirector offers clear buttons for sharing directly to Flickr, Email, and CyberLink’s cloud galleries from a dropdown. You can generate slideshows for instant viewing, saving to an MPEG-4 video file, or direct uploading to YouTube. Lightroom goes beyond this, though, with some actual video editing capabilities.

(Credit: PCMag)
PhotoDirector’s dedicated Print mode offers every imaginable paper size, custom grid settings, and watermarking, but it has no presets for standard sizes. The company has added a soft proofing feature, which will please pros who print their pictures. There’s also a Watermarks feature, something Corel only added to AfterShot Pro recently.
One final note about help: PhotoDirector includes a comprehensive, organized, searchable help system, along with video tutorials, both accessible from clear buttons in the interface. The help is now on the web rather than via a local file, however. Adobe’s software also takes you to the web for help, but you usually have to hunt through info on other programs than the one you’re using and even through user comments before you possibly find what you’re looking for. CyberLink wins on this count, and you can download its User Guide, in case you’re editing on the road with no connectivity. Wildlife photographers can relate to that situation.
CyberLink also offers a mobile version of PhotoDirector for both iOS(Opens in a new window) and Android. It’s pretty powerful, with a lot of fun effects and editing tools. The app is ad-supported, or you can pay $4.99 to remove the ads and allow higher output resolution.
PhotoDirector for macOS
Since people into the arts and creative media editing often prefer Mac computers, CyberLink has produced a macOS version of PhotoDirector from the start. The macOS version of PhotoDirector has everything discussed here except for three capabilities: integration with PowerDirector, uploading and downloading content from CyberLink Cloud, and AI Facial Recognition. That still leaves a ton of features.
PhotoDirector for Mac currently requires macOS 10.14 or later. Apple Silicon M1 CPUs are supported, though the product website only mentions Intel and AMD processors.
A Good Direction for Photos
You can have a lot of fun at a reasonable price with CyberLink PhotoDirector. Its interface is well thought-out, and it has all the standard photo-editing tools, along with many cool extras. Adobe Lightroom Classic, our top pick for pro photo workflow, continues to drive the state of the art in raw file interpretation and correction features. Pro-level photographers will still want the five-star Photoshop. DxO PhotoLab is best at noise reduction. And hobbyists should check out another Editors’ Choice app, Photoshop Elements, which offers many Photoshop tools but with a lot more handholding. For many, however, PhotoDirector offers a capable and low-cost alternative to all three, and it throws in valuable photo stock libraries, too.
4.0
(Opens in a new window)
(Opens in a new window)
View More
View More
This photo workflow and editing program offers a smooth interface and powerful tools. New denoise, content-aware, and anime tools and effects are among the many additions in the latest version.
[ad_2]
Source link : https://www.pcmag.com/reviews/cyberlink-photodirector

