Google Photos is an unparalleled photo management tool—one that greatly improved with the introduction of Live Albums, which allow Google to recognize people or pets in your pictures, automatically add them to albums, and share those albums with your friends or family. You can then assign a name to a face and search for that person in the app to see every photo Google has collected of them.
It even works on your pets. As long as your pets look a little different, Google can tell the difference between Princess Caroline and Mr. Peanutbutter.
Google recently upped the Live Album limit from 10,000 photos and videos up to 20,000 in total, which gives you far more room to play with, especially if you’re keeping professional work on Google Photos.
Taking the time to organize your Live Albums will save a lot of manual work in the long run. For example, if you create a family album, every photo will end up in the same place without the need to move any assets, from the family Thanksgiving selfie to a stray picture of your sister. If you’re conducting a photo shoot, you can keep photos organized based on the subject of the picture. You can even share a link to an album with your parents or clients so they can take a look at the contents of the folders.
Here’s how to create and categorize your own Live Albums.
Start a Google Photos Search
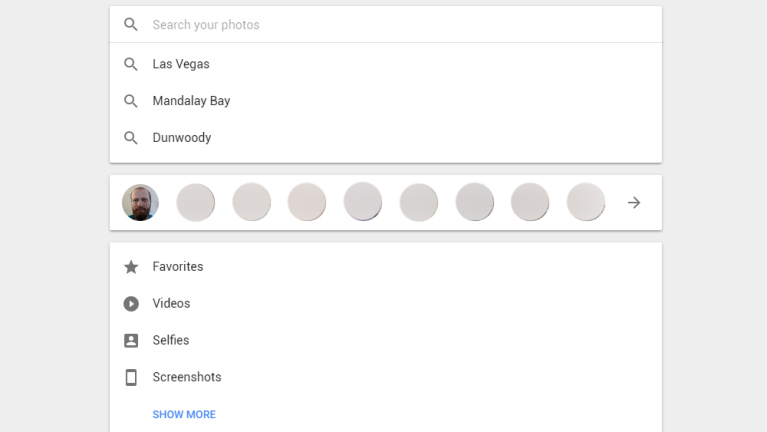
Open Google Photos(Opens in a new window) on the web and click the search box at the top of the window. Don’t type anything, just click the box. A drop-down menu will open with more options to refine your search.
Open the People & Pets Section
That drop-down menu will contain a row of faces in circular icons. These are the faces Google has identified from your photos. While the algorithm can recognize faces, it can’t identify who they are unless you name them. Click the arrow to the right of the faces to view all the pictures in which they’re tagged.
Pick the Face You Want to Name
You will see a grid of faces, both human and animal (if you have uploaded pictures of your furry friends). This is where you can tell Google the name of each face. Click on a face you want to name.
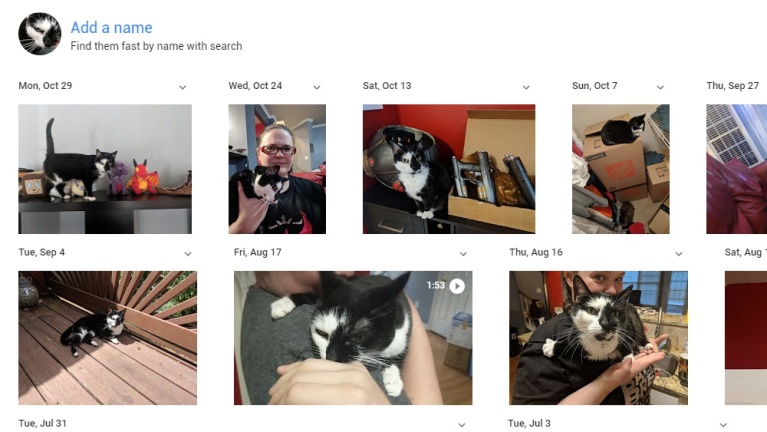
Put a Name to the Face
After clicking on a specific face, you will see a chronological feed of any pictures of that face. At the top of the photo gallery, click “Add a name,” and type the name of the person or pet tagged in the picture. Click the back arrow at the top and repeat this process for every face you want to add to a Live Album.
Create a New Album
Now that the faces have been named, you can create an album for them. On the Albums tab in Google Photos, click the big “Create album” icon.
Name Your Album
Give your album a name. Then click “Automatically add photos of people & pets” to start choosing faces to add to the album.
Choose the Faces to Add to the Live Album
You will now return to another grid selection of faces that have been identified by Google Photos. Select as many faces as you want to add to your live album. Folders can be dedicated to one person, like your significant other, or multiple people, such as a group of friends or your entire family.
Share the Album with Others
At this point, the album will automatically fill in any past or future photos of your people or pets. If you want to share the album, click the Share icon in the top-right corner of the screen. There, you can share via email or get a shareable link you can message to anyone you’d like to have access to your Live Album.
30 Tricks to Master Google Photos
Google Photos offers image editing, unlimited cloud storage, and more, for free. Here’s everything you need to know about Google’s photo-storage service.
Like What You’re Reading?
Sign up for Tips & Tricks newsletter for expert advice to get the most out of your technology.
This newsletter may contain advertising, deals, or affiliate links. Subscribing to a newsletter indicates your consent to our Terms of Use and Privacy Policy. You may unsubscribe from the newsletters at any time.
Thanks for signing up!
Your subscription has been confirmed. Keep an eye on your inbox!
Sign up for other newsletters
[ad_2]
Source link : https://www.pcmag.com/how-to/how-to-organize-pictures-in-google-photos


